Search
Complete Guide to Building Your Brewery

$19.95 USD

Support our site by using these affiliate links
Control Panel (Part 2)
STEP 9: Wire up PID controllers
 A PID controller (proportional integral derivative controller) is a control loop feedback device that is used to continually calculate the difference between the target temperature and the measured temperature and takes the appropriate action to make up for any difference.
A PID controller is an intelligent device that learns and trains itself to the behaviour of a system so as to not overshoot or undershoot the target temperature. It is more advanced than most simple temperature controllers (such as those from Love Controls) that only look at the temperature. A PID controller also considers the rate of change of temperature. This means that as a PID controller sees the target temperature approaching, it knows to "slow down" so that it doesn't overshoot the temperature. A PID controller uses calculus to measure this rate of change instead of simply looking at "am I too high or too low?".
The end result is a more consistent temperature, one that doesn't continually oscillate over and under the target temperature. The good news is that the PID controller does it all automatically for us. We don't have to have any understanding of how this all works (no need to remember your high school calculus).
The SYL-2352 PID controllers we use incorporate more advanced fuzzy logic as compared to some simpler PID controllers for even greater control. In our brewery when we set the target temperature, the liquid ramps up to that temperature and stays there. That's really all we care about.
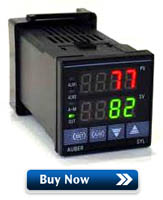
Our three PID controllers: 
The measured temperature from our probes is the top value (shown in red) on the PID controller. In the picture above, all three are at 66 degrees F which is the current room temperature as the system has just been turned on.
Our PID controllers have two operating modes: Automatic or manual. We use both depending on which PID we're using:
- Automatic mode (Hot Liquor Tank PID on the right): The bottom value (shown in green) is the target temperature (152F in our example above). The PID turns the Hot Liquor Tank element on and off until this temperature is reached. Once the temperature starts to approach the target temperature, the PID will "slow down" by firing the element less often in order not to overshoot. The PID will then continue to monitor the temperature and fire the element in short bursts to maintain the target temperature.
- Manual mode (Boil Kettle PID on the left): The bottom value (shown in green) is the duty cycle and shows "M100" which stands for 'Manual 100%'. Duty cycle is the percentage of time that the element will remain on over a given period of time (called cycle time). For example, at 100% the element will remain on all the time while at 10% the element will only turn on for 10% of the cycle time. The default cycle time when using SSRs is 2 seconds, so the element would fire for 0.2 seconds every 2 seconds. When on, the element is on at full power.
So why can't we use automatic mode in the Boil Kettle for boiling? Boiling water never goes above 212F so setting the PID to 212F or higher would result in the element firing continuously which may result in a too vigorous boil. Instead, we run the PID in manual mode at 100% until boil is reached and then turn it down to maintain the boil.
Even though most of the time we use the Boil Kettle PID in manual mode, automatic mode can be useful too: It helps us minimize the chance of 'boil overs'. When wort first starts to boil it foams up considerably. If left unattended (brewers are easily distracted), it will result in messy boil-overs. To avoid this, when we're overly busy we run the PID in automatic mode with the temperature set to just below boiling (208F). We also set the alarm to sound once that temperature is reached. The wort is then automatically heated to just below boiling without going any higher, and the alarm sounds. We then switch over to manual mode and continue heating while watching and stirring to avoid the initial boil over.
Automatic mode is also useful in the Boil Kettle when extended hop stands are performed. A dial type control for the boil does not allow for this sort of control. During a hop stand hops are added and steeped at specific temperatures for extended durations after the boil is completed. The Alchemist's Heady Topper is likely the world's most famous beer that makes use of this process. Our Electric Hop Candy (New England style IPA) also employs this method.
The PID controllers need to be programmed to lock out manual mode (Mash/Lauter Tun and Hot Liquor Tank PID only) and tell them what sort of temperature probe we use. This is a one-time operation and is covered in a separate Control Panel (Setup) article.
 There are only two places during our entire brewery build process where soldering with a soldering iron is required. This is one of them. If you've never soldered before I suggest you watch this YouTube video on the correct way to solder. It's quite simple.
A fancy soldering iron is not really needed here, but if you're considering a good quality unit that'll last you a lifetime and is easier to use, the Hakko FX-888D soldering station is an excellent choice. Over the years we went through countless $10-$20 pencil soldering irons before buying one that would last and actually maintained heat properly. Use rosin core solder (63% tin, 37% lead). We recommend Kester 63/37 available in 1 lb spools and small 1 oz packs (more than enough for our project here).
Wire up the components as shown in the diagram below using the wire sizes and colours indicated.
PID controller wiring diagram: 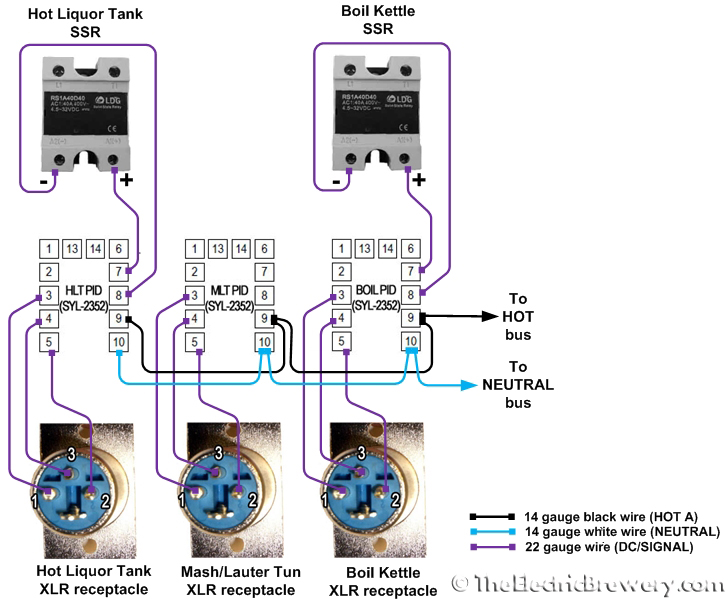
How it works
The Boil Kettle and Hot Liquor Tank PID controllers read the respective probe temperature and send signals to the SSRs to turn the two heating elements on and off. SSRs are Solid State Relays, essentially switches with no moving parts so they are able to switch as fast as required, often many times per second. Regular mechanical relays are not meant for this amount of switching as the contacts quickly would wear out. Whenever frequent switching is required, SSRs are used instead. This is not an issue with the three 30A/240V DPDT relays we use as they are only switched once or twice during the brewing session (these relays are used in the way that was intended).
Our Mash/Lauter Tun PID controller does not control anything. It simply displays the temperature of the wort as it exits the Mash/Lauter Tun, providing us feedback as to how the brewing process is proceeding.
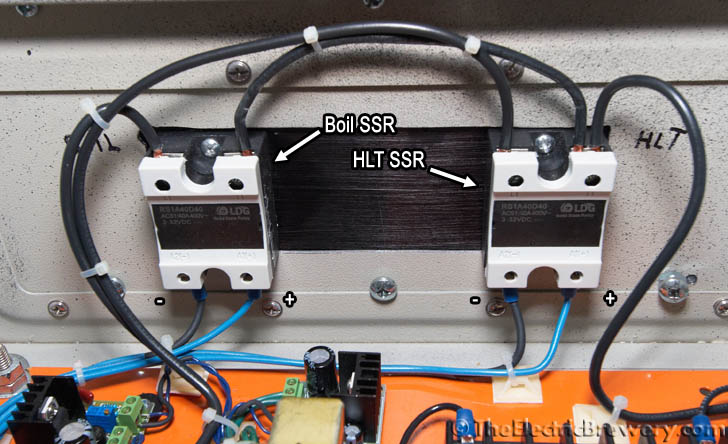
Location of the components: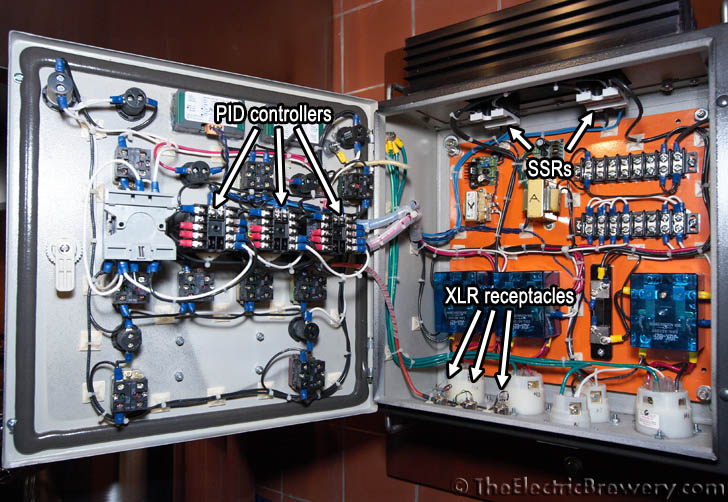
Close-ups: