Search
Complete Guide to Building Your Brewery

$19.95 USD

Support our site by using these affiliate links
Fermenting and Packaging
How you ferment and package your beer is in no way related to how you created the wort using our Electric Brewery setup, so you may proceed as you would normally and skip the information below if you like. There is nothing about our setup that could or should cause you to alter your fermentation or packaging steps in any way.
That said, we'll still provide you with our general thoughts and ideas on how we approach these steps for those that may be new to brewing using the example Blonde Ale from our Brew Day: Step by Step article. This will be done at a fairly high level. For more in-depth information on fermentation and packaging, refer to Chapters 8-11 of How to Brew, pages 86-89 of Brewing Better Beer, and pages 41-44 of Brewing Classic Styles. (All essential books for every brewing library, in our humble opinion).
So what to ferment in? Different brewers will use different types of fermentation vessels based mostly on personal preference and convenience, not because one necessarily makes better beer than another. The three most common types of fermentation vessels include plastic food grade fermentation buckets, glass carboys, and conical fermenters. All three require an airlock or similar to allow CO2 to escape while preventing contamination from the outside world. Each vessel has its own pros and cons:
- Plastic food-grade fermentation buckets: Easiest to clean, inexpensive, sturdy, do not provide a good oxygen barrier for long term storage, easily scratched and therefore more difficult to sanitize.
- Glass carboys: Fragile, harder to clean, can be sanitized effectively as glass is scratch resistant, good oxygen barrier for long term storage.
- Conical fermenters: Sturdiest, harder to clean, sediment can be removed without racking (transferring), yeast can be harvested, can be sanitized effectively as most are stainless steel which is scratch resistant, exposure to oxygen is reduced or eliminated, good oxygen barrier for long term storage, considerably more expensive. Some advanced conicals called 'unitanks' are built to withstand higher pressures (usually 15 PSI or more) which adds the ability to carbonate directly in the fermenter before packaging. This higher pressure also simplifies doing closed transfers and filtering directly out of the vessel, an option mostly used by professional brewers who wish to skip using a separate post-fermentation vessel for clarifying (called a 'brite' or 'bright' tank). Some conicals also include integrated heating/cooling systems. Just plug them in and set the temperature and brew any beer any time of the year at just about any ambient room temperature. No need for separate refrigeration. Very useful for lagers which are fermented near 50F or some ales (notably Belgians) that may require temperatures as high as 95F. These advanced conicals measure the actual wort temperature instead of the ambient air. This can be important as wort undergoing active fermentation can easily measure 5-6 degrees above the desired temperature in typical home fermenter sizes.
Hybrid solutions exist as well, including specialized stainless steel fermentation buckets which combine many of the benefits of the above solutions into one package, including chilling solutions.
The ultimate 14 gallon conical (both heated and cooled). A slightly different 27 gallon version is also available. 
Stainless steel fermentation buckets are proving to be extremely popular amongst brewers (optional chilling coil and pump also available):
Most of the time we use stainless steel fermentation buckets in fridges. Two identical units are used to allow experimentation with different yeasts, dry hops, and temperatures. The fridges we use are available as 45-bottle wine coolers or 124-can beverage centers and can be set from 39 to 64F, allowing a wide variety of beers to be produced from lagers to ales without any additional modifications (no need for an external temperature controller).
Our fermentation buckets in fridges with shelves removed. No external temperature controller required.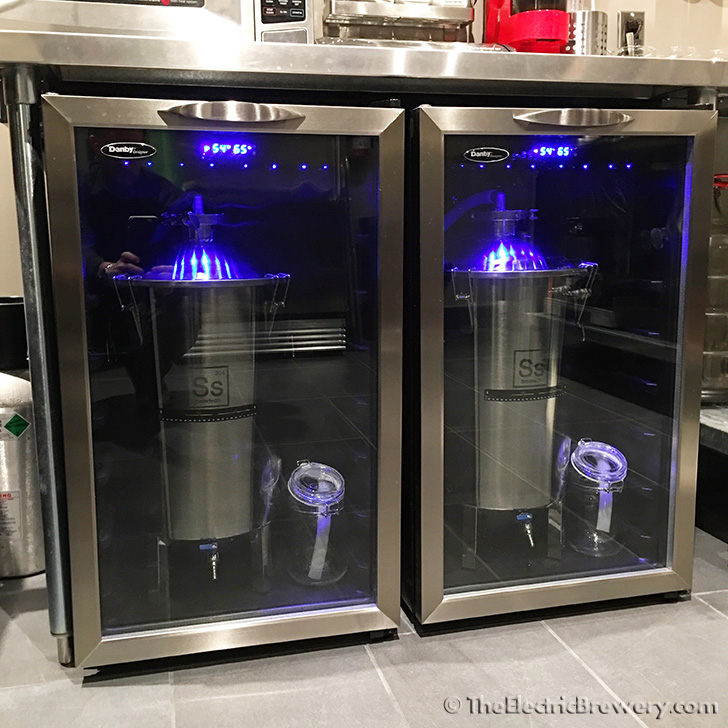
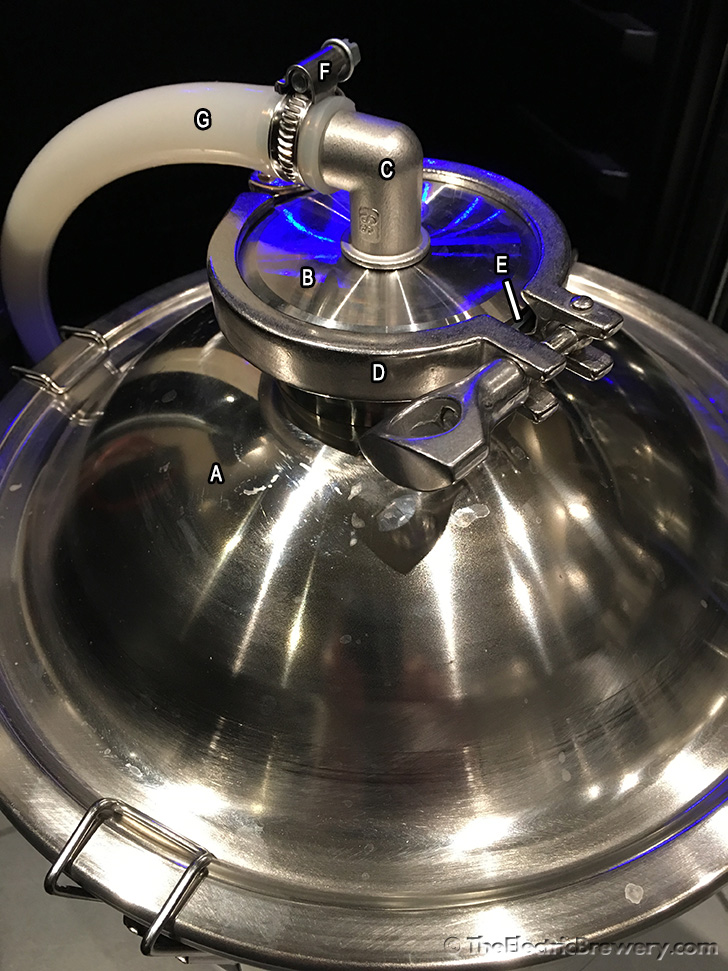
We replaced the standard (flat) lid on the stainless steel fermentation buckets with a domed lid with a 3" tri-clamp fitting as it provides more room for krausen and to make it easier to use an aeration wand and to add dry hops. A 3" tri-clamp cap and 90 degree hose barb are used to connect 1/2" silicone tubing as a blow off hose that is placed in a jar half full of water to create an airlock. Much less likely to clog as compared to a regular airlock.
Breakdown of lid parts:
(A) 3" tri-clamp dome lid
(B) 3" tri-clamp cap
(C) 90 degree hose barb
(D) 3" tri-clover clamp
(E) 3" tri-clover gasket
(F) Stainless steel smooth-band worm-drive hose clamp (5/8" to 1-1/16" clamp diameter range)
(G) 4 foot piece of high temperature food-grade silicone tubing (1/2" ID 3/4-7/8" OD)
7.9 US gallon (6.5 UK gallon) plastic fermentation buckets also fit if a small stand is used to raise them above the compressor hump at the back of the fridges. These stands were built from scrap pieces of 2x4 and painted black. 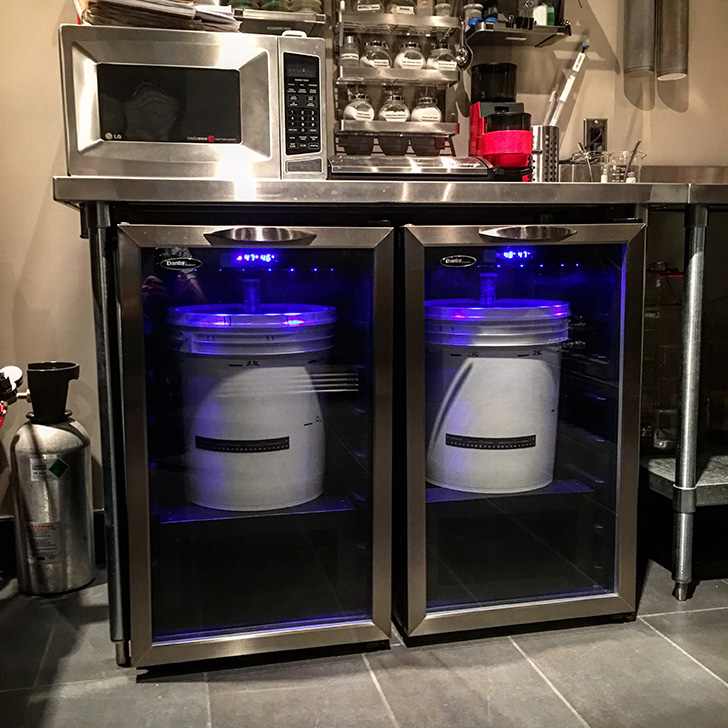
When wort is rapidly chilled, proteins will precipitate out of solution and form fluffy 'cloud like' material at the bottom of the fermenter. This is a good thing and it is called 'cold break'. If the wort is cooled too slowly cold break will not come out of solution which results in hazy beer (called 'chill haze') once it is refrigerated for serving. The lack of a good cold break during chilling may also cause long term stability problems.
When making a clean tasting beer like the Blonde Ale from our Brew Day: Step by Step article, consider waiting a few hours for the cold break to settle and then rack (transfer) into another vessel for fermentation, leaving the cold break behind. This may result in a cleaner tasting beer (a highly debated topic). If using a conical fermenter, no racking is required: Simply open the valve at the bottom for a few seconds to dump out the cold break. When making other styles of beer we tend to leave the cold break in (it can actually be beneficial and help with fermentation). We only consider racking off cold break for the absolutely lightest tasting beers.
If using dry yeast it should be rehydrated by sprinkling it into a cup of boiled water that has been cooled to about 80F. Wait approximately 20 minutes, stir into a cream, and then wait another 20 minutes or so. A froth should start to form on top which helps to confirm that the yeast is alive and viable.
Rehydrating dry yeast (12 grams of Safale US-05 on left, 24 grams of Saflager W-34-70 on the right).
We often split the wort and brew half as an ale and half as lager. It's a great way to learn what affect a specific yeast strain will have on the resulting beer.
If using more expensive liquid yeast, a 'starter' is usually made a few days ahead of the brew day. A starter is simply a small batch of fermented wort that is used to increase the amount of yeast available. Most liquid yeast packs contain approximately 100 billion cells and often more is required to properly ferment wort. See our HOW-TO: Making a Yeast Starter article for more information. Dry yeast is inexpensive enough such that most brewers will simply pitch the amount of yeast required.
Making a yeast starter is an economical way to increase the yeast count without having to purchase multiple liquid yeast packs.
Before pitching the yeast, the wort must be aerated well to provide the yeast with the oxygen required for growth and reproduction as most of the oxygen was driven off during boiling. We use a Fizz-X device for 60-120 seconds. Once aerated, pitch the yeast directly into the wort and attach your airlock with stopper (or blow off hose) to prevent any contamination. If using airlocks we prefer the 3-piece airlocks over the S-shaped ones as they're easier to clean.
We perform a single vessel fermentation for both ales and lagers. The Blonde Ale from our Brew Day: Step by Step article should be fermented at 68F. If making the Premium Lager instead, it must be fermented at a lower 50-53F temperature if we are to retain the clean lager-like characteristics. Every yeast and to some degree, every beer, may have its own optimal temperature range. See our individual recipes for complete details on the recommended fermentation temperature and schedule. During active fermentation yeast can throw off quite a bit of heat, especially a more active ale fermentation. The target fermentation temperatures are the target wort temperature, not the ambient temperature.
As mentioned previously, to control fermentation temperatures brewers have a wide variety of options available including home made fermentation chillers, regular fridges or freezers with an external temperature controller, wine coolers or beverage centers (no external temperature controller required), chilled conical fermenters, or stainless steel fermentation buckets with integrated chilling systems. If you have a location available to you where the ambient temperature remains steady at (or just slightly below) the fermentation temperature, then temperature control is not required. All will produce first rate results if used correctly and the temperature remains steady.
A temperature controller may be added to a regular fridge or freezer to override and control the temperature, especially useful for fermenting lagers:
An ale like the Blonde Ale from our Brew Day: Step by Step article fermented near room temperature should take about a week to reach final gravity. By comparison, a lager fermented at a lower temperature will reach final gravity in about 2-4 weeks.
Measure the gravity using the hydrometer and test jar to see if we met our target final gravity. It should be around 1.010. For greater accuracy, consider using a final gravity hydrometer at this time as they are meant for taking readings in the final gravity range.
Different yeasts will attenuate to different levels. Some will leave more sugars behind than others. Under-pitching (not using enough yeast) or not aerating properly can also stall yeast and lead to a higher than expected final gravity. Mashing at higher temperatures will also result in more unfermentable sugars.
Fermentation is complete once the specific gravity has not dropped over a period of a few days or even a week. With today's high quality yeasts there is no harm in leaving the beer on the yeast sediment for an extra few days or even a week after the gravity has stabilized. It can be beneficial as the extra time allows the yeast to 'clean up' after itself after the fermentation has finished. Do not rush fermentation and avoid taking too many gravity readings with your hydrometer and test jar. Leave this ale for a good week before even checking. Don't trust the bubbling airlock to tell you when fermentation is complete. Take a gravity reading.
When the gravity reading has been stable for a week, rack (transfer) the beer into a new vessel for clarifying (called a 'brite' or 'bright' tank) being careful to not overly disturb the sediment (which we want to leave behind). The vessel should be as full as possible to minimize contact with oxygen. 5 gallon glass carboys are a good choice as you should be able to fill two right to the top. We recommend purging the vessel with CO2 before racking to minimize oxygen contact. If using a conical fermenter there is no need to use a brite tank. Simply open the valve to drop the sediment out the bottom and purge the headspace with CO2 if possible. (Some oxygen will enter from the top but there should be enough CO2 still in the vessel to blanket and protect the beer from oxygen as C02 is heavier than oxygen).
All beer will eventually clear on its own if given enough time (assuming it's a beer that should be clear, as some styles are purposely hazy). For beers we want perfectly clear we prefer to speed up the process as follows: For this 10 gallon batch we slowly dissolve one pouch of Knox gelatin (or approximately 6-8 grams of similar unflavoured gelatin) in a cup of warm distilled water and stir for a few minutes. Once clear, add it to the beer. The beer will become noticeably clearer within a few hours and be very clear within 2-3 days as the gelatin pulls suspended yeast and other solids to the bottom and forms a layer of sediment that will be left behind when packaging.
Note: Using gelatin may "round off" some hop flavour / aroma so we do not tend to use it on hop forward beers like Pale Ales, IPAs, or NEIPAs. If you prefer to drink hop forward beers like this fresh then we recommend not using gelatin in order to keep the beer as vibrant as possible. We feel it makes sense in beers that you want as clear as possible such as light lagers, a Kolsch, or even a Pilsner. Try both ways and see which you prefer!
Measure the pH of the finished beer if desired using the pH meter. It will have dropped even further with most beers between 4.0 and 4.6 (measured at room temperature), and sour beers such as Lambics being even lower. The yeast strain factors in here such that ales tend to have a lower pH than lagers. pH also decreases with attenuation so dryer beers will have slightly lower pH. As the pH lowers during fermentation the colour of beer will lighten as some of the molecules become decolourized. If the beer has too high of a pH (over 4.6) it will be more prone to infection and long term stability will be reduced. Often, the pH of the final beer describes how “lively” a beer is. An otherwise well-brewed beer can taste lackluster if the pH is too high. Do not make any pH adjustments. We measure simply to keep records for possible future troubleshooting.
The beer is now ready for packaging. We recommend kegging using 5-gallon Corney kegs and a C02 tank for force carbonating instead of bottling and using priming sugar to carbonate. It is considerably less work (both on the packaging side and cleaning side) and results in no yeast sediment when the beer is served. Again, we recommend purging the keg with CO2 before racking to minimize oxygen contact.
If the beer was dry hopped in the fermenter, the brite tank, or the keg, we use a Hop Stopper Keg Edition filter on the end of the keg's liquid out dip tube to ensure that hops do not clog the dip tube and/or end up in the glass.
The Hop Stopper Keg Edition filter prevents blocked or clogged dip tubes and stops hop bits from ending up in your glass. 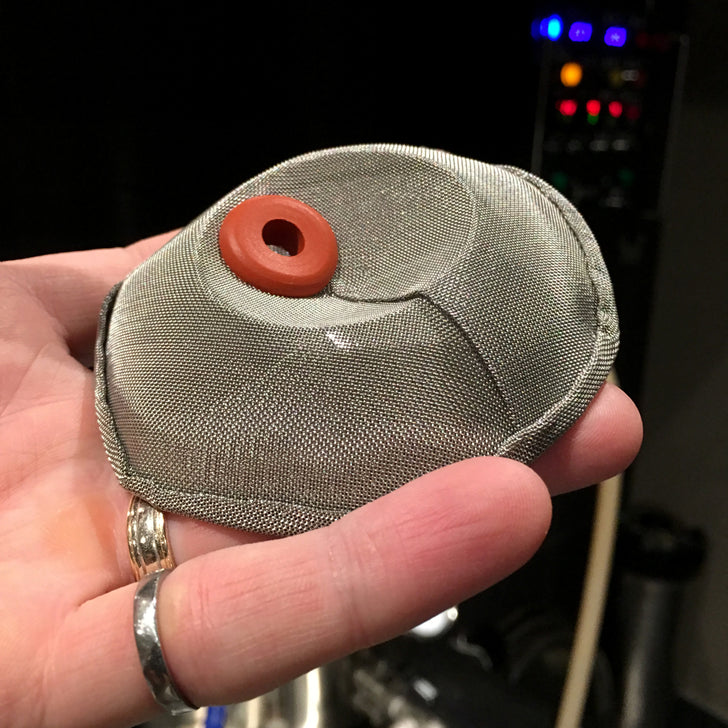
If making a lager, the beer generally needs to be 'lagered' before serving which means holding it at just above freezing temperature for an extended period to further improve the clean taste that lagers are known for. We use a Frigidaire commercial refrigerator that holds 6 kegs. The higher the alcohol content of the beer, the longer the lagering should be done. For a 5% ABV beer one month of lagering should be plenty. A strong 7-10% ABV Doppelbock on the other hand could require 6 months or more to achieve its cleanest taste. Traditionally speaking, ales are not lagered, though most beers will benefit from some conditioning period at a lower temperature, especially our light hybrid ales. The higher the gravity, the longer the conditioning time required. A strong 12% ABV barleywine will change noticeably over the first few years of its life. Sampling is encouraged throughout the brewing and aging cycle so that you can learn and appreciate how different beers change over time.
We carbonate and serve our beer using a C02 tank with a dual body regulator. This allows us to carbonate our beers to two different levels depending on style. A lower carbonation is used for British style ales and other beers where we want to minimize any sort of carbonic bite from the CO2, while higher carbonation is used for lighter coloured lagers and wheat beers. If your setup allows it, you can lager and carbonate at the same time. We carbonate by simply connecting the CO2 up to the keg and waiting two weeks with the regulator set to the standard serving pressure. Some brewers prefer to carbonate quickly by chilling the beer and greatly increasing the CO2 pressure while they shake the keg over a period of about hour, being careful to not overcarbonate. We find all beers benefit from at least a couple of weeks of aging so we prefer our simplified approach.
We condition/lager and carbonate at the same time in our Frigidaire commercial refrigerator that holds 6 kegs:
Once done, tap and serve as you would normally and enjoy!
We serve our beer on an 8-tap tower in our bar immediately outside of the brewery (see here for pictures, and here for the bar setup components we use). If you're space constrained, consider a kegerator that holds two kegs and comes ready to use.
For more information on fermentation and packaging refer to Chapters 8-11 of How to Brew, pages 86-89 of Brewing Better Beer, and pages 41-44 of Brewing Classic Styles.
For more information on draft beer dispensing and what's required (including building your own refrigerator kegerator by adding taps to a fridge), see this Kegging Equipment page.
Cheers!


