Search
Complete Guide to Building Your Brewery

$19.95 USD

Support our site by using these affiliate links
Hot Liquor Tank
STEP 2: Add ball valves for the HERMS coil
 We need some way to connect the HERMS coil to the outside of the kettle to allow hoses to be connected so we use stainless quick disconnects with full port ball valves.
The ball valves allow us to close off both the input and output of the coil before disconnecting or connecting a hose.
This is important as we want to make sure we don't end up with up to half a gallon of (possibly hot) liquid on the floor as hoses are connected/disconnected during the brewing process. The 50' long 1/2" inner diameter HERMS coil holds more liquid than you think.
HERMS input/output quick disconnects with ball valves:
 Measure the height difference between the two ends of your HERMS coil as every coil will be slightly different. The coil we made has ends that are 7" apart. We want to place the coil just above the heating element but still as low as possible. Our coil sits approximately 1" above the heating element. The coil is rigid enough to hold itself up without any issues. Keeping the coil as low possible in the kettle ensures that the coil will remain submerged as much as possible as you use up water from the HLT.
In our setup the center of the upper hole is 11.5" from the bottom of the kettle, while the center of the lower hole is 4.5" from the bottom of the kettle.
The left/right placement of these holes is not critical, they don't even have to line up vertically as ours did in our setup. We placed ours approximately 2" to the left of the level gauge (sight glass).
Once you've marked your locations, use a GreenLee 13/16" punch to create two 13/16" diameter holes for the ball valves. Refer to Step 4: Punch a hole in the kettle from the Heating Elements article for instructions on how to properly create clean holes using a punch like this. Do not use step bits or drills bits exclusively as they do not create nice clean holes.
Position of the 13/16" diameter holes for the HERMS coil ball valves (make sure to confirm the height (7” in our case) with your exact HERMS coil before punching your holes):
Wrap the threaded ends on the quick disconnect and the closed nipple with PTFE white teflon thread sealant tape to ensure a tight, leak-free fit. Use approximately 6 wraps and always wrap in the direction of the thread so that when the parts are screwed together it does not unwrap. Confused? Watch the video below to learn the correct way of applying PTFE teflon tape if this is the first time you've used it.
The quick disconnect and closed nipple are first wrapped with PTFE white teflon thread sealant tape: 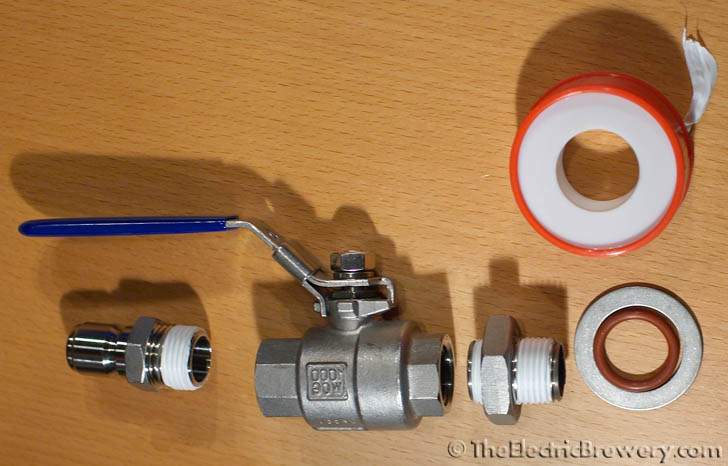
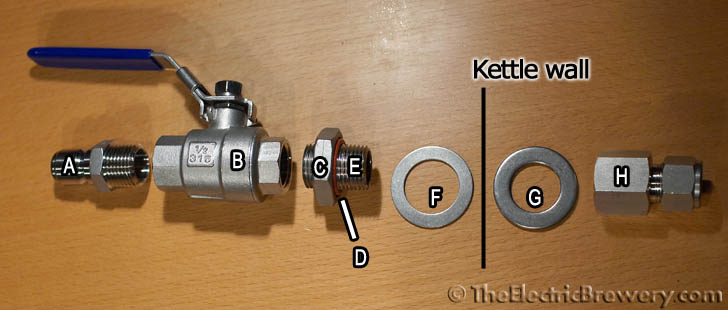
Attach the two ball valves and associated hardware to the inside/outside of the kettle as shown in the picture below. Be careful to place the lock nut (part C) with the inner groove towards the kettle wall. The silicone o-ring (part D) will partially sit inside this groove to avoid being overly compressed between the lock nut and the kettle wall.
Breakdown of the HERMS ball valve connections:
(A) Stainless steel male quick disconnect 1/2" NPT male
(B) Stainless steel ball valve 1/2" full port
(C) Stainless steel 1/2" NPT lock nut
(D) Silicone high temperature o-ring (13/16" ID, 1-1/16" OD, 1/8" thick)
(E) Stainless steel nipple threaded 1/2" x close NPT
(F) Stainless steel washer/shim (1-1/8" ID, 1-5/8" OD, 0.062" thick)
(G) Stainless steel washer/shim (7/8" ID, 1-3/8" OD, 0.062" thick)
(H) Stainless steel 1/2" compression x 1/2" NPT female fitting
Tighten the parts using a wrench until the whole assembly is firmly attached to the kettle wall. You should not be able to twist, turn, or move it at all by hand. Do not be afraid of overtightening as the silicone o-ring cannot be overcompressed.
When finished, the ball valves should feel as if they are welded directly to the kettle and be very stable and secure, exactly like the Blichmann ball valve that is included with the kettle. This should not come as a surprise as we are using the same weldless techniques that Blichmann uses to attach our ball valves.
Once attached we closed both ball valves and filled the kettle up past the highest valve to ensure there were no leaks.
Testing for leaks: 
Draining the kettle after testing:


