
|
|
|

|
 |
|
|
| View previous topic :: View next topic |
| Author |
Message |
brewmaster
Joined: 12 Jan 2019
Posts: 31
Location: Oscoda, MI

|
 Link Posted: Fri Jan 18, 2019 1:35 pm Post subject: Heating element build question Link Posted: Fri Jan 18, 2019 1:35 pm Post subject: Heating element build question |
 |
|
|
So, after reviewing the assembly instructions for the heating element assembly build, I am still a bit confused with why the large washer is required. The waterproof (3/4" 3 hole) boxes I purchased at Home Depot have a very smooth surface that would seem to make an acceptable seal without having to use the washer or the second cover. Am I missing something, or can I eliminate those parts? Adding elements to both HLT and BK. I use Sanke kegs in my system, and at least the HLT is a permanent part of the brew stand. Trying to simplify........
|
|
| Back to top |
|
 |
dp Brewing Company

Joined: 08 Jul 2013
Posts: 664
Location: Midwest
Drinking: Chocolate Taco, Raspberry Mango Cider, American X, Sandy Dunes
Working on: Nothing
|
| Link Posted: Fri Jan 18, 2019 1:51 pm Post subject: |
|
|
The large washer is to keep the O-ring from being compressed to much.
_________________
Visit dp Brewing Company
Hangovers hurt....but good memories last forever!
|
|
| Back to top |
|
|
kal
Forum Administrator
Joined: 12 Dec 2010
Posts: 11121
Location: Ottawa, Canada
Drinking: Pub Ale, Electric Creamsicle, Mild, Pliny the Younger, Belgian Dark Strong, Weizen, Russian Imperial Stout, Black Butte Porter
|
|
| Back to top |
|
|
brewmaster
Joined: 12 Jan 2019
Posts: 31
Location: Oscoda, MI
|
| Link Posted: Fri Jan 18, 2019 1:55 pm Post subject: |
|
|
|
Sorry, I guess I am still not getting it....the o-ring sits between the curved kettle surface, and a flat surface whether it's a washer or the box, so how does the washer prevent over compression ?
|
|
| Back to top |
|
|
brewmaster
Joined: 12 Jan 2019
Posts: 31
Location: Oscoda, MI
|
| Link Posted: Fri Jan 18, 2019 1:56 pm Post subject: |
|
|
|
Never mind....the light went on....I get it now....it's the thickness of the washer that is key. If the box wall is thick enough, a counter-bore could accomplish the same function.
|
|
| Back to top |
|
|
kal
Forum Administrator
Joined: 12 Dec 2010
Posts: 11121
Location: Ottawa, Canada
Drinking: Pub Ale, Electric Creamsicle, Mild, Pliny the Younger, Belgian Dark Strong, Weizen, Russian Imperial Stout, Black Butte Porter
|
| Link Posted: Fri Jan 18, 2019 2:01 pm Post subject: |
|
|
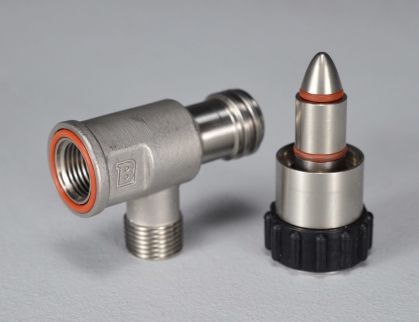
Correct. The thickness of the washer vs the thickness of the o-ring is key.
Same as what Blichmann does with all fittings on their kettles like the sight glass, thermometer, and output valve. They are all weldless and use the exact same "o-ring inside a slightly less thick washer" trick. I stole the idea when designing how to fit other things on to the kettles like heating elements, ball valves, or the HERMS coil.
More info in my kettles article here: http://www.theelectricbrewery.com/kettles-overview
| Quote: | Going weldless
Blichmann kettles are 100% weldless meaning that there are no threaded screw-on fittings and none of the parts are welded on. The BrewMometer, level gauge, and ball valve are all simply held in place with washers, nuts, and high temperature silicone o-rings. Some feel that weldless means you'll end up with poorly fitted, lose, or leaky connections. Not true. When done right weldless connections will be tight fitting, never leak, never require any adjustments, and be perfectly safe. The stigma of weldless likely comes from the fact that most third party weldless add-ons we know of do not create a tight fitting connection and do require special care when installing or they will leak. Figure 2 from the BoilerMaker manual shows how Blichmann was able to achieve tight and leak-free weldless connections using the BrewMometer as an example (see picture below).
Blichmann weldless BrewMometer:

To seal the kettle from the outside, Blichmann uses a high temperature food grade silicone o-ring fitted inside a stainless steel washer. The washer is the key differentiator between how Blichmann does weldless and how other third party kits do weldless. Most third party weldless kits do not include a washer so the component that is connected to your kettle ends up simply resting against the o-ring and tends to move around when pushed/pulled. These kits always warn about over tightening as it will compress the o-ring and make it bulge, which then causes the setup to leak. Definitely not an ideal solution, especially with items such as ball valves, which tend to get pushed and pulled a fair bit.
Blichmann carefully selected the size of the o-ring and washer such that the o-ring is slightly thicker than the washer. This allows the nut to be tightened down completely, ensuring that the external component does not move at all and still allows the o-ring to create an excellent seal.
Later on in our instructions you'll see how we've applied this same Blichmann weldless principle to attach extra components to our kettles. The result is an extremely tight fit with zero leaks. We'll provide you with all of the washer and o-ring specifications so that you can do the same yourself without having to guess or choose parts by trial and error. |
I'm sure that most people with Blichmann kettles don't even realize that the parts are held on weldlessly this way. Blichmann has likely sold tens of thousands of kettles that work this way. They work perfectly, never need adjustment, never leak.
Kal
_________________
Our new shop with over 150 new products: shop.TheElectricBrewery.com
We ship worldwide and support our products and customers for life.
Purchasing through our affiliate links helps support our site at no extra cost to you. We thank you!
My basement/bar/brewery build 2.0
|
|
| Back to top |
|
|
brewmaster
Joined: 12 Jan 2019
Posts: 31
Location: Oscoda, MI
|
| Link Posted: Fri Jan 18, 2019 3:43 pm Post subject: |
|
|
|
Yeah, I use the Blichmann weldless fittings elsware without a washer and they have never leaked (at least 15 years now). Since the washer is only providing the function of preventing over compression as well as being able to have a "tight" connection, I should be able to use 2 (maybe 4) =5/16" washers (which I have many of) around the o-ring which should serve the same purpose. Not as elegant for sure, but I like to use what I have on hand. Only other difference is that the 5/16" washers are 0.063" thick, but I think that should be ok. What do you think?
|
|
| Back to top |
|
|
kal
Forum Administrator
Joined: 12 Dec 2010
Posts: 11121
Location: Ottawa, Canada
Drinking: Pub Ale, Electric Creamsicle, Mild, Pliny the Younger, Belgian Dark Strong, Weizen, Russian Imperial Stout, Black Butte Porter
|
| Link Posted: Fri Jan 18, 2019 4:07 pm Post subject: |
|
|
| brewmaster wrote: | | Yeah, I use the Blichmann weldless fittings elsware without a washer and they have never leaked (at least 15 years now). |
Blichmann does use washers on their setups, at least for some things on my G1 kettles. That picture I posted above is directly from their manual and shows how they use a washer for the temperature probe on the G1 kettle. The output valves that came with my G1 Blichmann kettles have the same thing. If there's no washer it's because they've integrated it right into the fitting like what they did with the valve on the G2 kettle:
So while you don't technically may not need a washer, you still need some way to ensure that the o-ring is not overly compressed if you want a good leak-free fit. You can get a leak-free fit without a washer too as long as you don't overtighten too far and compress the o-ring and then never touch or hit the item that's attached too much. That to me doesn't make sense as something like a output valve gets pushed and pulled constantly. Last thing I'd want is a finicky fit that's prone to leaking. The way Blichmann's done it on my kettles you wouldn't even know the valve is weldless. You can push/pull it any way you like and it'll never leak.
| Quote: | | Since the washer is only providing the function of preventing over compression as well as being able to have a "tight" connection, I should be able to use 2 (maybe 4) =5/16" washers (which I have many of) around the o-ring which should serve the same purpose. Not as elegant for sure, but I like to use what I have on hand. Only other difference is that the 5/16" washers are 0.063" thick, but I think that should be ok. What do you think? |
I can't confirm.
I carefully chose the thickness of the washer and the o-ring to ensure a tight/leakfree fit. I did many tests on this with various o-rings and washer thicknesses to end up with the sizes I recommend. This including boiling water for 60 minutes to get everything as hot as possible, and then wearing heat resistant gloves and a protective splash apron I tried pushing and pulling on the external heating element box as hard as I could to try and make it leak. I couldn't.
If you're deviate from the parts I use/recommend, I would suggest doing some thorough testing yourself.
Washers and o-rings are cheap in the grand scheme of things that frankly I'd use something that's proven to work correctly, but completely up to you.
The washer is here: http://www.theelectricbrewery.com/Stainless-steel-washer-shim-0-075-thick-1-1-2-ID-2-1-4-OD
The corresponding o-ring is here: http://www.theelectricbrewery.com/Silicone-high-temperature-o-ring-1-3-16-ID-x-1-7-16-OD-x-1-8-width-AS568A-Dash-No-217-Durometer-hardness-A70-FDA-complia
We sell both in our online store (first link on the two pages above).
Kal
_________________
Our new shop with over 150 new products: shop.TheElectricBrewery.com
We ship worldwide and support our products and customers for life.
Purchasing through our affiliate links helps support our site at no extra cost to you. We thank you!
My basement/bar/brewery build 2.0
|
|
| Back to top |
|
|
mvakoc
Joined: 19 Sep 2011
Posts: 152
Location: Evergreen, CO
|
| Link Posted: Fri Jan 18, 2019 8:12 pm Post subject: |
|
|
Hi Kal,
I am replacing a failed element (after 7 years, looks fine, but now fails a continuity test) with an element purchased from the kal store. I noticed this element is shipped with a washer. Would you use that one or remove it and use the silicone o-rings that you have always mentioned?
|
|
| Back to top |
|
|
kal
Forum Administrator
Joined: 12 Dec 2010
Posts: 11121
Location: Ottawa, Canada
Drinking: Pub Ale, Electric Creamsicle, Mild, Pliny the Younger, Belgian Dark Strong, Weizen, Russian Imperial Stout, Black Butte Porter
|
|
| Back to top |
|
|
mvakoc
Joined: 19 Sep 2011
Posts: 152
Location: Evergreen, CO
|
| Link Posted: Fri Jan 18, 2019 9:41 pm Post subject: |
|
|
Thanks. I built the elements so long ago it was hard to remember, but I didn't recall any element coming with a washer. Should have read the instructions!
15 minute swap out and now running the leak test (so far so good).
|
|
| Back to top |
|
|
|
|
|
|
|
|
You cannot post new topics in this forum
You cannot reply to topics in this forum
You cannot edit your posts in this forum
You cannot delete your posts in this forum
You cannot vote in polls in this forum
You cannot attach files in this forum
You can download files in this forum
|
Forum powered by phpBB © phpBB Group
|
|


