| View previous topic :: View next topic |
| Author |
Message |
StafflesBrew
Joined: 31 May 2016
Posts: 28
Location: UK - Midlands

|
 Link Posted: Mon Apr 03, 2017 3:03 pm Post subject: StafflesBrew Garage Brewery Thread Link Posted: Mon Apr 03, 2017 3:03 pm Post subject: StafflesBrew Garage Brewery Thread |
 |
|
Howdy folks - or whatever you say on that side of the pond! In sunny UK land I have permission to convert the garage into a proper brew lab. Work has already begun to make the garage a more habitable space by ripping out all the old storage and the years of clutter. Painting and sealing the walls and floor will happen over the coming weekend - pics to follow!
At the moment I am stuck on the plan, plan and plan again stage. Because of the shape of the single garage I am having a job fitting everything in in an aesthetic and functionally pleasing way. The only thing I can't seem to fix in place is the control box - I made my own out of wood but have some concerns depending on where it will end up.
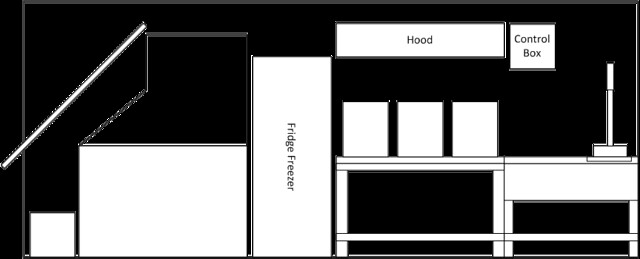
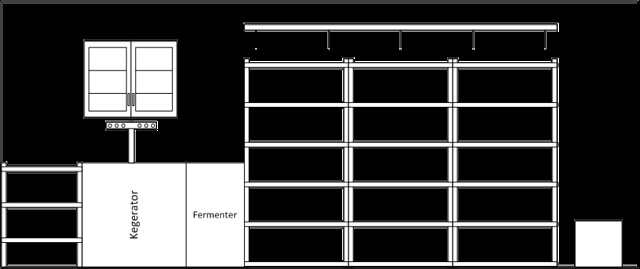
These are the two plans I have at the moment showing the top down and side elevation.
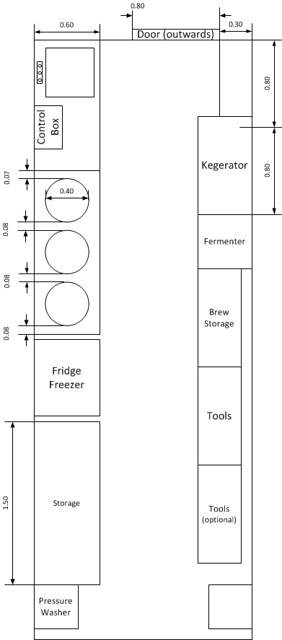
Ideally I don't want the box next to the kettle due to steam rising from boiling liquids, and I don't want it sat over the sink - I am a duck when it comes to washing up, water everywhere! But I can't seem to find a sensible place to put it, without compromising on the other storage space. I can't take up the whole garage as we have other stuff to store.
Has anyone tried mounting the control box under the bench? I can see hassle when trying to control pumps and switch hoses etc.
Any bright ideas?  
Last edited by StafflesBrew on Mon Jul 10, 2017 9:28 am; edited 8 times in total
|
|
| Back to top |
|
 |
Ozarks Mountain Brew
Joined: 22 May 2013
Posts: 737
Location: The Ozark Mountains of Missouri
|
| Link Posted: Tue Apr 04, 2017 12:04 am Post subject: |
|
|
could you switch things around and put the sink at the very end wall, bottom of this drawing, that would allow you to put the brew rig to the right or left and control box farthest from the sink
_________________
"Imagination is more important than knowledge. Knowledge is limited. Imagination encircles the world."
|
|
| Back to top |
|
|
kal
Forum Administrator

Joined: 12 Dec 2010
Posts: 11123
Location: Ottawa, Canada
Drinking: Pub Ale, Electric Creamsicle, Mild, Pliny the Younger, Belgian Dark Strong, Weizen, Russian Imperial Stout, Black Butte Porter
|
| Link Posted: Tue Apr 04, 2017 1:12 am Post subject: |
|
|
I wouldn't want the control panel directly above a sink but in your case it looks to a bit to the left and above? (Most electrical codes don't actually forbid an outlet or similar above a sink you usually don't see it done). I would most certainly make sure that the control panel is GFI protected - that's something everyone should have and is part of the build instructions. Otherwise it looks ok. Good luck!
Kal
_________________
Our new shop with over 150 new products: shop.TheElectricBrewery.com
We ship worldwide and support our products and customers for life.
Purchasing through our affiliate links helps support our site at no extra cost to you. We thank you!
My basement/bar/brewery build 2.0
|
|
| Back to top |
|
|
StafflesBrew
Joined: 31 May 2016
Posts: 28
Location: UK - Midlands
|
| Link Posted: Tue Apr 04, 2017 7:06 am Post subject: |
|
|
| Ozarks Mountain Brew wrote: | | could you switch things around and put the sink at the very end wall, bottom of this drawing, that would allow you to put the brew rig to the right or left and control box farthest from the sink |
Thanks for the reply! I think where you are suggesting is the main garage door? Unfortunately I need to keep that for the time being until this temporary brewery becomes a permanent fixture in the minds of all the people in my house!
| kal wrote: | | I would most certainly make sure that the control panel is GFI protected |
The main consumer unit for the house is in the garage - on the same wall but closer to the main door. The previous owners ran a hot tub in the garden fed from a 32A RCBO. When we took out the wiring for the hot tub we were left with a load of outdoor cable and waterproof sockets (they had lights and stuff but took all the appliances with them). The 32A feed is still in place with the breaker on the fence post switched off. I plan to re-use this and bring it back inside the garage and terminate in three off waterproof sockets - one for the fridge freezer, one for the control box, and the last for the kegerator/fermentation store. From what research I have done an RCBO is the UK equivalent of GFI, but happy to be educated if not!
The current plan is to use the cooling coil of an under counter fridge to make a cold chamber similar to KC Brewer's Garage Brewery. I like the theory and I have the fridge already, which has a shelf in the bottom for the compressor so the fermenting bucket has to be propped up with a bit of wood. I can't see what results/success has been had with it though but from the videos posted the principle seems sound.
Aspirationally I will move from plastic buckets to a conical fermentor, but need to figure out how much this build is going to cost for the basics first!
Needed some measurements to get the other wall mapped out but here it is. Need to check the door will still open with the shelving there but its modular so I can make it one shelf shorter if needs be.
Last edited by StafflesBrew on Mon Jul 10, 2017 9:29 am; edited 1 time in total
|
|
| Back to top |
|
|
StafflesBrew
Joined: 31 May 2016
Posts: 28
Location: UK - Midlands
|
| Link Posted: Wed Apr 05, 2017 10:06 am Post subject: |
|
|
One of the things troubling me at the moment is how to smooth off the existing concrete slab floor. I think the plan is to use a latex self leveling compound and then finish with a polyurethane floor paint. This should give a smooth surface with a hardened coat of paint over the top. There won't be any vehicles in the garage, or any harsh chemicals, I just need it to be wipe clean and free of dust.
Conventional wisdom says that SLC isn't suitable as a top coat surface and is designed to be overlaid with tile, vinyl or carpet. Does anyone have experience of PU or resin based paint over SLC?
|
|
| Back to top |
|
|
Ozarks Mountain Brew
Joined: 22 May 2013
Posts: 737
Location: The Ozark Mountains of Missouri
|
| Link Posted: Wed Apr 05, 2017 2:33 pm Post subject: |
|
|
we always used concrete thin set to level then cover with flooring or paint with an oil base floor paint, although it does wear down over time, you might want to use some sort of epoxy resin as the finish coat, it really depends on your budget and time I guess
_________________
"Imagination is more important than knowledge. Knowledge is limited. Imagination encircles the world."
|
|
| Back to top |
|
|
wscottcross
Joined: 03 Jul 2015
Posts: 212
Location: CT
Drinking: Launch IPA, Double Sunshine clone, Maple Coffee breakfast stout
Working on: expanding my beer horizons (and my beltline)
|
| Link Posted: Wed Apr 05, 2017 5:37 pm Post subject: |
|
|
I used garage epoxy from Home Depot and it worked quite well. I have one spot that is peeling up but I think I may have missed that spot with the TSP prep.
_________________
Kal clone controller, 30 gallon Spike Brewing kettles, 6 tap keezer
|
|
| Back to top |
|
|
mcl
Joined: 11 Oct 2011
Posts: 155
|
| Link Posted: Thu Apr 06, 2017 2:09 pm Post subject: |
|
|
|
I used garage epoxy and it is holding up fine. If your floor isn't in good shape then it might not be a good option. I put a bunch of the "grit" in to make it non slip when it gets wet. I wish I wouldn't have or at least not as much as I did. It makes it harder to wipe clean. I don't think the panel is ideal where you have it but you might not have much choice. If you keep it there make sure it is high and out of the way. I am curious if you can use one of the multi adjustable TV stands to move it to the other side (adjust it out and down when in use).
|
|
| Back to top |
|
|
Ozarks Mountain Brew
Joined: 22 May 2013
Posts: 737
Location: The Ozark Mountains of Missouri
|
| Link Posted: Thu Apr 06, 2017 2:23 pm Post subject: |
|
|
if you don't want anything permanent you can always just cover with a garage mat
_________________
"Imagination is more important than knowledge. Knowledge is limited. Imagination encircles the world."
|
|
| Back to top |
|
|
StafflesBrew
Joined: 31 May 2016
Posts: 28
Location: UK - Midlands
|
| Link Posted: Wed Apr 12, 2017 7:34 am Post subject: |
|
|
| Ozarks Mountain Brew wrote: | | we always used concrete thin set to level then cover with flooring or paint with an oil base floor paint, although it does wear down over time, you might want to use some sort of epoxy resin as the finish coat, it really depends on your budget and time I guess |
Thanks for this - I couldn't find any people online who had tried this - normally self level and then tile/vinyl flooring.
| wscottcross wrote: | | I used garage epoxy from Home Depot and it worked quite well. I have one spot that is peeling up but I think I may have missed that spot with the TSP prep. |
In the end I went with this stuff:
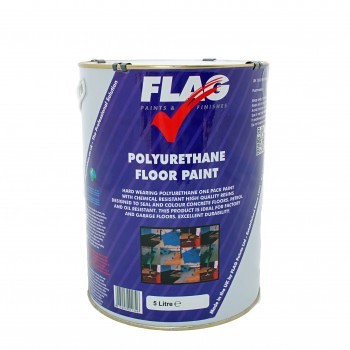
I was really worried about coverage - painting over leveling compound would suck all the moisture out and the tin states a coverage of 15 sqm which is just about on the limit. As it is I did the entire floor in a single coat with less than half the tin without thinning it down! Needless to say a second coat will be going on this evening. As with all oil based paints though the fumes from this are terrible. I keep expecting people walking past the house to faint!
Anyway here are the progress pics to date:
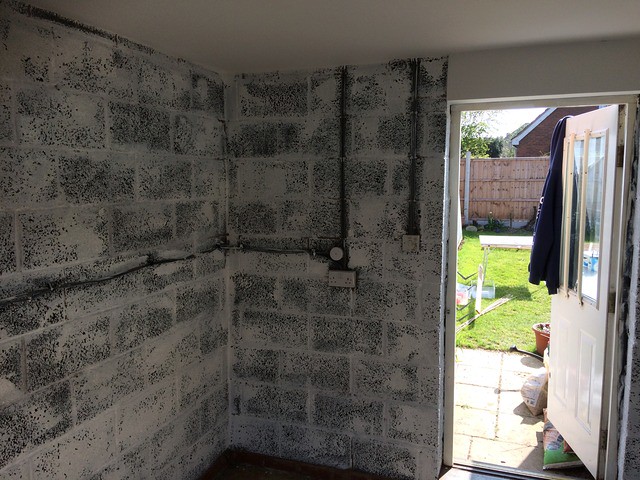
Before:


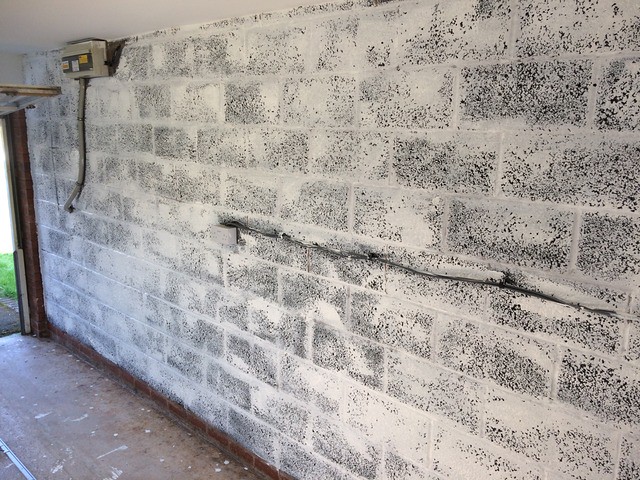
And this after two trips to the dump!! The bricks on the walls are fairly open - like a sponge - and needed a good brushing with a stiff brush to get all the loose bits and cobwebs off. The ceiling got the same treatment with a softer brush as it is a plaster finish. And finally the network cable that make up for the poor wi-fi coverage through the house, which has been dangling around and getting caught by the door for months, finally gets a permanent fixing.
Ready to paint!
On a day in April that was hotter than the sun the ceiling paint had dried completely by the time I finished the first coat, and as it was just emulsion it got a second and a third.
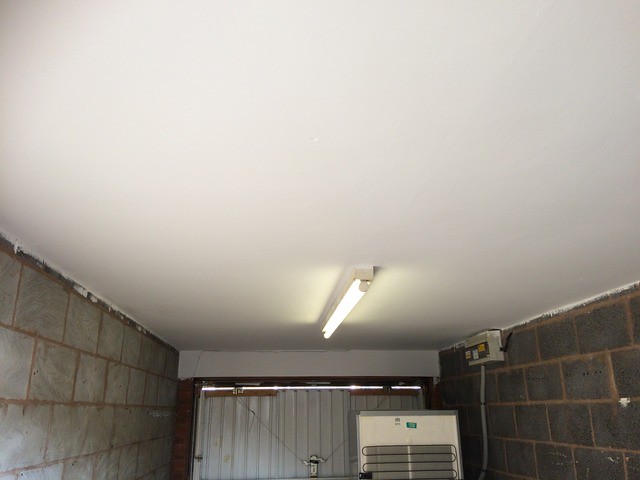
Really brightens up the space!
Onto the walls
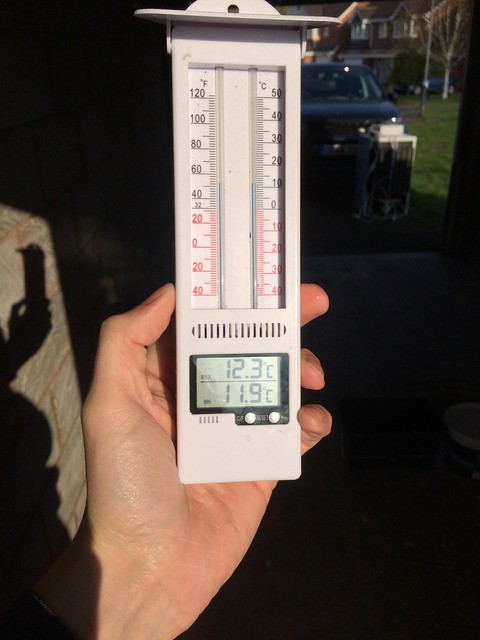
At 8:00 am checking that it was warm enough to work the masonry paint into the walls. Today was to be hotter than yesterday!
First Coat
Second Coat
Third Coat
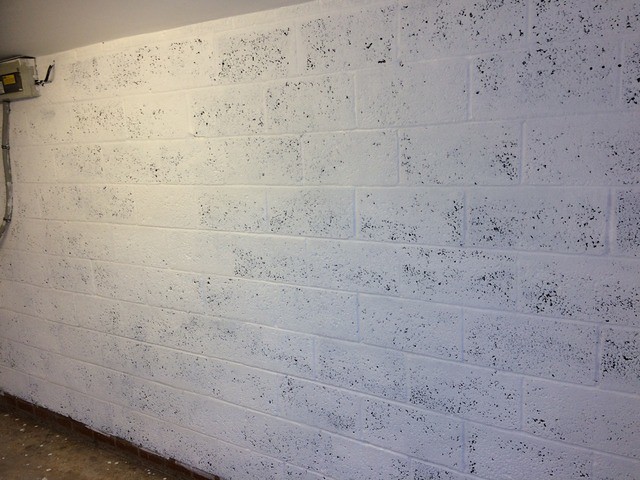
The other wall was a breeze (pun intended) and covered really well in a couple coats.
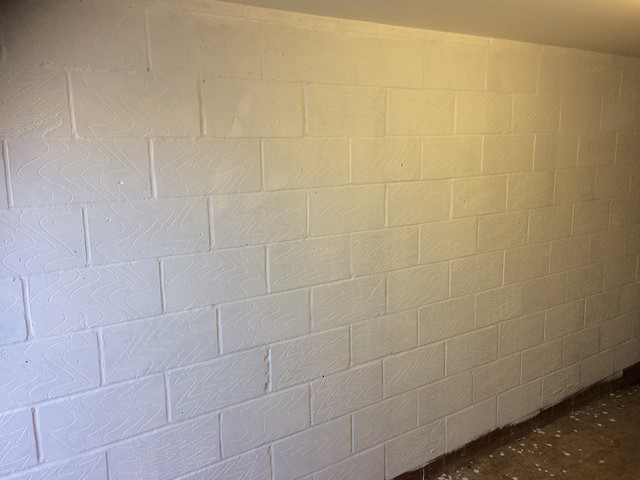
If anyone else is thinking of painting these kinds of bricks - either invest in a sprayer or thin the paint down to the consistency of milk for the first coat to get it into the cracks. Using a masonry brush and long pile roller was hard work but it is what I had. The first coat went on almost neat and really needed thinning down. Some special action was required to get the bits that will be visible looking more white which you can see in later photos.
Last edited by StafflesBrew on Mon Jul 10, 2017 9:36 am; edited 1 time in total
|
|
| Back to top |
|
|
StafflesBrew
Joined: 31 May 2016
Posts: 28
Location: UK - Midlands
|
| Link Posted: Wed Apr 12, 2017 7:46 am Post subject: |
|
|
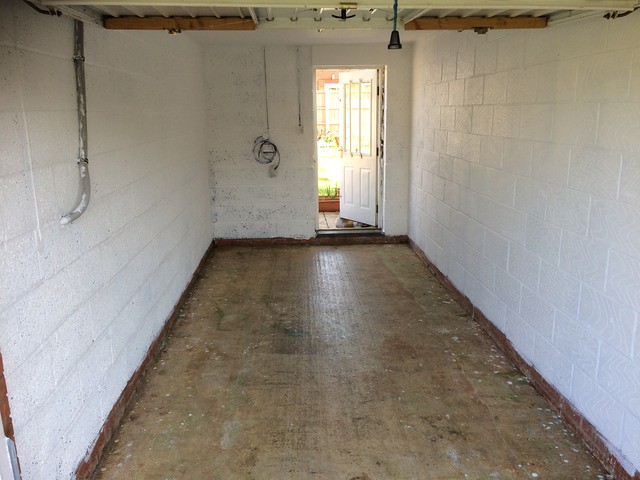
Onto the floor
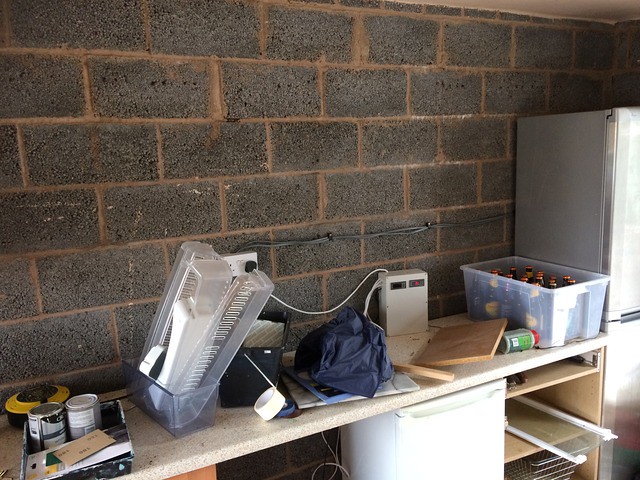
The floor by now was covered in spots of ceiling and masonry paint - if I am a duck when washing up you can imagine what I am like when painting....
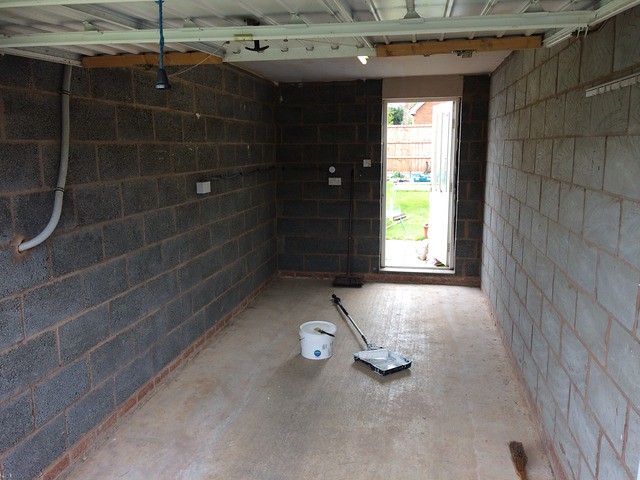
A quick tour round with the pressure washer and a tornado wand attachment saw most of it lift off and a load of dirt that I didn't know was there as the floor changed colour!!
A coat of floor primer (matched to the brand of self levelling compound just in case) went down and I mixed up way more of it that I needed. The floor sucked up the water from the pressure washer as it dried so I guessed it was fairly porous. Mixed up the primer for a porous floor and actually could have used it neat. Protip: wear protective clothing (not shorts) and don't splash it on your leg.... It was such a hot day I couldn't face trousers. It's ok though, after spending a couple days looking like I was leaking green stuff out the bottom of my shorts it came off fairly easily in the bath!
I made a barrier for the door as the floor slopes down to this point. Really i should have screwed this into the tarmac or weighted it down better as of course the stuff just seeped under it to leave an interesting pattern.
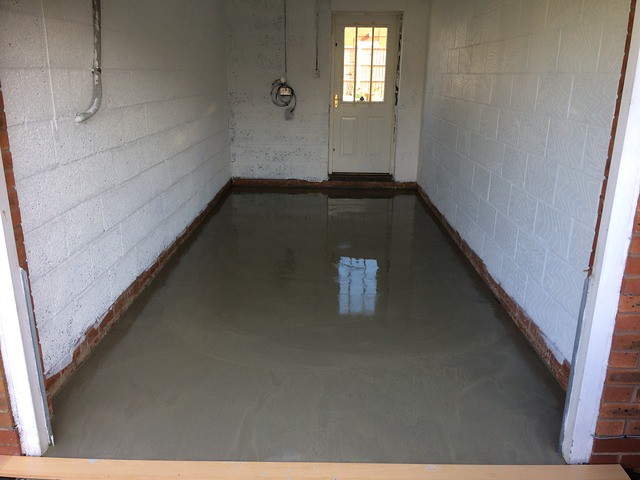
There is a slight dip where the garage floor slab meets the driveway and water pools in this point. I was hoping to get the screed to level this as well but realised I had no way to control it or to make it look nice afterwards. The first bucket was a bit too wet and spread too easily, also created a mountain of air bubbles that I couldn't do anything about. The bubbles that didn't burst, despite looking like a teenager with ACNE, needed a light dusting with sandpaper to smooth them off. Also the screed didn't quite fill the voids around the edges of the wall as I would have liked.
Hoping the paint will fix a lot of issues but that might be asking too much.
Last edited by StafflesBrew on Mon Jul 10, 2017 9:38 am; edited 1 time in total
|
|
| Back to top |
|
|
StafflesBrew
Joined: 31 May 2016
Posts: 28
Location: UK - Midlands
|
| Link Posted: Wed Apr 12, 2017 7:55 am Post subject: |
|
|
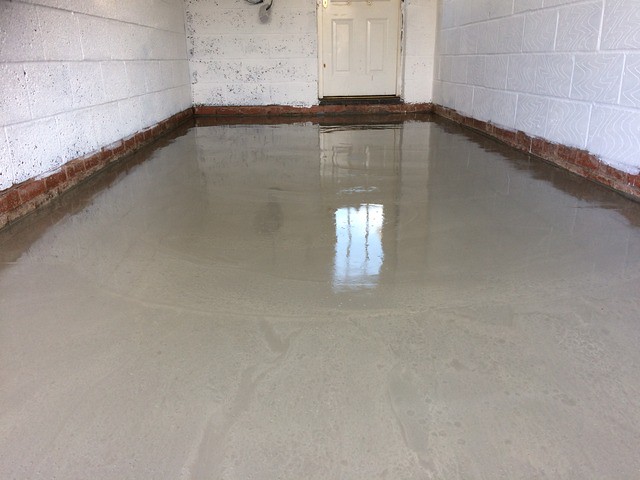
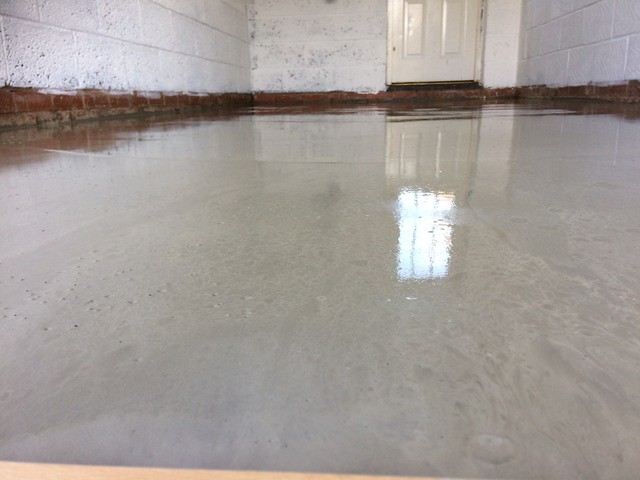
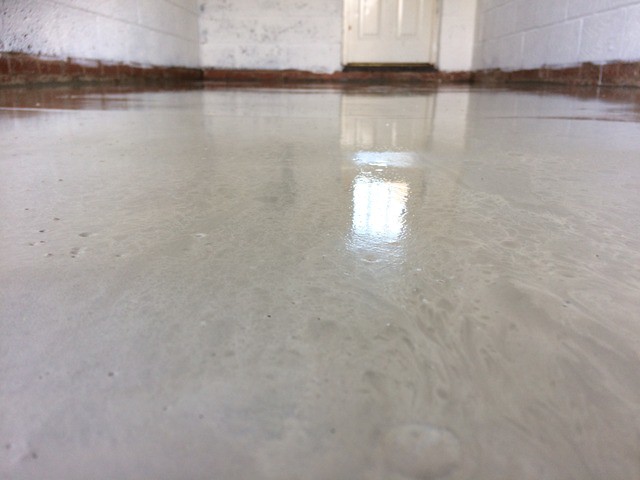
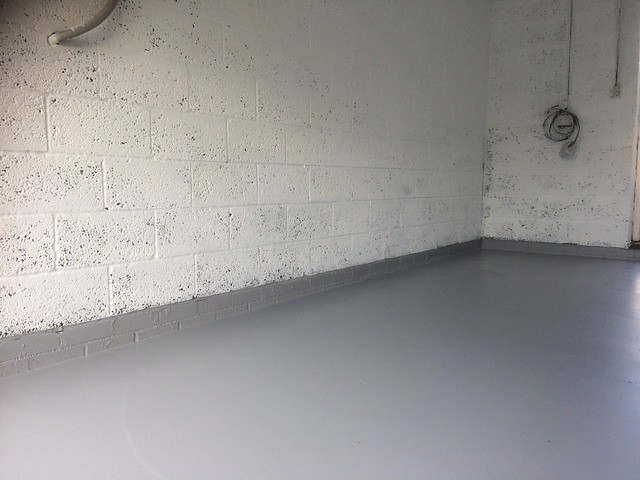
Floor Painting
This floor paint was something else as already mentioned. The coverage was great and the finish really smooth. This will be getting a second coat tonight while the weather holds up. Certain other people are itching to reclaim the garden and to put all the stuff back in the garage.
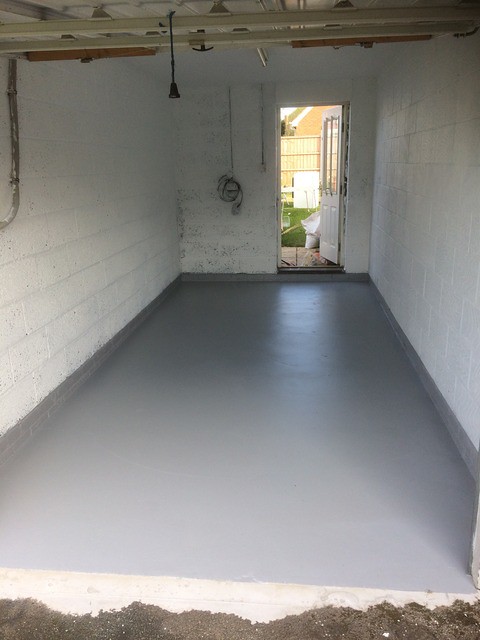
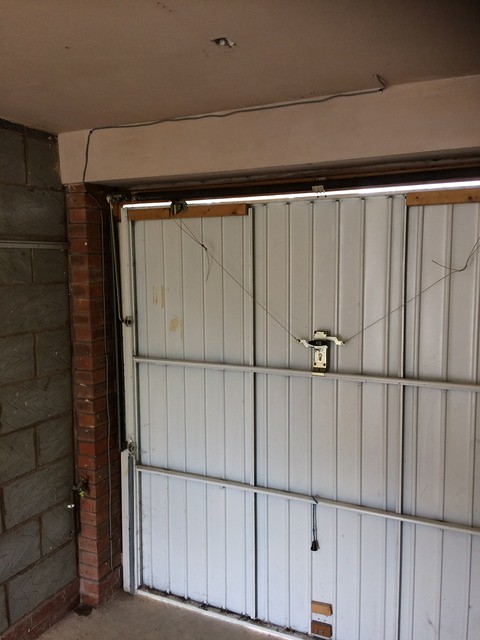
Question for other garage owners. There is a gap under the garage door of about 1-1.5" which lets a load of dirt and weather in, and from recent experience small furry pests that like to feast on bags of grain. I can't really put anything on the ground to close the gap as I need to use this as a drain for excess liquid and have a flat floor for access so looking for something to add onto the door to try and seal it. Any ideas?
Just got a text that two items are being delivered today. Hopefully next update will be a good one 
Last edited by StafflesBrew on Mon Jul 10, 2017 9:38 am; edited 1 time in total
|
|
| Back to top |
|
|
Kazumichan
Joined: 07 May 2014
Posts: 177
Location: Cincinnati Ohio area
Working on: Belgium golden, Dubbel, and imperial red
|
|
| Back to top |
|
|
StafflesBrew
Joined: 31 May 2016
Posts: 28
Location: UK - Midlands
|
|
| Back to top |
|
|
Kazumichan
Joined: 07 May 2014
Posts: 177
Location: Cincinnati Ohio area
Working on: Belgium golden, Dubbel, and imperial red
|
|
| Back to top |
|
|
Ozarks Mountain Brew
Joined: 22 May 2013
Posts: 737
Location: The Ozark Mountains of Missouri
|
| Link Posted: Wed Apr 12, 2017 10:28 pm Post subject: |
|
|
one tip for the future at some point your going to hose it out so you should think about the path that takes outside so it will drain away and not pool up
_________________
"Imagination is more important than knowledge. Knowledge is limited. Imagination encircles the world."
|
|
| Back to top |
|
|
Tennessee
Joined: 04 Apr 2015
Posts: 116
Location: Tennessee
|
|
| Back to top |
|
|
StafflesBrew
Joined: 31 May 2016
Posts: 28
Location: UK - Midlands
|
| Link Posted: Thu Apr 13, 2017 1:36 pm Post subject: |
|
|
I like the look of these and they seem to do a good job of weather sealing, but I don't have a floor drain and need to be able to push water out of the door and into the soak away.
| Ozarks Mountain Brew wrote: | | one tip for the future at some point your going to hose it out so you should think about the path that takes outside so it will drain away and not pool up |
Exactly this, which is why I think any seal needs be on the door rather than the floor.
| Tennessee wrote: | | http://www.sealeze.com/weatherseal-products/door-sweeps |
Yes this looks about right. Whether to go for a rubber blade or a brush type like this.
|
|
| Back to top |
|
|
Tennessee
Joined: 04 Apr 2015
Posts: 116
Location: Tennessee
|
| Link Posted: Thu Apr 13, 2017 7:57 pm Post subject: |
|
|
| StafflesBrew wrote: |
I like the look of these and they seem to do a good job of weather sealing, but I don't have a floor drain and need to be able to push water out of the door and into the soak away.
| Ozarks Mountain Brew wrote: | | one tip for the future at some point your going to hose it out so you should think about the path that takes outside so it will drain away and not pool up |
Exactly this, which is why I think any seal needs be on the door rather than the floor.
| Tennessee wrote: | | http://www.sealeze.com/weatherseal-products/door-sweeps |
Yes this looks about right. Whether to go for a rubber blade or a brush type like this. |
The "brush type" is an industry standard for commercial applications. Whether your using it for a door sweep or an astragal application, it's durability is far superior to a "rubber type" material. Even if your floor is not level it's still flexes enough to work! The brushes come in just about any height you may need.
_________________
Kal Clone (30amp),Mash Re-Circulation Manifold, Custom BK Hop Filter.
|
|
| Back to top |
|
|
Ozarks Mountain Brew
Joined: 22 May 2013
Posts: 737
Location: The Ozark Mountains of Missouri
|
|
| Back to top |
|
|
|
|


