| View previous topic :: View next topic |
| Author |
Message |
McGruber

Joined: 12 Aug 2014
Posts: 237
Location: Idaho

|
 Link Posted: Fri Oct 30, 2015 7:06 am Post subject: Link Posted: Fri Oct 30, 2015 7:06 am Post subject: |
 |
|
| asparknz wrote: | Amazing!!
How are you chilling your fermenters? |
Thanks asparknz. You have a wonderful website! Your control panel looks familiar.  I am good friends/ basically family with a gal from Fairlie, NZ (small town outside Christchurch). I'd love to come visit your neck of the woods sometime. I am good friends/ basically family with a gal from Fairlie, NZ (small town outside Christchurch). I'd love to come visit your neck of the woods sometime.
I have a fridge that holds bottles or kegs, but not both at the same time due to having to place or remove shelves. I have plans and parts to build individual fermentation chambers using a glycol recirculating system, solenoids, a transmission cooler, and a 24 V PID similar to Kal's. I'll post more on it later ) Most of my online questions regarding the build have been met with silence, so I'll give it a go and see what happens! Cheers!
(EDIT: Completed Build here! - http://www.theelectricbrewery.com/forum/viewtopic.php?t=30544)
Last edited by McGruber on Thu Jan 26, 2017 8:46 pm; edited 2 times in total
|
|
| Back to top |
|
 |
McGruber
Joined: 12 Aug 2014
Posts: 237
Location: Idaho
|
| Link Posted: Fri Oct 30, 2015 7:33 am Post subject: |
|
|
Here's what I did for air flow. I have a hood and vent that are the same as Kal's. I really didn't want to permanently modify the bedroom by drilling huge holes in the foundation or having to re-do the ceiling. I decided to go out the window, just on brew days.
I made a piece of OSB board (which I don't think was the best choice) and painted it with weather-proof spray paint (jury's out if this was a good idea), with a 6" vertical vent for steam and heat with a vent cap. There's an air return (the bottom piece in both pictures) that brings fresh air in under the SS table at about the distance of the MLT.
The air flow is great. It's a little awkward to set up, and take down but not too bad. The junctions of the power vent and flexible tubing, and the inside lower 90 where it meets the vertical stack are "soft" joints. They come apart at those points when I'm not brewing. I did drill a hole in the bottom of the stack at the 90 to alleviate condensation pooling.
I don't want to put any more holes in walls, but let me know if you have any suggestions.
EDIT: I removed the stack entirely. I have less headache attaching the window insert into the stack, and ventilation still works great.
| Description: |
|
| Filesize: |
117.24 KB |
| Viewed: |
43519 Time(s) |

|
| Description: |
|
| Filesize: |
76.92 KB |
| Viewed: |
43519 Time(s) |

|
Last edited by McGruber on Mon Jul 23, 2018 5:11 pm; edited 2 times in total
|
|
| Back to top |
|
|
Tennessee
Joined: 04 Apr 2015
Posts: 116
Location: Tennessee
|
| Link Posted: Fri Oct 30, 2015 11:24 am Post subject: |
|
|
BTW, your build is SICK! Very cool lighting. Is that a stainless peg board ?
_________________
Kal Clone (30amp),Mash Re-Circulation Manifold, Custom BK Hop Filter.
|
|
| Back to top |
|
|
McGruber
Joined: 12 Aug 2014
Posts: 237
Location: Idaho
|
| Link Posted: Fri Oct 30, 2015 4:53 pm Post subject: |
|
|
| Tennessee wrote: | | BTW, your build is SICK! Very cool lighting. Is that a stainless peg board ? |
Thanks! It's the AllSpace Wall Organization System. I saw it sitting by itself on a different pile of stuff in Costco and thought it was perfect. I probably would have bought two, but apparently it was the last one in the store. I looked online to see where else to get it, and hit dead ends. It's great though.
|
|
| Back to top |
|
|
silverspoons
Joined: 21 Dec 2010
Posts: 555
Location: Webster NY
|
| Link Posted: Sat Oct 31, 2015 3:39 pm Post subject: |
|
|
Great look and nice job. can you post the source of the edison cages lights?
transforming a barn into a bedroom suite and those would be great in the bathroom
Silverspoons
|
|
| Back to top |
|
|
rcrabb22
Joined: 23 Dec 2010
Posts: 462
Location: Illinois
|
|
| Back to top |
|
|
McGruber
Joined: 12 Aug 2014
Posts: 237
Location: Idaho
|
| Link Posted: Sat Oct 31, 2015 9:36 pm Post subject: |
|
|
| silverspoons wrote: | Great look and nice job. can you post the source of the edison cages lights?
transforming a barn into a bedroom suite and those would be great in the bathroom
Silverspoons |
Thank you! Here is the cage/ bulb I got. It's strange that two of the pictures show a little "shorty" bulb as I don't remember those when I bought mine. My bulbs do fill the length of the cage, with just enough room to unscrew them and take them out without undoing the cage.
http://www.amazon.com/gp/product/B00N9PA2BK/ref=as_li_tl?ie=UTF8&camp=1789&creative=390957&creativeASIN=B00N9PA2BK&linkCode=as2&tag=theelectricbrewery-20&linkId=XK5II5WLPLWCOWMR
Link updated to support our site at no additional cost to you - we thank you!
If you search "EcoPower Cage Edison Light" on Amazon it pulls up all the ones I was looking at from various sellers. These pendant style lights were cheaper to buy individually than the individual or paired sconces. I got these since I knew I would be disassembling them anyway to mount to the pipe.
|
|
| Back to top |
|
|
Anticlimaddox
Joined: 05 Feb 2016
Posts: 85
Location: Harrisonburg, VA
|
| Link Posted: Fri Feb 05, 2016 8:12 pm Post subject: |
|
|
Hey McGruber -
VERY nice work! Your lighting fits the style of my brewery perfect, I appreciate you sharing. Can I ask how you attached the light fixture to the T pipe fitting? Almost looks like there is an adjustable lighting grip similar to film equipment I've used. Or was it just something reengineered that came with the pendants?
Cheers.
// brian
_________________
Rebuilding the brewery!
|
|
| Back to top |
|
|
McGruber
Joined: 12 Aug 2014
Posts: 237
Location: Idaho
|
| Link Posted: Fri Feb 05, 2016 9:26 pm Post subject: |
|
|
| Anticlimaddox wrote: | Hey McGruber -
Can I ask how you attached the light fixture to the T pipe fitting? Almost looks like there is an adjustable lighting grip similar to film equipment I've used. Or was it just something reengineered that came with the pendants?
Cheers.
// brian |
Hi Brian,
If you use the same lighting system I did, this is how I did it. IMG 2067 and IMG 2070 show the light parts: electrical cord with a dense plastic/ metal nut at the bottom of the picture, a metal housing for holding the socket assembly (this part is necessary to secure the cage), and the threaded socket part (there's a large plastic nut that screws down the socket to the housing which holds the cage to the center-metal piece). The plastic socket fits through the housing and screws into that plastic nut on the cord.
| Description: |
|
| Filesize: |
19.42 KB |
| Viewed: |
42451 Time(s) |

|
| Description: |
|
| Filesize: |
16.51 KB |
| Viewed: |
42451 Time(s) |

|
Last edited by McGruber on Fri Feb 05, 2016 9:50 pm; edited 1 time in total
|
|
| Back to top |
|
|
McGruber
Joined: 12 Aug 2014
Posts: 237
Location: Idaho
|
| Link Posted: Fri Feb 05, 2016 9:28 pm Post subject: |
|
|
IMG 2075 shows the light system assembled as I tried to figure out how to mount it. Since the socket screws into the plastic nut on the cord, and the pieces don't all fit inside the metal elbow, AND there's no way to mount the metal housing to the elbow while still being able to attach the socket to the nut...
...I instead removed the plastic nut all-together. I placed the metal housing over the elbow and struck it to mark where to drill holes so it could be mounted. (IMG 2076), and then sanded it and JB-welded a nut to the bottom of the housing. That way I could screw the housing to the elbow, and the socket into the housing (IMG 2080)
| Description: |
|
| Filesize: |
21.7 KB |
| Viewed: |
42440 Time(s) |

|
| Description: |
|
| Filesize: |
21.7 KB |
| Viewed: |
42440 Time(s) |

|
| Description: |
|
| Filesize: |
18.67 KB |
| Viewed: |
42440 Time(s) |

|
|
|
| Back to top |
|
|
McGruber
Joined: 12 Aug 2014
Posts: 237
Location: Idaho
|
| Link Posted: Fri Feb 05, 2016 9:38 pm Post subject: |
|
|
The part you're talking about is a 1/2" NPT threaded elbow that I got from a specialty lighting store that I stumbled across while I was looking for ideas. They do antique lighting restorations and custom design lighting systems. I'm not sure what the part is called exactly. They offered to build what I wanted but it was super expensive and would have taken a long time. The guy was nice enough to simply sell me the elbows. I briefly looked online for more and to compare cost, but couldn't find any. I used a plumbing reducing washer (1 1/2" to 1 1/4") to make the assembly more stable on the elbow, and fill a small gap.
Then I sanded it all, taped it, and spray painted it all with a textured black paint.
I hope that helps! Let me know if you have any questions, and good luck!
| Description: |
|
| Filesize: |
39.97 KB |
| Viewed: |
42429 Time(s) |

|
| Description: |
|
| Filesize: |
19.51 KB |
| Viewed: |
42429 Time(s) |

|
|
|
| Back to top |
|
|
Anticlimaddox
Joined: 05 Feb 2016
Posts: 85
Location: Harrisonburg, VA
|
| Link Posted: Fri Feb 05, 2016 11:37 pm Post subject: |
|
|
This is perfect. Appreciate the thorough answer, i'll spend some time this weekend tracking down some parts. Have a great one!
Cheers // brian
_________________
Rebuilding the brewery!
|
|
| Back to top |
|
|
Campana93
Joined: 06 Feb 2016
Posts: 1
Location: Delaware
|
| Link Posted: Sat Feb 06, 2016 7:19 pm Post subject: Beer jockey |
|
|
|
Any more info on the beer jockey?
|
|
| Back to top |
|
|
McGruber
Joined: 12 Aug 2014
Posts: 237
Location: Idaho
|
|
| Back to top |
|
|
McGruber
Joined: 12 Aug 2014
Posts: 237
Location: Idaho
|
| Link Posted: Sun Feb 07, 2016 1:05 am Post subject: |
|
|
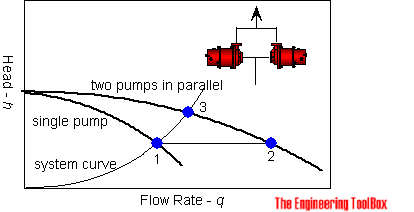
You may recall I had asked about how to increase speed in the whirlpool. I did do some experiments, and found out that running the pumps in series does help with output speed.
I filled the whirlpool with 12 gallons of water, and placed a wine cork in it. I then ran the pump for 3 minutes to get the water up to speed, and then counted the revolutions per minute of the cork for 3 minutes. I recorded the RPM's twice (three minutes each).
Then I hooked up the pumps in series and ran the same test the same way, again twice. I placed my data somewhere that I wouldn't forget where it was...and of course now I can't find it.  However, I recall that when I ran one pump by itself the cork lazily made its way around the WP. When I ran it in series, I fairly often had to knock the cork off the wall of the WP because it was being thrown to the outside at a faster rate (centrifugal force) and would slow down because of the increased contact/ friction with the wall. The RPM of the cork in the "series" test was roughly about 1.5X faster. However, I recall that when I ran one pump by itself the cork lazily made its way around the WP. When I ran it in series, I fairly often had to knock the cork off the wall of the WP because it was being thrown to the outside at a faster rate (centrifugal force) and would slow down because of the increased contact/ friction with the wall. The RPM of the cork in the "series" test was roughly about 1.5X faster.
I also found these websites that talk more about overcoming head pressure, but seem to confirm my data on overcoming friction loss.
http://blog.craneengineering.net/operating-centrifugal-pumps-in-series-or-parallel
http://www.mcnallyinstitute.com/18-html/18-1.htm
http://www.engineeringtoolbox.com/pumps-parallel-serial-d_636.html
I plan on scoring the bottom of the WP to increase friction at the bottom of the pot. That will help even further with trub pile formation. Ideally the 90 degree elbow wouldn't be there (flow resistance), and would instead be a hole that is flush with the WP wall. However, I wanted to get as much off the bottom as possible. I may modify this design as I play with it a little more, but I'm pretty happy with how it has been working.
EDIT: I bought a third (dedicated WP) pump and installed a larger impeller in it. Works great. Less headache. See also the No-move hose link on the first post of this thread.
| Description: |
|
| Filesize: |
68.02 KB |
| Viewed: |
42313 Time(s) |

|
| Description: |
|
| Filesize: |
28.83 KB |
| Viewed: |
42313 Time(s) |

|
Last edited by McGruber on Mon Jan 22, 2018 4:36 am; edited 1 time in total
|
|
| Back to top |
|
|
HopSteady
Joined: 09 Jan 2016
Posts: 36
|
| Link Posted: Fri Feb 12, 2016 10:27 pm Post subject: |
|
|
Have you tried 2 pumps in parallel instead of in series? This should add flow rate instead of head.

|
|
| Back to top |
|
|
McGruber
Joined: 12 Aug 2014
Posts: 237
Location: Idaho
|
| Link Posted: Sat Feb 13, 2016 1:19 am Post subject: |
|
|
| HopSteady wrote: | | Have you tried 2 pumps in parallel instead of in series? This should add flow rate instead of head. |
I have not. I was happy with the increased output with them in series, and I don't think it's worth the added cost of extra hardware to form all the junctions. If I was really worried about it and used the current pump size, it might make sense to use larger diameter ID hoses to handle the flow rate. Using the hoses I am now and increasing resistance (friction loss) by adding more T's and 90's I don't think will help much. I'm more interested in decreasing the resistance in the whirlpool by making the intake and outputs flush with the inside wall. Even that though is fine tuning as I'm pretty happy with the trub pile as it is.
|
|
| Back to top |
|
|
HopSteady
Joined: 09 Jan 2016
Posts: 36
|
| Link Posted: Sat Feb 13, 2016 8:23 am Post subject: |
|
|
Are you using a March 809 or equivalent? I was thinking up going one model up purely for whirpool reasons.
I am also considering having a tangential inlet welded onto the blichmanns. Would be great if someone offered these in weldless format:

|
|
| Back to top |
|
|
Tiny
Joined: 31 Jan 2015
Posts: 25
Location: Newaygo, MI
Drinking: Simcoe IPA
|
| Link Posted: Thu Mar 10, 2016 12:02 am Post subject: |
|
|
|
McGruber, your setup is really nice. My wife loves your light fixture. I am try to build one for her new bathroom, but figuring out what the name of that electrical elbow is proving to be tough. Has anyone figured it out by chance?
|
|
| Back to top |
|
|
bobby4
Joined: 30 Oct 2014
Posts: 9
|
| Link Posted: Wed Mar 16, 2016 3:01 pm Post subject: |
|
|
|
Incredibly impressive build, well done!
|
|
| Back to top |
|
|
|
|


