| View previous topic :: View next topic |
| Author |
Message |
kal
Forum Administrator

Joined: 12 Dec 2010
Posts: 11122
Location: Ottawa, Canada
Drinking: Pub Ale, Electric Creamsicle, Mild, Pliny the Younger, Belgian Dark Strong, Weizen, Russian Imperial Stout, Black Butte Porter

|
 Link Posted: Tue Jun 24, 2014 7:36 pm Post subject: High resolution photos of 30A panel wiring Link Posted: Tue Jun 24, 2014 7:36 pm Post subject: High resolution photos of 30A panel wiring |
 |
|
EDIT: July 2019 - See our order page for some newer high resolution photos: https://shop.theelectricbrewery.com/collections/control-panels/products/standard-30a-electric-brewery-control-panel
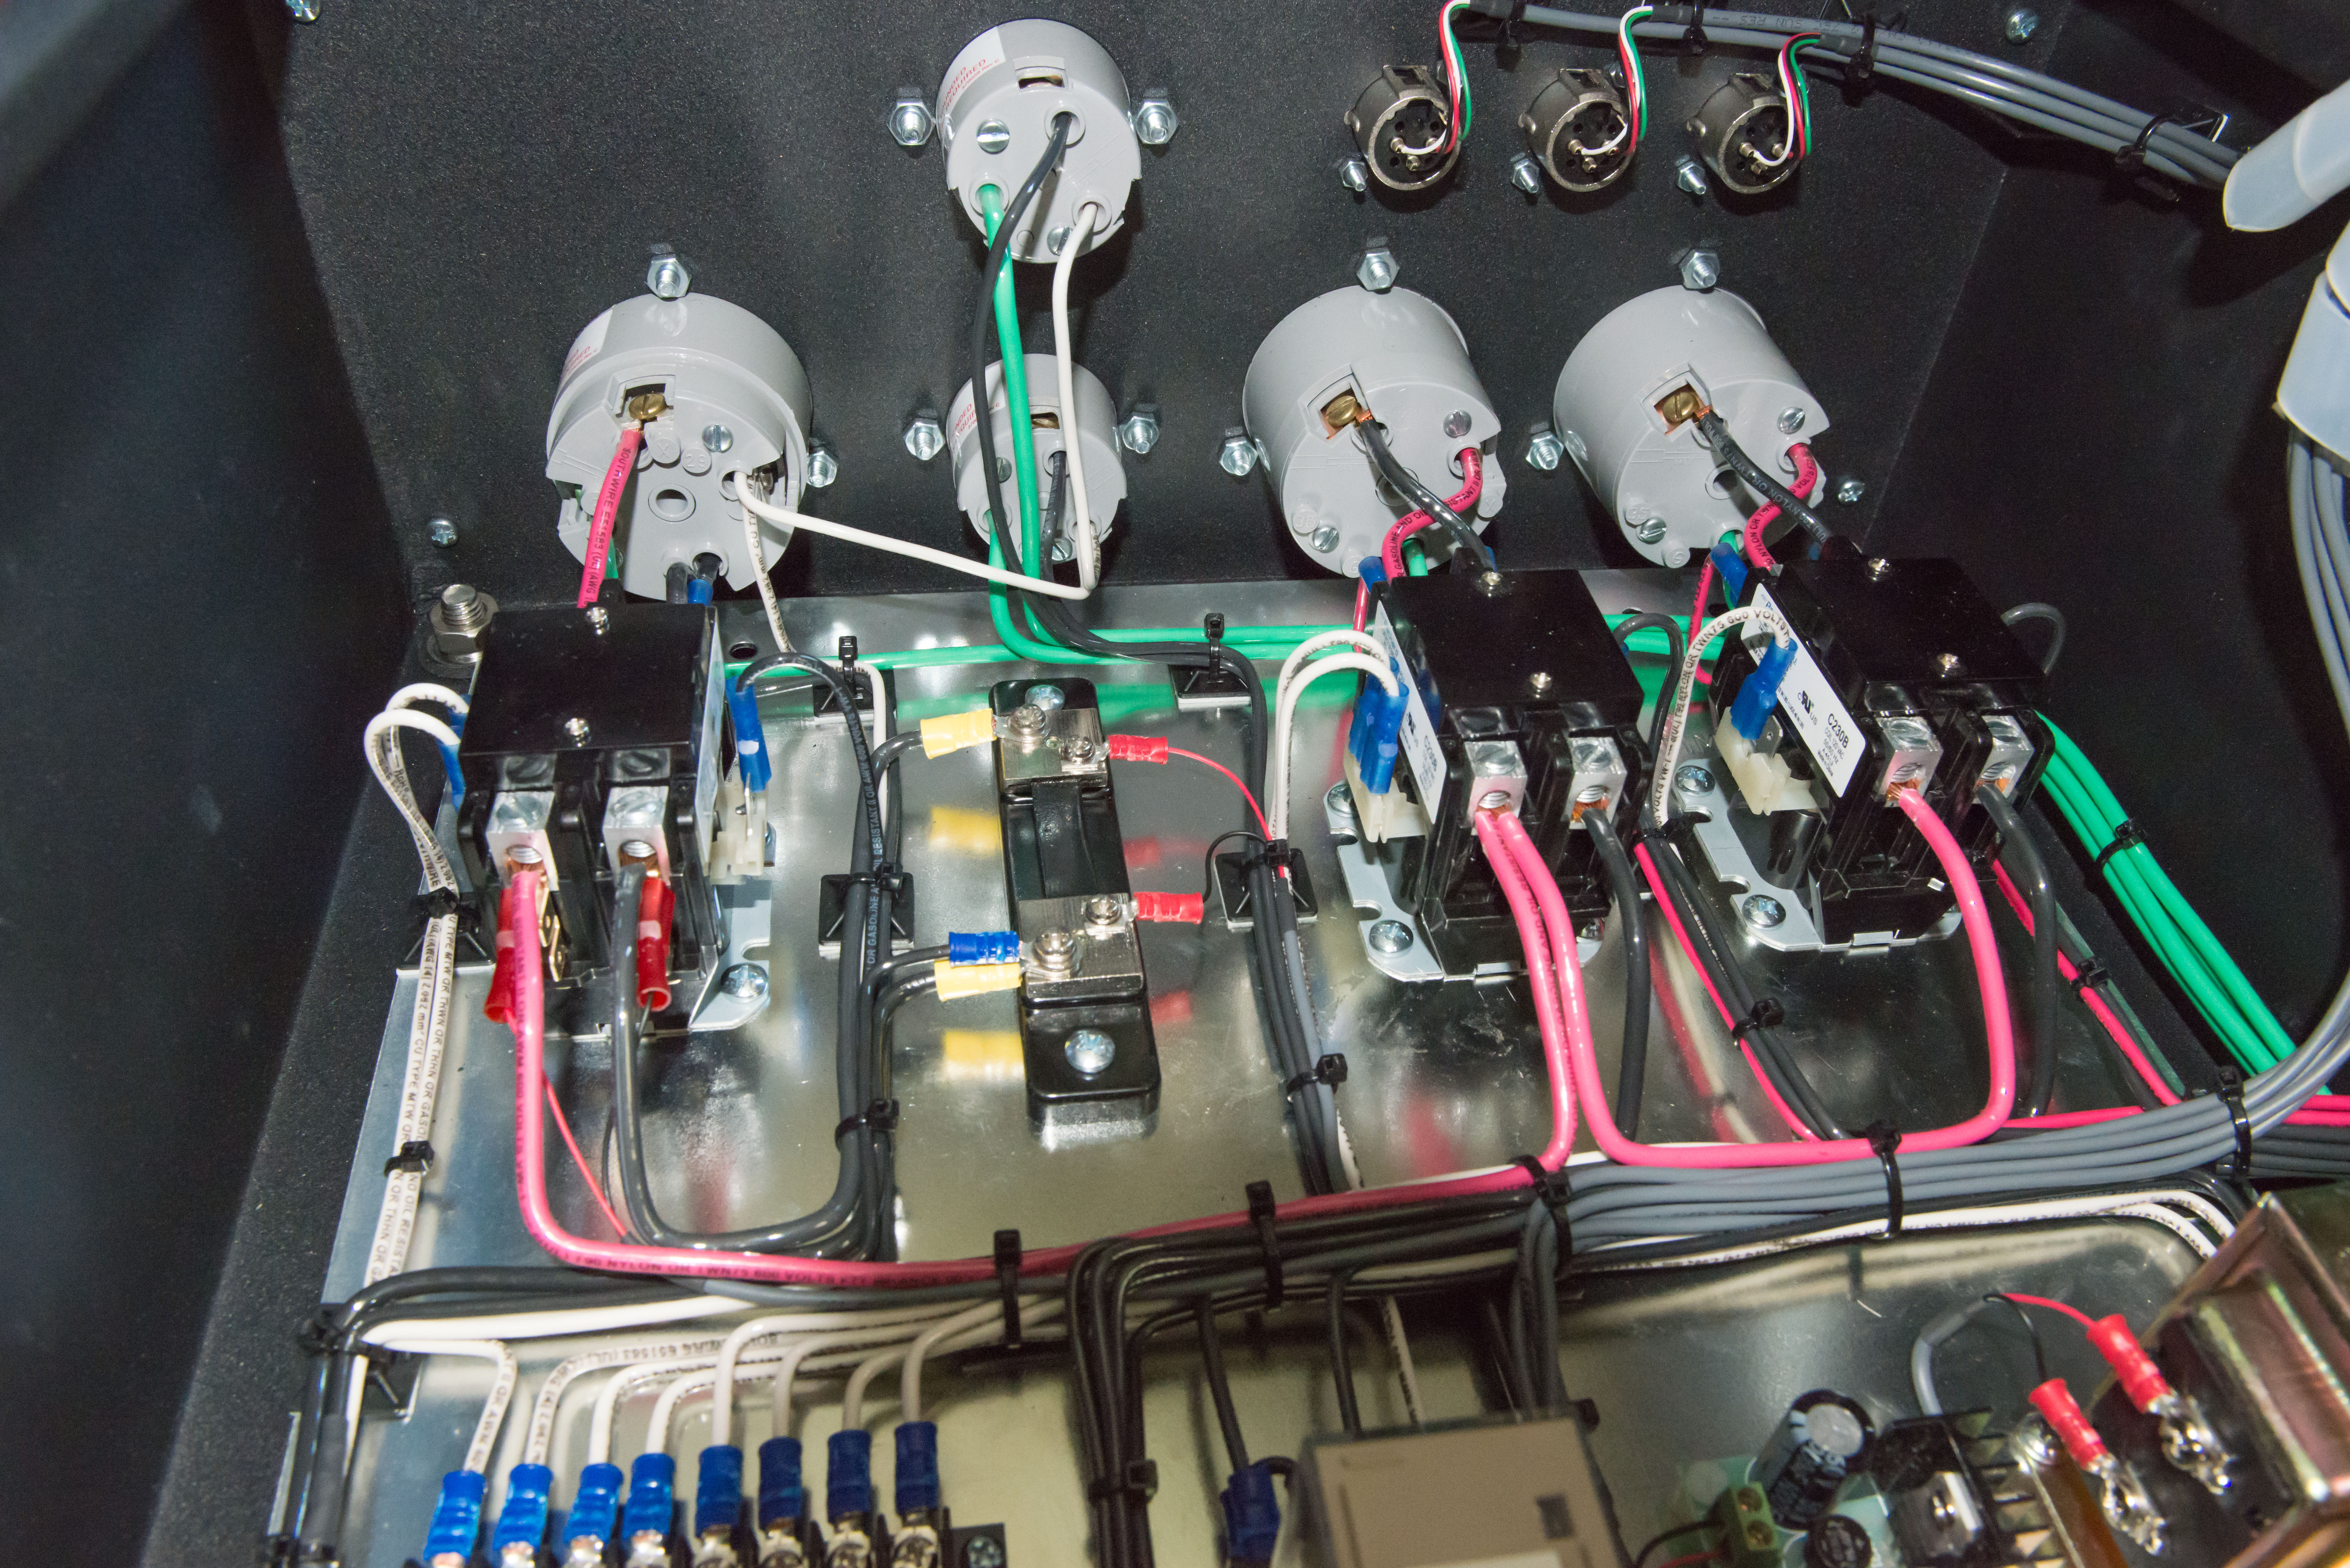
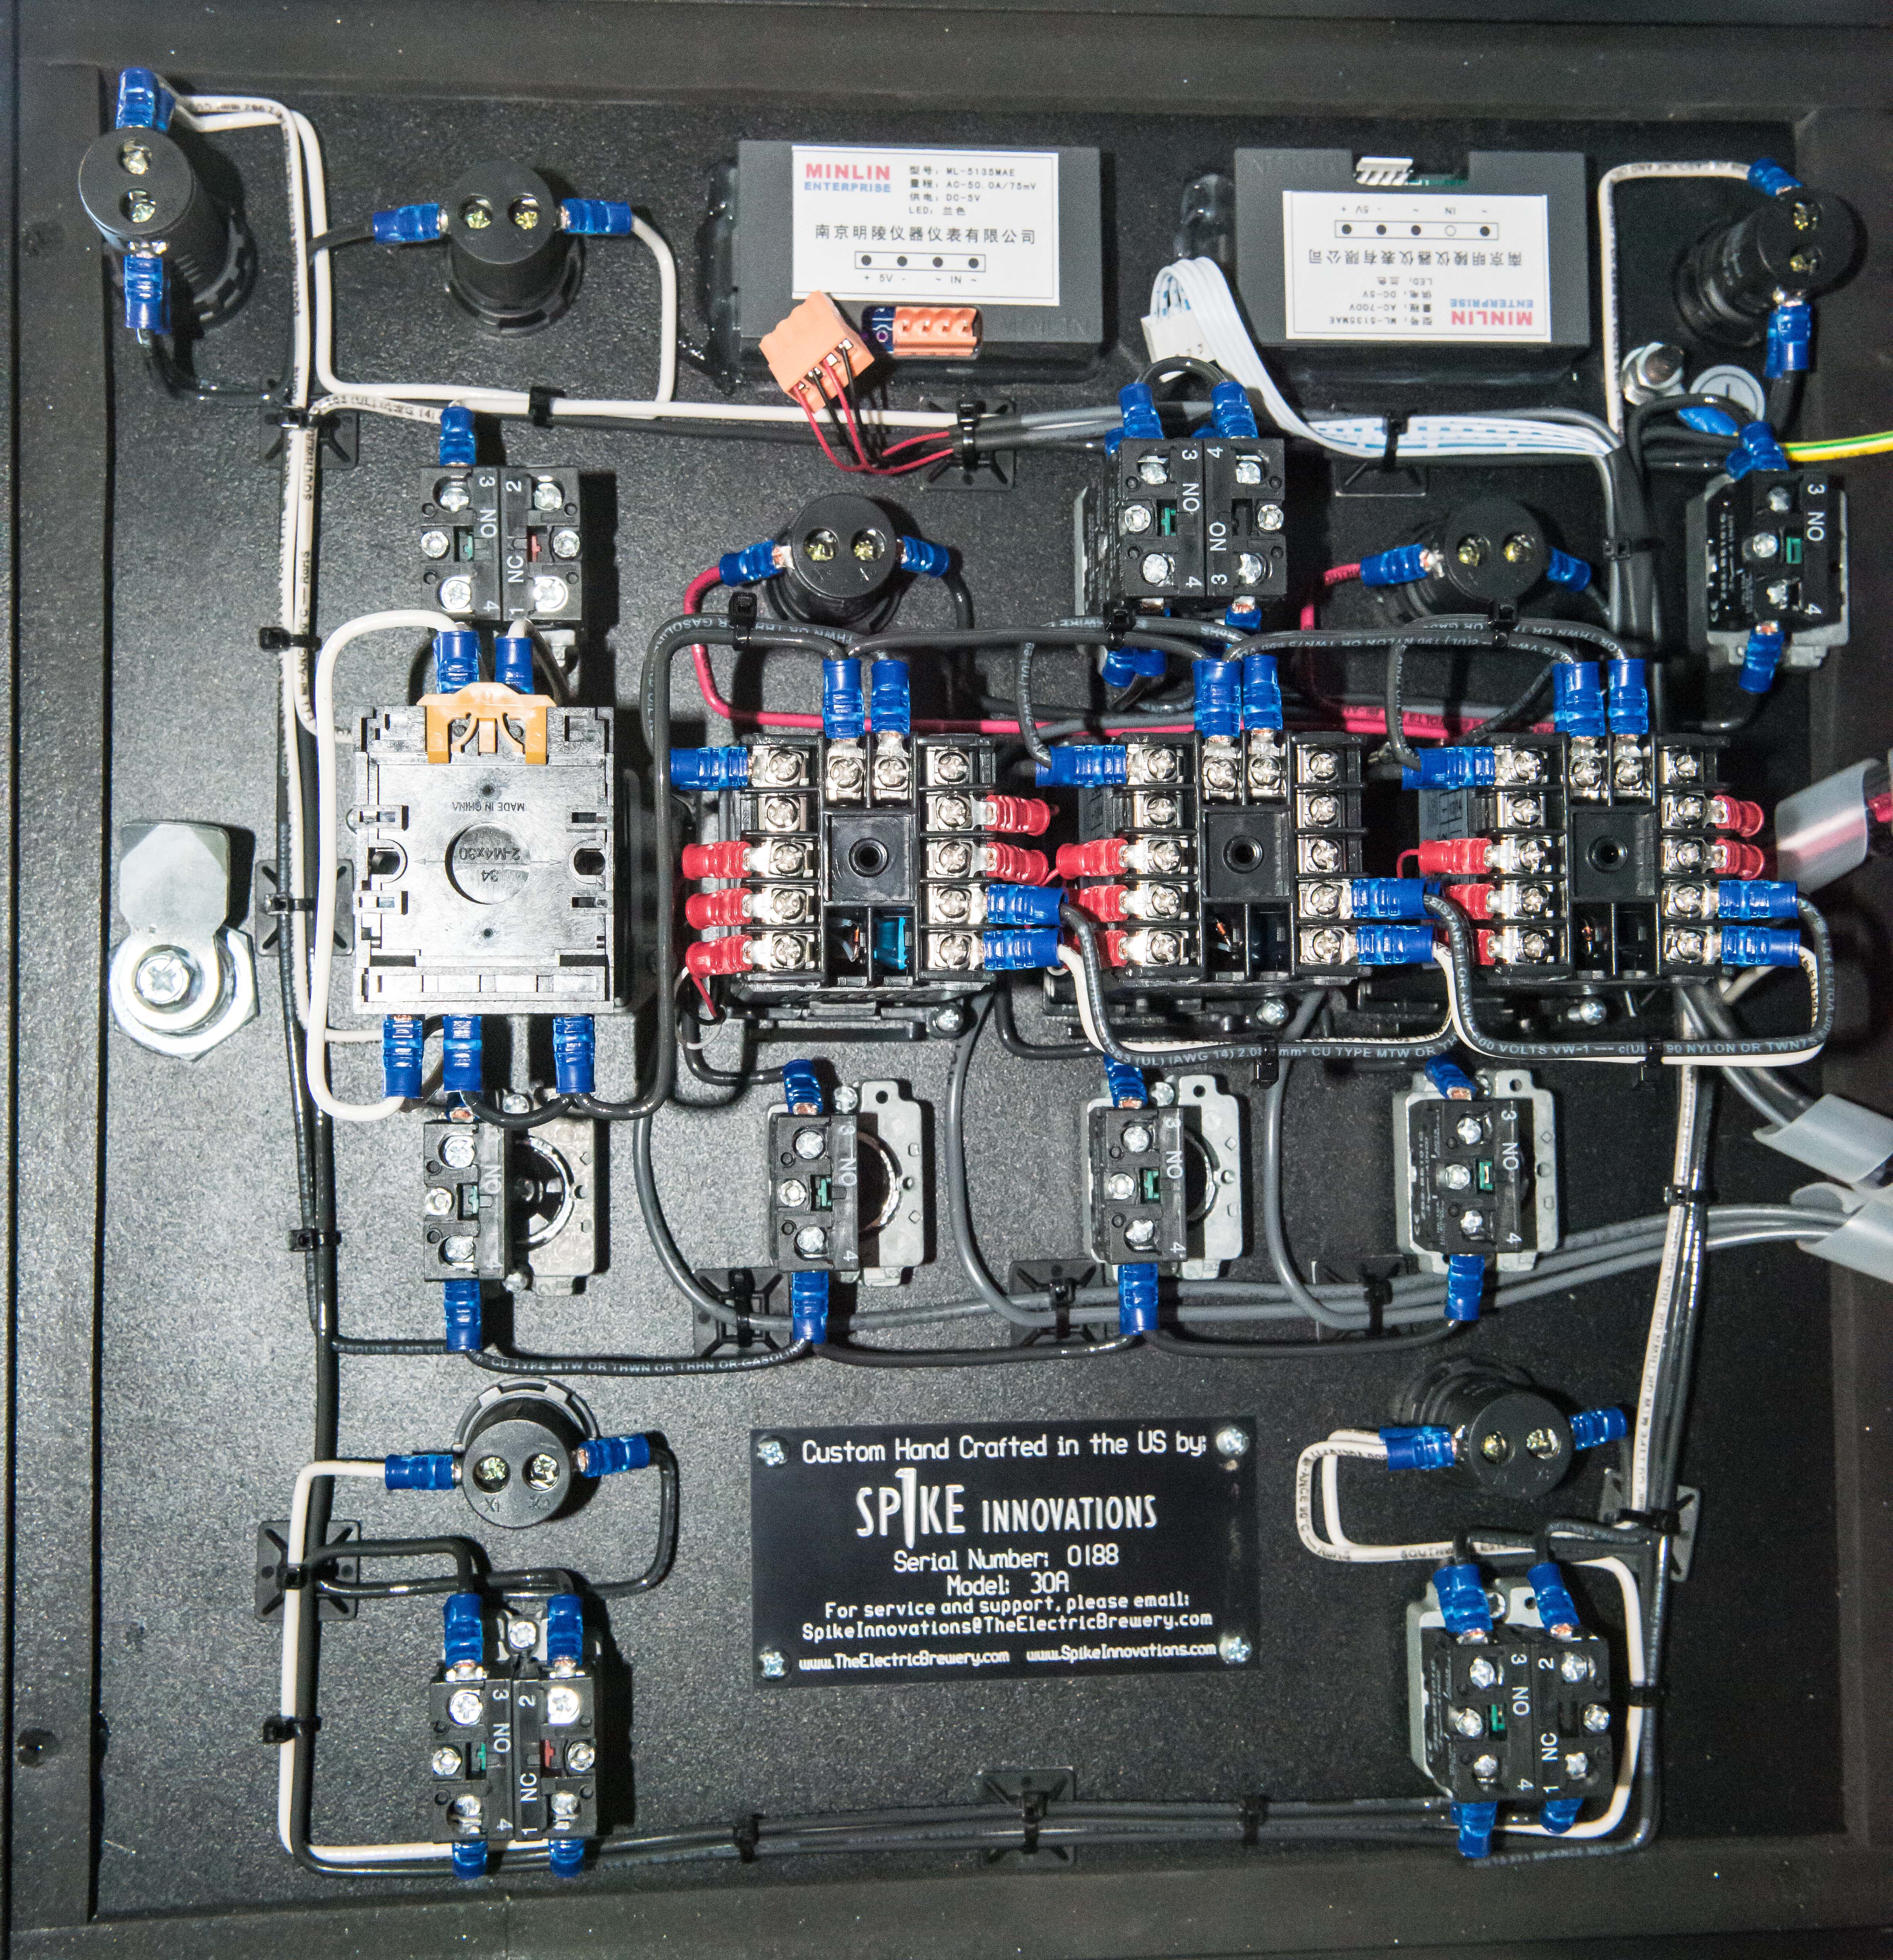
For those that are curious, I thought I'd share some high resolution photos of the inside of our pre-built standard 30A control panels taken by one of our customers. This was a panel built by Mike at TheElectricBrewery.com. Very nice clean work as always!
I figured it's one thing to post product shots that come out of a professional photoshoot/lightbox as you know things are going to look perfect. It's a completely different thing to send a panel on an 8 hour trip down a bumpy road and then have a non-professional photographer (ie: customer) take photos without us knowing or asking... that's about as real as it gets. 
(Click on the images for the full resolution original photo)


Kal

_________________
Our new shop with over 150 new products: shop.TheElectricBrewery.com
We ship worldwide and support our products and customers for life.
Purchasing through our affiliate links helps support our site at no extra cost to you. We thank you!
My basement/bar/brewery build 2.0
Last edited by kal on Tue Feb 05, 2019 1:59 pm; edited 6 times in total
|
|
| Back to top |
|
 |
barryhannah
Joined: 09 Feb 2014
Posts: 48
Location: Whangaparaoa, New Zealand
|
| Link Posted: Wed Jun 25, 2014 12:59 am Post subject: |
|
|
Looks amazing, almost as good as my own DIY one!*
*in my dreams.
|
|
| Back to top |
|
|
sjp770
Joined: 20 Jun 2014
Posts: 6
|
| Link Posted: Tue Jul 08, 2014 1:32 pm Post subject: |
|
|
Very inspiring!! I hope I can be that neat 
|
|
| Back to top |
|
|
atouk78
Joined: 04 May 2015
Posts: 19
Location: Northern NJ
|
| Link Posted: Wed May 27, 2015 12:24 pm Post subject: |
|
|
|
Very impressive. These images are really informative also, just staring at them for a bit helped with several things I was less than confident about with my own wiring work.
|
|
| Back to top |
|
|
TomDD
Joined: 23 Dec 2014
Posts: 35
|
| Link Posted: Wed May 27, 2015 1:10 pm Post subject: |
|
|
so, hopelessly foolish electrical question:
in the instructions, it says this: "Which screws on the bus are used for the connections does not matter, but all wires connected to the bus must be tied together using short wire jumpers as the 8 small metal bars that make up the buses are not connected electrically. "
from what i'm seeing in those (I agree, very helpful) pics, it appears there's one connection on top of the bus, and the other connections are just connected in alignment...no jumpers. i would have expected anything connected to the bus to have a corresponding jumper wire on the screw directly above it to pass juice... now i'm concerned that i'm fundamentally misunderstanding something...
ugh,. i need a beer.
|
|
| Back to top |
|
|
kal
Forum Administrator
Joined: 12 Dec 2010
Posts: 11122
Location: Ottawa, Canada
Drinking: Pub Ale, Electric Creamsicle, Mild, Pliny the Younger, Belgian Dark Strong, Weizen, Russian Imperial Stout, Black Butte Porter
|
| Link Posted: Wed May 27, 2015 4:12 pm Post subject: |
|
|
| TomDD wrote: | | from what i'm seeing in those (I agree, very helpful) pics, it appears there's one connection on top of the bus, and the other connections are just connected in alignment...no jumpers. |
There are metal jumpers. Zoom in to see closer. They look sort of like this:
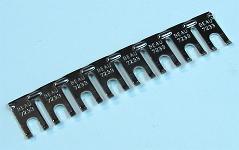
There are different types available. I mention them in the starting part of the wiring instructions as a tip. More details here:
http://www.theelectricbrewery.com/terminal-strip-jumpers
Kal
_________________
Our new shop with over 150 new products: shop.TheElectricBrewery.com
We ship worldwide and support our products and customers for life.
Purchasing through our affiliate links helps support our site at no extra cost to you. We thank you!
My basement/bar/brewery build 2.0
Last edited by kal on Thu May 28, 2015 2:10 pm; edited 1 time in total
|
|
| Back to top |
|
|
TomDD
Joined: 23 Dec 2014
Posts: 35
|
| Link Posted: Wed May 27, 2015 4:48 pm Post subject: |
|
|
|
ok... that is FREAKIN cool!
|
|
| Back to top |
|
|
huaco
Joined: 05 Apr 2012
Posts: 1506
Location: Burleson Texas
|
| Link Posted: Thu May 28, 2015 1:23 pm Post subject: |
|
|
|
Yeah, those jumpers save a LOT of time!
|
|
| Back to top |
|
|
jphussey
Joined: 17 Oct 2012
Posts: 171
|
| Link Posted: Sun Oct 23, 2016 10:21 pm Post subject: |
|
|
In this prebuilt, it looks like there is a terminal strip being used for the ground wires. I only see the ground post on the main body of the enclosure connected to the door; are all of the other components being grounded just through the backplate -> backplate screws?
Or is there a wire going from the main body's ground post to that terminal strip?
|
|
| Back to top |
|
|
kal
Forum Administrator
Joined: 12 Dec 2010
Posts: 11122
Location: Ottawa, Canada
Drinking: Pub Ale, Electric Creamsicle, Mild, Pliny the Younger, Belgian Dark Strong, Weizen, Russian Imperial Stout, Black Butte Porter
|
| Link Posted: Mon Oct 24, 2016 2:43 am Post subject: |
|
|
| jphussey wrote: | In this prebuilt, it looks like there is a terminal strip being used for the ground wires. I only see the ground post on the main body of the enclosure connected to the door; are all of the other components being grounded just through the backplate -> backplate screws?
Or is there a wire going from the main body's ground post to that terminal strip? |
Grounding is done through the backplate to the enclosure as you mentioned. There's also a grounding wire from the back part of the enclosure to the door.
Kal
_________________
Our new shop with over 150 new products: shop.TheElectricBrewery.com
We ship worldwide and support our products and customers for life.
Purchasing through our affiliate links helps support our site at no extra cost to you. We thank you!
My basement/bar/brewery build 2.0
|
|
| Back to top |
|
|
GLRRA47
Joined: 20 Dec 2015
Posts: 43
Location: Ohio
|
| Link Posted: Thu Nov 24, 2016 11:50 pm Post subject: |
|
|
|
Are there high res pictures of a 50 A panel by chance?
|
|
| Back to top |
|
|
kal
Forum Administrator
Joined: 12 Dec 2010
Posts: 11122
Location: Ottawa, Canada
Drinking: Pub Ale, Electric Creamsicle, Mild, Pliny the Younger, Belgian Dark Strong, Weizen, Russian Imperial Stout, Black Butte Porter
|
| Link Posted: Fri Nov 25, 2016 12:30 am Post subject: |
|
|
| GLRRA47 wrote: | | Are there high res pictures of a 50 A panel by chance? |
Sorry, no! There are some pictures of the insides in the build instructions however.
Kal
_________________
Our new shop with over 150 new products: shop.TheElectricBrewery.com
We ship worldwide and support our products and customers for life.
Purchasing through our affiliate links helps support our site at no extra cost to you. We thank you!
My basement/bar/brewery build 2.0
|
|
| Back to top |
|
|
dirtyderek
Joined: 04 Jan 2016
Posts: 14
Location: Arlington,TX
|
| Link Posted: Mon Jun 05, 2017 2:49 pm Post subject: |
|
|
|
I see you have 2 neutrals coming off the power in coil. Assuming one goes to the neutral bus, where is the other going? I don't see that in the instructions.
|
|
| Back to top |
|
|
kal
Forum Administrator
Joined: 12 Dec 2010
Posts: 11122
Location: Ottawa, Canada
Drinking: Pub Ale, Electric Creamsicle, Mild, Pliny the Younger, Belgian Dark Strong, Weizen, Russian Imperial Stout, Black Butte Porter
|
| Link Posted: Mon Jun 05, 2017 7:22 pm Post subject: |
|
|
| dirtyderek wrote: | | I see you have 2 neutrals coming off the power in coil. Assuming one goes to the neutral bus, where is the other going? I don't see that in the instructions. |
Please ignore pictures of wired panels as there is more than one way to wire a panel not to mention it's impossible to try and follow where wires go in a picture of a real panel. Instead, use the wiring diagrams. Good luck!
Kal
_________________
Our new shop with over 150 new products: shop.TheElectricBrewery.com
We ship worldwide and support our products and customers for life.
Purchasing through our affiliate links helps support our site at no extra cost to you. We thank you!
My basement/bar/brewery build 2.0
Last edited by kal on Tue Jun 06, 2017 4:19 am; edited 1 time in total
|
|
| Back to top |
|
|
LGarby
Joined: 18 May 2014
Posts: 66
|
| Link Posted: Tue Jun 06, 2017 4:12 am Post subject: |
|
|
| dirtyderek wrote: | | I see you have 2 neutrals coming off the power in coil. Assuming one goes to the neutral bus, where is the other going? I don't see that in the instructions. |
It goes to one of the pump neutral plugs which is then daisy chained to the other pump plug. I tried following the wiring that Mike does in his panels cause it looks fantastic but ran into issues at places including here as the holes for the wires on the pump and power in are not large enough to accommodate two conductors as shown in the photo, at least with the gear that shipped with the panel kit when I bought it back in December. I wound up using these photos as a guide but ultimately relying on the wiring guides Kal created.
|
|
| Back to top |
|
|
dirtyderek
Joined: 04 Jan 2016
Posts: 14
Location: Arlington,TX
|
| Link Posted: Tue Jun 06, 2017 5:46 am Post subject: |
|
|
|
yeah. lol! it has been a little confusing. but i figured out my mistake... i think. will know when i plug in tomorrow.
|
|
| Back to top |
|
|
Chris55
Joined: 11 Aug 2019
Posts: 2
Location: Warrington, UK
|
| Link Posted: Mon Aug 12, 2019 8:15 pm Post subject: |
|
|
Hi everyone, first time poster here..... great website...... but it's costing me a lot of money!!!
Anyhow, I'm mid build of my 240V UK spec panel based very closely on Kal''s design and about to embark on the wiring.
Whilst browsing the forum posts I noticed the link on this thread to new high res images from July 2019. I've spotted that these images now show crimped connectors on the 10 gauge wires leading in and out of the contactors. I'm curious as to why this update has taken place and what type of connector is being used.
At first I thought they were round bootlace ferrules but looking closer it seems the metal terminal has a square profile, not round like a bootlace ferrule. Image 6 in the series of new photos shows this best where the 2 hot lines feed into the contactor. Maybe it's simply squashed into a square profile when the contactor screw is tightened, or alternatively, have crimp 'pin' connectors been used instead which have a more square profile at the terminal? (no sign of these in the online shop though).
Ultimately, since the design now includes crimped terminals rather than bare wire, and the high current involved, what connector type is going to give best contact between wire and contactor?
Thanks in advance
Chris
|
|
| Back to top |
|
|
kal
Forum Administrator
Joined: 12 Dec 2010
Posts: 11122
Location: Ottawa, Canada
Drinking: Pub Ale, Electric Creamsicle, Mild, Pliny the Younger, Belgian Dark Strong, Weizen, Russian Imperial Stout, Black Butte Porter
|
|
| Back to top |
|
|
Chris55
Joined: 11 Aug 2019
Posts: 2
Location: Warrington, UK
|
| Link Posted: Mon Aug 12, 2019 9:16 pm Post subject: |
|
|
Hi Kal, thanks for the quick reply.
Now I understand. I had looked on the wiring page of your online shop but not the DIN rails component page where it shows the ferrules clearly!
It does look neater and quite possibly gives a better contact between wire and component.
Looking forward to getting the wiring started, although Mike has set the bar very high with his uncompromisingly neat wiring. Do you know if he forms these by hand each time or has he got a jig set to form the wires around before offering them into the panel?
Thanks again
Chris
|
|
| Back to top |
|
|
kal
Forum Administrator
Joined: 12 Dec 2010
Posts: 11122
Location: Ottawa, Canada
Drinking: Pub Ale, Electric Creamsicle, Mild, Pliny the Younger, Belgian Dark Strong, Weizen, Russian Imperial Stout, Black Butte Porter
|
| Link Posted: Mon Aug 12, 2019 9:24 pm Post subject: |
|
|
| Chris55 wrote: | | Do you know if he forms these by hand each time or has he got a jig set to form the wires around before offering them into the panel? |
He builds most of the wire harnesses outside of the panels first - especially the big bundles that go between door and backplate.
A discussion about this a couple of years ago that has some examples of harness building for those who are not familiar with it: http://www.theelectricbrewery.com/forum/viewtopic.php?p=321661#321661
Kal
_________________
Our new shop with over 150 new products: shop.TheElectricBrewery.com
We ship worldwide and support our products and customers for life.
Purchasing through our affiliate links helps support our site at no extra cost to you. We thank you!
My basement/bar/brewery build 2.0
|
|
| Back to top |
|
|
|
|