| View previous topic :: View next topic |
| Author |
Message |
chastuck

Joined: 06 Oct 2013
Posts: 193
Location: Beckenham, Kent, UK
Drinking: Bitter
Working on: IPA

|
 Link Posted: Wed Jan 07, 2015 3:55 pm Post subject: My oxygen setup Link Posted: Wed Jan 07, 2015 3:55 pm Post subject: My oxygen setup |
 |
|
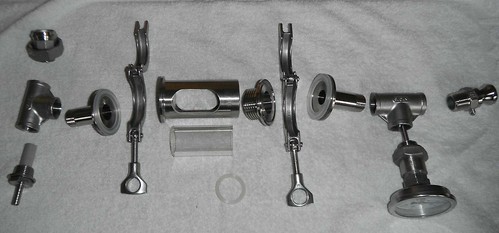
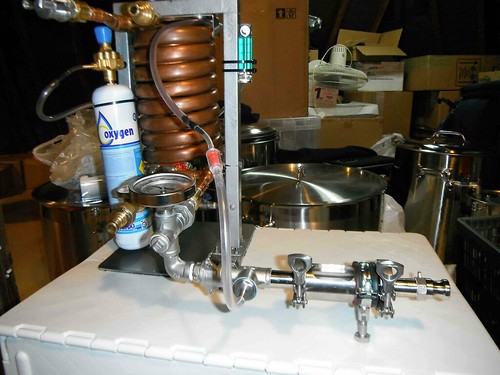
Got the bit I was finally waiting for from Morebeer.com - a 1.5" triclamp sight glass. I've now got all the parts I need for my oxygen setup. Main parts before assembly are shown below:
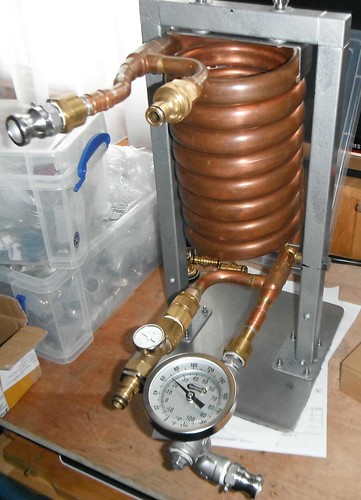
I am going to fix the assembly onto my existing wort CFC. The present outlet and temperature dial is held on with a cone hex union, so I can easily replace it with any other outlet assembly. Before and after as below:
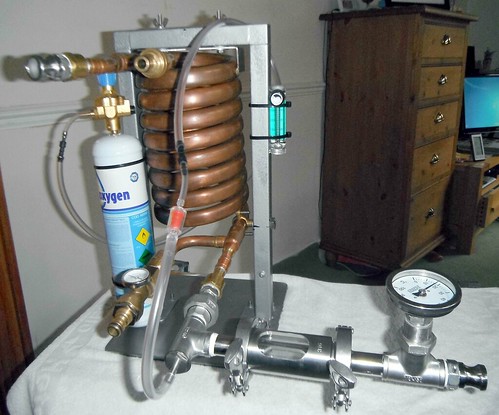
I've used the existing CFC caddy as the support for the disposable oxygen cylinder and the flow control valve. Cable ties hold them to the caddy legs. In the oxygen supply tube I have fitted a one-way valve to stop any wort flowing back into the regulator. PTFE tape has been used on all the joints, except for the stainless steel oxygen stone and the new temperature dial. I have fitted these into their respective tees with stainless steel dowty food-grade washers, so that I can readily disassemble these two parts for cleaning and sterilisation. I've tested for leaks and all is well, but I've not tested it in a live brewing situation yet. I will be brewing at the end of the month - an imperial IPA - so will post again on how it performed.
|
|
| Back to top |
|
 |
huaco
Joined: 05 Apr 2012
Posts: 1506
Location: Burleson Texas
|
| Link Posted: Wed Jan 07, 2015 4:48 pm Post subject: |
|
|
|
I had considered doing something similar... I changed my mind though with the prospect of all those threaded fittings on the cold side. Do you plan to disassemble them and sterilize after each use?
|
|
| Back to top |
|
|
chastuck
Joined: 06 Oct 2013
Posts: 193
Location: Beckenham, Kent, UK
Drinking: Bitter
Working on: IPA
|
| Link Posted: Wed Jan 07, 2015 6:10 pm Post subject: |
|
|
| huaco wrote: | | I had considered doing something similar... I changed my mind though with the prospect of all those threaded fittings on the cold side. Do you plan to disassemble them and sterilize after each use? |
Short answer is no. The triclamps, airstone and dial thermometer will be unscrewed for sterilising these components as they are not screwed in with PTFE tape, but nothing else. Once these are off, and the rubber washer and dial removed from the cold water inlet, all the CFC and remaining connected parts can be removed from the caddy and put into an oven for baking if required. I have never understood the concern for threaded fittings on the cold side. After all, where the cold wort goes the sterilising liquid can go as well. Even if there are traces of solid matter in the threads, this would be sterilised. I generally flush through everything with hot water, followed by Starsan or Videne, after using. After 45 years of home brewing I have never had a spoilt beer due to any contaminate being in the threads of fittings.
Last edited by chastuck on Thu Jan 08, 2015 10:00 am; edited 1 time in total
|
|
| Back to top |
|
|
ParadiseBrew
Joined: 09 Dec 2014
Posts: 83
Location: paradise, ca
|
| Link Posted: Wed Jan 07, 2015 7:31 pm Post subject: |
|
|
looks sweet! can you show a pic of the output of the water side? where did you get that inline temp prob, it just what i am looking to add to my cfc.
Thanks
|
|
| Back to top |
|
|
chastuck
Joined: 06 Oct 2013
Posts: 193
Location: Beckenham, Kent, UK
Drinking: Bitter
Working on: IPA
|
| Link Posted: Wed Jan 07, 2015 7:46 pm Post subject: |
|
|
| ParadiseBrew wrote: | looks sweet! can you show a pic of the output of the water side? where did you get that inline temp prob, it just what i am looking to add to my cfc.
Thanks |
The output of the water side is clearly shown in the CFC photo - it's the brass outlet at the top with the push-on hose fitting. As for the temp probe, it's a 2.5 inch dial thermometer, 6cm stem length, 1/4" bsp fitting. I added a couple of stainless steel bolts on the back to make sure that the long probe length was able to clear the depth of the tee.
|
|
| Back to top |
|
|
Creepy
Joined: 04 Feb 2014
Posts: 127
Location: North Chicago Burbs
|
| Link Posted: Wed Jan 07, 2015 9:27 pm Post subject: |
|
|
Now that's a proper setup! Excited to hear how it performs.
Cheers!
Scott
|
|
| Back to top |
|
|
Castermmt
Joined: 03 Jan 2011
Posts: 863
Location: Lowell, In
Drinking: Steelhead Porter, Alt-Toids, Hefty-Weizen, Terry's Kolsch, African Amber, Pumpkin Ale, Double Dog Ale
Working on: Janet's Brown Ale, Terry's Kolsch, Pilsner
|
| Link Posted: Wed Jan 07, 2015 11:55 pm Post subject: |
|
|
Looks great!! 45 years of home brewing experience, WOW. Sounds like you been brewing longer then most people on this forum have been alive. With that much experience, whats the best beer you ever brewed? Why the sight glass? Thanks for sharing, Castermmt
_________________
http://www.theelectricbrewery.com/forum/viewtopic.php?t=24836
|
|
| Back to top |
|
|
chastuck
Joined: 06 Oct 2013
Posts: 193
Location: Beckenham, Kent, UK
Drinking: Bitter
Working on: IPA
|
| Link Posted: Thu Jan 08, 2015 9:58 am Post subject: |
|
|
| Castermmt wrote: | | Looks great!! 45 years of home brewing experience, WOW. Sounds like you been brewing longer then most people on this forum have been alive. With that much experience, whats the best beer you ever brewed? Why the sight glass? Thanks for sharing, Castermmt |
I guess the best beer I ever brewed was a Timothy Taylor clone, but to be honest I've not yet brewed one I didn't like! My tastes have changed somewhat over the years and I now prefer heavily hopped styles. One thing that has changed for the better is the high quality ingredients available now to home brewers. When I first started it was only the goods that farmers/stores didn't want that you could get.
The sight gauge is a clover clamp with a one inch inside flow for placement inline during transfer of wort from kettle to fermenter. In my system I will use it to monitor flow and to see how the inline oxygenator is working. Not strictly necessary I know, but just gives that extra piece of mind when you can see the bubbles! Plus - it's shiny!
|
|
| Back to top |
|
|
Castermmt
Joined: 03 Jan 2011
Posts: 863
Location: Lowell, In
Drinking: Steelhead Porter, Alt-Toids, Hefty-Weizen, Terry's Kolsch, African Amber, Pumpkin Ale, Double Dog Ale
Working on: Janet's Brown Ale, Terry's Kolsch, Pilsner
|
|
| Back to top |
|
|
chastuck
Joined: 06 Oct 2013
Posts: 193
Location: Beckenham, Kent, UK
Drinking: Bitter
Working on: IPA
|
| Link Posted: Fri Jan 30, 2015 5:25 pm Post subject: Modifications to my oxygen set up |
|
|
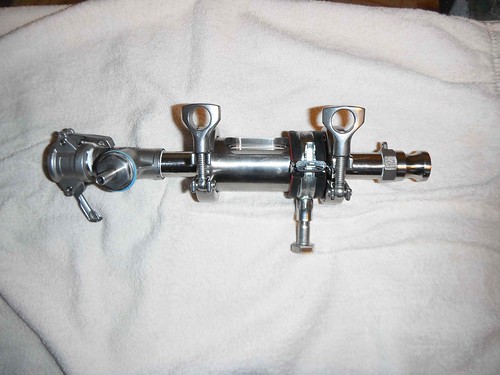
In the light of first use of my oxygen set up, I have modified it to improve performance. The main revision is changing the position of the dial thermometer. Originally I had it placed after the oxygen stone, but what I found was that it was giving a false reading of the wort temperature as it was exiting the counterflow chiller. I think this was because the oxygen bubbles in the flowing wort were preventing a good surface contact with the probe of the thermometer. After I used it the first time I found the pitching temperature in the fermenter was 28 deg C instead of about 20 deg C, in spite of the dial thermometer showing 18 deg C. I also found the pieces were quite heavy once put together, so I have fitted a Hilti 1.25 inch pipe support bracket on a 30mm M10 bolt to support its horizontal length. The second equal tee is not needed in the new arrangement. The use of a type A and a type B camlock completed the changes. I think the modified oxygenator is much better since it has enabled me to use the original output arrangement, which had a more accurate dial thermometer. The photos below show the modifications.
|
|
| Back to top |
|
|
inkedbrewer
Joined: 15 Jan 2015
Posts: 57
|
| Link Posted: Tue Jan 12, 2016 1:58 am Post subject: parts |
|
|
still building my system and i may want to eventually build something like this. do you have a list of all the necessary parts..and where you got them from?
cheers Matt
_________________
Good Men Like Good Beer - Hunter S. Thompson
|
|
| Back to top |
|
|
chastuck
Joined: 06 Oct 2013
Posts: 193
Location: Beckenham, Kent, UK
Drinking: Bitter
Working on: IPA
|
| Link Posted: Tue Jan 12, 2016 8:29 am Post subject: Re: parts |
|
|
| inkedbrewer wrote: | still building my system and i may want to eventually build something like this. do you have a list of all the necessary parts..and where you got them from?
cheers Matt |
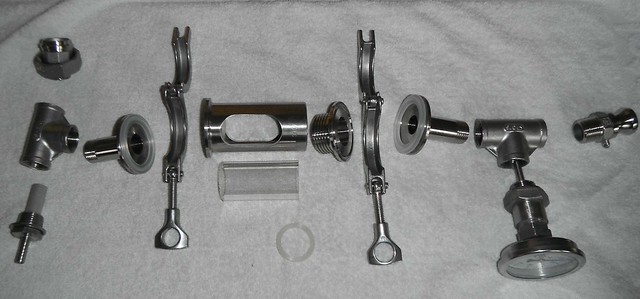
Sorry I don't have a list. But this photo might help.
|
|
| Back to top |
|
|
kal
Forum Administrator
Joined: 12 Dec 2010
Posts: 11121
Location: Ottawa, Canada
Drinking: Pub Ale, Electric Creamsicle, Mild, Pliny the Younger, Belgian Dark Strong, Weizen, Russian Imperial Stout, Black Butte Porter
|
|
| Back to top |
|
|
chastuck
Joined: 06 Oct 2013
Posts: 193
Location: Beckenham, Kent, UK
Drinking: Bitter
Working on: IPA
|
| Link Posted: Tue Jan 12, 2016 1:54 pm Post subject: |
|
|
| kal wrote: | Do you find it difficult to control the flow of O2 to get it low enough?
I picked up an O2 regulator and stone recently to try to see if it made a difference on really high gravity beers. Like this one here:
http://www.amazon.com/gp/product/B00QMOP9YK/ref=as_li_tl?ie=UTF8&camp=1789&creative=390957&creativeASIN=B00QMOP9YK&linkCode=as2&tag=theelectricbrewery-20&linkId=52FN4AWK6EJUGDZI
All you need is to get somewhat low flow (not too many bubbles coming to the surface) for about 90 seconds into the bottom of ~5-6 gallons of wort to properly oxygenate. Stone at the bottom and it bubbles up. If it bubbles like crazy at the surface you're just wasting O2.
Chilling takes much longer than 90 seconds so I would think you'd be over oxygenating / using up almost a full canister per batch no? Then flow rate of O2 has to be tied to the wort flow rate too so there's more dials to turn at the same time?
Kal |
It's quite easy to control how much oxygen goes into a batch. I use a gas flow meter (shown to the right of theCFC in the above pictures) to control the L/min flow rate and simply time how long I allow the regulator to be open. I devised a spread sheet using milligrams and mole equivalents per batch size to work out the timing (see attached). I also use a DOM to measure the final oxygen content in the wort before adding the yeast.
| Description: |
|

Download |
| Filename: |
OxygenWortFlow.xlsx |
| Filesize: |
15.58 KB |
| Downloaded: |
686 Time(s) |
|
|
| Back to top |
|
|
kal
Forum Administrator
Joined: 12 Dec 2010
Posts: 11121
Location: Ottawa, Canada
Drinking: Pub Ale, Electric Creamsicle, Mild, Pliny the Younger, Belgian Dark Strong, Weizen, Russian Imperial Stout, Black Butte Porter
|
|
| Back to top |
|
|
chastuck
Joined: 06 Oct 2013
Posts: 193
Location: Beckenham, Kent, UK
Drinking: Bitter
Working on: IPA
|
|
| Back to top |
|
|
kal
Forum Administrator
Joined: 12 Dec 2010
Posts: 11121
Location: Ottawa, Canada
Drinking: Pub Ale, Electric Creamsicle, Mild, Pliny the Younger, Belgian Dark Strong, Weizen, Russian Imperial Stout, Black Butte Porter
|
|
| Back to top |
|
|
kal
Forum Administrator
Joined: 12 Dec 2010
Posts: 11121
Location: Ottawa, Canada
Drinking: Pub Ale, Electric Creamsicle, Mild, Pliny the Younger, Belgian Dark Strong, Weizen, Russian Imperial Stout, Black Butte Porter
|
|
| Back to top |
|
|
kal
Forum Administrator
Joined: 12 Dec 2010
Posts: 11121
Location: Ottawa, Canada
Drinking: Pub Ale, Electric Creamsicle, Mild, Pliny the Younger, Belgian Dark Strong, Weizen, Russian Imperial Stout, Black Butte Porter
|
| Link Posted: Sun Feb 21, 2016 10:01 pm Post subject: |
|
|
| chastuck wrote: | | I devised a spread sheet using milligrams and mole equivalents per batch size to work out the timing (see attached). I also use a DOM to measure the final oxygen content in the wort before adding the yeast. |
Hey chastuck - when you measure with the DOM, are you seeing the ppm of O2 you expect?
Reason I ask is that unless I'm reading your spreadsheet incorrectly, your it doesn't give similar numbers as to what I'm reading around the 'net and also in the book Yeast: The Practical Guide to Beer Fermentation.
For example, assuming a 5 gallon (19 L) batch of 1.050 ale that I want to get to 10ppm (a generally accepted ppm value for such a beer), your spreadsheet tells me I'd have to flow pure O2 at a rate of 1 L/min for 8 seconds.
But the Yeast book (page 79) indicates 60 seconds at 1 K/min to get to 9.2 ppm (close to 10).
60 seconds at 1 L/min is also in line with what I've been reading on the 'net.
Am I not reading your spreadsheet correctly?
Thanks!
P.S. Your target numbers at the bottom of your spreadsheet are in line with everything else I've read, which is:
Medium strength worts (e.g. 1.035 1.060): 8-12ppm
Lager yeast strains: 10-14ppm
Strong worts (1.060 and above): 12ppm +
Kal
_________________
Our new shop with over 150 new products: shop.TheElectricBrewery.com
We ship worldwide and support our products and customers for life.
Purchasing through our affiliate links helps support our site at no extra cost to you. We thank you!
My basement/bar/brewery build 2.0
|
|
| Back to top |
|
|
chastuck
Joined: 06 Oct 2013
Posts: 193
Location: Beckenham, Kent, UK
Drinking: Bitter
Working on: IPA
|
| Link Posted: Sun Feb 21, 2016 10:24 pm Post subject: |
|
|
| kal wrote: | | chastuck wrote: | | I devised a spread sheet using milligrams and mole equivalents per batch size to work out the timing (see attached). I also use a DOM to measure the final oxygen content in the wort before adding the yeast. |
Hey chastuck - when you measure with the DOM, are you seeing the ppm of O2 you expect?
Reason I ask is that unless I'm reading your spreadsheet incorrectly, your it doesn't give similar numbers as to what I'm reading around the 'net and also in the book Yeast: The Practical Guide to Beer Fermentation.
For example, assuming a 5 gallon (19 L) batch of 1.050 ale that I want to get to 10ppm (a generally accepted ppm value for such a beer), your spreadsheet tells me I'd have to flow pure O2 at a rate of 1 L/min for 8 seconds.
But the Yeast book (page 79) indicates 60 seconds at 1 K/min to get to 9.2 ppm (close to 10).
60 seconds at 1 L/min is also in line with what I've been reading on the 'net.
Am I not reading your spreadsheet correctly?
Thanks!
P.S. Your target numbers at the bottom of your spreadsheet are in line with everything else I've read, which is:
Medium strength worts (e.g. 1.035 1.060): 8-12ppm
Lager yeast strains: 10-14ppm
Strong worts (1.060 and above): 12ppm +
Kal |
How are you forcing the oxygen into the wort? My spreadsheet is based on theoretical total absorption rates, that is, it assumes all the oxygen is absorbed for the flow duration. The way I feed-in the oxygen in a closed glass tube, rather than in the open fermenter, normally gets near the theoretical level. I always measure the wort in the fermenter afterwards with the DOM as I have found that the oxygen readily escapes from solution as the wort enters the fermenter - even though I use a tube submerged in the wort as it flows in. In practice, I normally double up the flow time just to make sure.
|
|
| Back to top |
|
|
|
|


