| View previous topic :: View next topic |
| Author |
Message |
chastuck

Joined: 06 Oct 2013
Posts: 193
Location: Beckenham, Kent, UK
Drinking: Bitter
Working on: IPA

|
 Link Posted: Wed Jul 09, 2014 10:19 pm Post subject: My UK Electric Brewery Build Link Posted: Wed Jul 09, 2014 10:19 pm Post subject: My UK Electric Brewery Build |
 |
|
Being in my early sixties and now retired, I decided to build my definitive brewery which will probably be the last one I build. I determined quite early on that this would be the best one I have ever made, picking up from my experience of building stainless steel pots over the last five years and my home brewing of around 40 years, plus all the knowledge picked up from the Forum. I have tried to follow best practice and learn from my past attempts at working with German made Bergland stainless steel catering pots. In this regard, I have decided to follow the build of The Electric Brewery as best I can, bearing in mind their successful clones all around the world. I have changed their overall plan to cater for my own brewing preferences. For instance, this means incorporating a separate HERMS setup rather than a combined HERMS/HLT coil and not buying Blichman BoilerMaker pots, which are incredibly expensive in the UK. The pots I bought were high-end stainless steel 100L pots made to the same gauge as Boilermakers, to which I added my own taps and elements. Without going through all the details and heartache involved in building my electric brewery, here's a picture of the finished results.
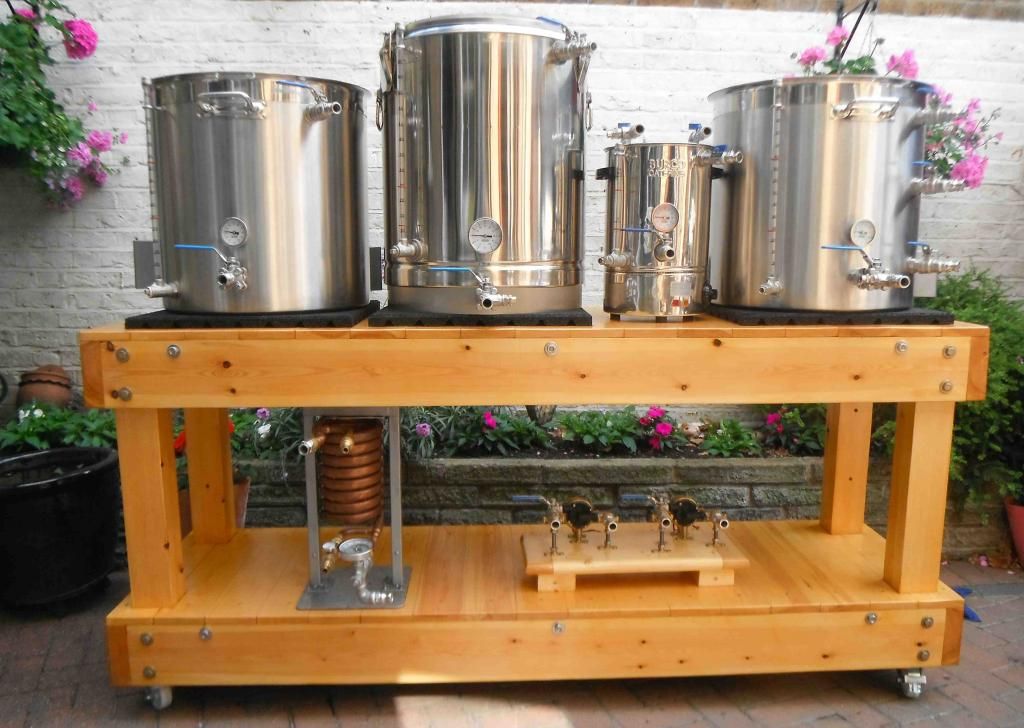
From left to right we have the 100L boil kettle, the 80L mash tun, the 10L HERMS pot, the 100L hot liquor tank (this also has an internal 1/2 inch x 50ft herms coil should I need to use it).
On the bottom shelf are shown the CFC and the wort and water pumps.
I have not shown the control panel, since I bought a standard kit from Spike Innovations for 240V use. But what I did do was to build into the panel an extra PID and relay for an auxiliary output, mainly for the separate HERMS pot. I also added additional output control lines to control a breakout box to run extra elements in both the boil kettle and HLT.
If anyone is really interested in the detail of my build, I do have a PDF file as a booklet with pictures which goes into much more detail. It's 2Mb, but if you want a copy send me a private message with your email address.
Last edited by chastuck on Tue Oct 10, 2017 1:23 pm; edited 1 time in total
|
|
| Back to top |
|
 |
kal
Forum Administrator
Joined: 12 Dec 2010
Posts: 11120
Location: Ottawa, Canada
Drinking: Pub Ale, Electric Creamsicle, Mild, Pliny the Younger, Belgian Dark Strong, Weizen, Russian Imperial Stout, Black Butte Porter
|
|
| Back to top |
|
|
Roadie
Joined: 13 Oct 2013
Posts: 127
Location: Charleston, SC
|
| Link Posted: Fri Jul 11, 2014 8:48 pm Post subject: |
|
|
|
Very nice!
|
|
| Back to top |
|
|
Castermmt
Joined: 03 Jan 2011
Posts: 863
Location: Lowell, In
Drinking: Steelhead Porter, Alt-Toids, Hefty-Weizen, Terry's Kolsch, African Amber, Pumpkin Ale, Double Dog Ale
Working on: Janet's Brown Ale, Terry's Kolsch, Pilsner
|
| Link Posted: Fri Jul 11, 2014 10:35 pm Post subject: |
|
|
Sweet! The lumber you used looks very straight and square, the stuff we get here in the USA is not nearly as nice. Great looking build. Early 60's means you should get at least that out of your build. Nice job! 
_________________
http://www.theelectricbrewery.com/forum/viewtopic.php?t=24836
|
|
| Back to top |
|
|
chastuck
Joined: 06 Oct 2013
Posts: 193
Location: Beckenham, Kent, UK
Drinking: Bitter
Working on: IPA
|
| Link Posted: Sat Jul 12, 2014 8:34 pm Post subject: |
|
|
| Castermmt wrote: | | Sweet! The lumber you used looks very straight and square, the stuff we get here in the USA is not nearly as nice. Great looking build. Early 60's means you should get at least that out of your build. Nice job! |
Thanks for that. I'm afraid the timber wasn't as straight as the finished look suggests! Some pieces took a fair amount of planing and sanding to get true.
|
|
| Back to top |
|
|
Crouch
Joined: 03 Jul 2014
Posts: 12
Location: Melbourne, Australia
|
| Link Posted: Wed Jul 16, 2014 3:30 am Post subject: |
|
|
|
I LOVE that bench ... something about timber that just fits nicely into a brewery. It's much better then the stainless bench we just put in.
|
|
| Back to top |
|
|
Crazy Brewer
Joined: 12 Feb 2014
Posts: 60
Location: Houston area, Texas
|
| Link Posted: Sun Aug 03, 2014 9:34 am Post subject: |
|
|
Sweet set-up! I really like the wood too. Enjoy the brewing!
Cheers,
Tony
|
|
| Back to top |
|
|
therealdairylea
Joined: 14 Oct 2014
Posts: 5
|
| Link Posted: Tue Oct 14, 2014 8:52 am Post subject: |
|
|
|
Wow looks amazing! Would love to see how you built it from start to finish!
|
|
| Back to top |
|
|
guzzi23
Joined: 17 Dec 2014
Posts: 2
Location: Stüsslingen, Switzerland
|
| Link Posted: Mon Dec 22, 2014 8:58 am Post subject: What kind of heating elements did you use? |
|
|
Hi,
I am in the process of building my own small clone. What type of heating elements did you use in your HLT/Boil kettle and HERMS pot?
Thanks,
Oliver
|
|
| Back to top |
|
|
chastuck
Joined: 06 Oct 2013
Posts: 193
Location: Beckenham, Kent, UK
Drinking: Bitter
Working on: IPA
|
| Link Posted: Mon Dec 22, 2014 11:52 am Post subject: Re: What kind of heating elements did you use? |
|
|
| guzzi23 wrote: | Hi,
I am in the process of building my own small clone. What type of heating elements did you use in your HLT/Boil kettle and HERMS pot?
Thanks,
Oliver |
I bought two stainless steel 5500 Watt 240V single phase Heating Element 14" element length from Brewmation. Weblink: brewmation.com/Heating_Elements.html. I was going to use the Camco elements as per the Electric Brewery build, but after reading about the rust problems with them on this forum, I went for the Brewmation ones. They are cost more, but they are superb and much better than the Camco ones.
|
|
| Back to top |
|
|
guzzi23
Joined: 17 Dec 2014
Posts: 2
Location: Stüsslingen, Switzerland
|
| Link Posted: Mon Dec 22, 2014 12:25 pm Post subject: Re: What kind of heating elements did you use? |
|
|
| chastuck wrote: | | guzzi23 wrote: | Hi,
I am in the process of building my own small clone. What type of heating elements did you use in your HLT/Boil kettle and HERMS pot?
Thanks,
Oliver |
I bought two stainless steel 5500 Watt 240V single phase Heating Element 14" element length from Brewmation. Weblink: brewmation.com/Heating_Elements.html. I was going to use the Camco elements as per the Electric Brewery build, but after reading about the rust problems with them on this forum, I went for the Brewmation ones. They are cost more, but they are superb and much better than the Camco ones. |
Thanks for the link. What type of fuse are you using in the UK then? Must be higher than the 10/16A we have in Switzerland.
|
|
| Back to top |
|
|
chastuck
Joined: 06 Oct 2013
Posts: 193
Location: Beckenham, Kent, UK
Drinking: Bitter
Working on: IPA
|
| Link Posted: Mon Dec 22, 2014 12:35 pm Post subject: Re: What kind of heating elements did you use? |
|
|
| guzzi23 wrote: | | chastuck wrote: | | guzzi23 wrote: | Hi,
I am in the process of building my own small clone. What type of heating elements did you use in your HLT/Boil kettle and HERMS pot?
Thanks,
Oliver |
I bought two stainless steel 5500 Watt 240V single phase Heating Element 14" element length from Brewmation. Weblink: brewmation.com/Heating_Elements.html. I was going to use the Camco elements as per the Electric Brewery build, but after reading about the rust problems with them on this forum, I went for the Brewmation ones. They are cost more, but they are superb and much better than the Camco ones. |
Thanks for the link. What type of fuse are you using in the UK then? Must be higher than the 10/16A we have in Switzerland. |
I have a dedicated 32 amp supply running from my consumer unit. It uses wire rated at 45 amps and has a 32 amp fuse.
|
|
| Back to top |
|
|
fessafoyce
Joined: 01 Mar 2015
Posts: 1
|
| Link Posted: Tue Mar 03, 2015 6:01 am Post subject: Re: What kind of heating elements did you use? |
|
|
| chastuck wrote: | | guzzi23 wrote: | | chastuck wrote: | | guzzi23 wrote: | Hi,
I am in the process of building my own small clone. What type of heating elements did you use in your HLT/Boil kettle and HERMS pot?
Thanks,
Oliver |
I bought two stainless steel 5500 Watt 240V single phase Heating Element 14" element length from Brewmation. Weblink: brewmation.com/Heating_Elements.html. I was going to use the Camco elements as per the Electric Brewery build, but after reading about the rust problems with them on this forum, I went for the Brewmation ones. They are cost more, but they are superb and much better than the Camco ones. |
Thanks for the link. What type of fuse are you using in the UK then? Must be higher than the 10/16A we have in Switzerland. |
I have a dedicated 32 amp supply running from my consumer unit. It uses wire rated at 45 amps and has a 32 amp fuse. |
Looks great. Thanks for sharing. I'm very interested in the HERMS pot.
|
|
| Back to top |
|
|
joe89
Joined: 27 Feb 2015
Posts: 17
Location: Yorkshire, UK
|
| Link Posted: Thu Mar 05, 2015 8:00 pm Post subject: |
|
|
|
That looks like a really nice setup. What is your reasoning for having a dedicated pot for heat exchange? Is this for quicker ramp up speeds when doing step mashes? I'm currently in the process of building my herms system, well just buying all the parts at the moment but can't wait to get started with the build. Also from the UK as well and we are not as spoilt as those guys from over the pond when it comes to all the nice gear they can buy.
|
|
| Back to top |
|
|
chastuck
Joined: 06 Oct 2013
Posts: 193
Location: Beckenham, Kent, UK
Drinking: Bitter
Working on: IPA
|
| Link Posted: Thu Mar 05, 2015 9:42 pm Post subject: |
|
|
| joe89 wrote: | | That looks like a really nice setup. What is your reasoning for having a dedicated pot for heat exchange? Is this for quicker ramp up speeds when doing step mashes? I'm currently in the process of building my herms system, well just buying all the parts at the moment but can't wait to get started with the build. Also from the UK as well and we are not as spoilt as those guys from over the pond when it comes to all the nice gear they can buy. |
You are spot on with your guess for my reasoning. The smaller 10L pot is also very handy for heating up very quickly small batches of water for sterilising and washing.
|
|
| Back to top |
|
|
joe89
Joined: 27 Feb 2015
Posts: 17
Location: Yorkshire, UK
|
| Link Posted: Fri Mar 06, 2015 5:28 am Post subject: |
|
|
Thanks Charles.
The pdf came through. Looks great, looking forward to reading through it. Thanks for this information it's greatly appreciated
Joe
|
|
| Back to top |
|
|
Rex071
Joined: 21 Jun 2015
Posts: 1
|
| Link Posted: Sun Jun 21, 2015 1:23 pm Post subject: |
|
|
Hi,
This is the most beautiful HERMS in homemade I've seen so far. Congratulations.
|
|
| Back to top |
|
|
simonk68
Joined: 08 Oct 2015
Posts: 1
Location: Hull
|
| Link Posted: Thu Oct 08, 2015 1:28 pm Post subject: Re: My UK Electric Brewery Build |
|
|
| chastuck wrote: | Being in my early sixties and now retired, I decided to build my definitive brewery which will probably be the last one I build. I determined quite early on that this would be the best one I have ever made, picking up from my experience of building stainless steel pots over the last five years and my home brewing of around 40 years, plus all the knowledge picked up from the Forum. I have tried to follow best practice and learn from my past attempts at working with German made Bergland stainless steel catering pots. In this regard, I have decided to follow the build of The Electric Brewery as best I can, bearing in mind their successful clones all around the world. I have changed their overall plan to cater for my own brewing preferences. For instance, this means incorporating a separate HERMS setup rather than a combined HERMS/HLT coil and not buying Blichman BoilerMaker pots, which are incredibly expensive in the UK. The pots I bought were high-end stainless steel 100L pots made to the same gauge as Boilermakers, to which I added my own taps and elements. Without going through all the details and heartache involved in building my electric brewery, here's a picture of the finished results.
From left to right we have the 100L boil kettle, the 80L mash tun, the 10L HERMS pot, the 100L hot liquor tank (this also has an internal 1/2 inch x 50ft herms coil should I need to use it).
On the bottom shelf are shown the CFC and the wort and water pumps.
I have not shown the control panel, since I bought a standard kit from Spike Innovations for 240V use. But what I did do was to build into the panel an extra PID and relay for an auxiliary output, mainly for the separate HERMS pot. I also added additional output control lines to control a breakout box to run extra elements in both the boil kettle and HLT.
If anyone is really interested in the detail of my build, I do have a PDF file as a booklet with pictures which goes into much more detail. It's 2Mb, but if you want a copy send me a private message with your email address. |
Fantastic looking build, just the sort of thing I am looking at building. I will PM u for plans.
|
|
| Back to top |
|
|
thomag
Joined: 13 Oct 2015
Posts: 1
Location: Liverpool
|
| Link Posted: Wed Oct 14, 2015 4:41 pm Post subject: |
|
|
Fantastic setup. Truely inspirational.
I will aspire to create something similar in the next year or so. Will PM you for the documentation.
|
|
| Back to top |
|
|
Minkey
Joined: 05 Mar 2015
Posts: 2
Location: Crediton, Devon. UK
|
| Link Posted: Thu Oct 29, 2015 4:51 pm Post subject: Wonderful engineering |
|
|
A quick public message to thank Charles for the 'paperwork' on this build.
I've been lurking on this and other HB forums for a while, having got in to all grain brewing around 10 years ago.
Finally the time has come to upgrade from the dodgy plastic buckets. I've looked at many, many self-build systems, but what Charles has achieved here has to be very close to a work of engineering art.
Now it's my turn to follow in his highly detailed footsteps.
Thanks again,
Mike
|
|
| Back to top |
|
|
|
|


