
|
|
|

|
 |
|
|
| View previous topic :: View next topic |
| Author |
Message |
foomench

Joined: 21 Feb 2012
Posts: 704
Location: Longmont, CO
Drinking: Pinot barrel aged quad
Working on: Flanders oude bruin in barrel, Flanders red fermenting to refill the barrel

|
 Link Posted: Thu Sep 20, 2012 5:09 pm Post subject: Eric's basement brewery/cooler/etc. build Link Posted: Thu Sep 20, 2012 5:09 pm Post subject: Eric's basement brewery/cooler/etc. build |
 |
|
This is nowhere near as expansive or exciting at Kal's project, but I'm glad to be moving forward with it. Our basement is much smaller, and fitting things in was a challenge, so we hired an architect. He got us past our problems by expanding part of the space past a beam and two steel support poles that we had kind of considered as a hard wall boundary. This allows us to move some things (e.g. water heater) out of the crowded side so thing there have more space. Since a picture is worth a thousand words:

The brewing area is in the top-right corner, more the size of Kal's 1.0 brewery. The top of that space has a stainless steel sink as part of a large stainless table. I already own this, purchased off of Craiglist. I plan to put some stainless rack shelves above and below the sink for equipment storage. The brew stand is on the opposite wall. Conveniently the wet wall of the bathroom is there, so I'm going to have a water supply for the brewstand too. (I'm wondering exactly how to do this, but that will be a different thread.) I have a 36" hood to go over the stand that I bought from Home Depot. It is rated at 400 or 450 cfm, so I'm pretty sure the capacity will be enough, but I'm a little concerned about the size, as it won't cover all three vessels on the stand. For now I plan on covering the BK and HLT, but I could swap the HLT and mash tun if the mash releases more vapor. The hood will vent right out the wall.
Left of the brewery and utility room is a walk in cooler. The far left side is the beer side, and where the cooling unit will be. I already have a wine cellar chiller, and will be modifying it to go colder. Taps will be out through the left wall of the cooler. The cooler will be divided by a restaurant style walk-in cooler plastic curtain, separating the beer side from the cellar side. The beer side will be kept 40-45 degrees, the cellar side at 55 degrees. A fan between the two will pump out air from the beer side to the cellar side as necessary. I'm looking at controller options to do this now, and might use a WebControl.
Meeting with builders now and trying to narrow down some of the many options.
_________________
Brewery equipment photos (et al) here: https://picasaweb.google.com/114861423235799103704
|
|
| Back to top |
|
 |
sincere01
Joined: 16 Jun 2012
Posts: 162
Location: Gresham OR
|
| Link Posted: Thu Sep 20, 2012 5:25 pm Post subject: |
|
|
|
Awesome, can't wait to see pics of the progress.....
|
|
| Back to top |
|
|
Prime
Joined: 22 Nov 2011
Posts: 39
|
| Link Posted: Thu Sep 20, 2012 6:53 pm Post subject: |
|
|
|
Very nice. Looking forward to seeing this project!
|
|
| Back to top |
|
|
kal
Forum Administrator
Joined: 12 Dec 2010
Posts: 11123
Location: Ottawa, Canada
Drinking: Pub Ale, Electric Creamsicle, Mild, Pliny the Younger, Belgian Dark Strong, Weizen, Russian Imperial Stout, Black Butte Porter
|
| Link Posted: Thu Sep 20, 2012 6:56 pm Post subject: Re: Eric's basement brewery/cooler/etc. build |
|
|
Very exciting! Please do post a lot of pictures if you can. I love to see these sorts of builds progress.
| foomench wrote: | | I have a 36" hood to go over the stand that I bought from Home Depot. It is rated at 400 or 450 cfm, so I'm pretty sure the capacity will be enough, but I'm a little concerned about the size, as it won't cover all three vessels on the stand. For now I plan on covering the BK and HLT, but I could swap the HLT and mash tun if the mash releases more vapor. |
I think it will be ok. You really don't need something over the HLT and MLT since they're covered most of the time. It's the uncovered vigorous boil that goes on for 60-90 minutes really needs to be properly vented. With the fan running on low speed, any steam or vapour that escapes from the MLT or HLT will be picked up just fine eventually.
How are you going to do the make-up air for the brewery room when you're running in the fan? I'd recommend some way of being able to seal off the room and have a make-up air vent so that when you do run the fan to exhaust, the air coming in to replace the evacuated air is air from the outside instead of heated or cooled air in the house.
| Quote: | | Left of the brewery and utility room is a walk in cooler. |
Great idea. This is one thing I tried to fit in but simply could not. Instead I left the brewery room big enough so that I could always fit an extra fridge in there if required. Not as nice as a real walk-in room however.
Best of luck!
Kal
_________________
Our new shop with over 150 new products: shop.TheElectricBrewery.com
We ship worldwide and support our products and customers for life.
Purchasing through our affiliate links helps support our site at no extra cost to you. We thank you!
My basement/bar/brewery build 2.0
|
|
| Back to top |
|
|
foomench
Joined: 21 Feb 2012
Posts: 704
Location: Longmont, CO
Drinking: Pinot barrel aged quad
Working on: Flanders oude bruin in barrel, Flanders red fermenting to refill the barrel
|
| Link Posted: Thu Sep 20, 2012 8:53 pm Post subject: Re: Eric's basement brewery/cooler/etc. build |
|
|
| kal wrote: | | How are you going to do the make-up air for the brewery room when you're running in the fan? I'd recommend some way of being able to seal off the room and have a make-up air vent so that when you do run the fan to exhaust, the air coming in to replace the evacuated air is air from the outside instead of heated or cooled air in the house. |
Thanks for the wishes. We will run a make-up air line, and I figured I would show the builder the picture of the cover you have in your thread Kal. Easiest would be to run in through the ceiling parallel to the exhaust line, but obviously it needs to terminate somewhere else. If co-located next to the exhaust line, it would terminate to the left end of the brew stand. But I'm not sure if that is really enough separation, so we could run a make up line on the other side of the room. I'm presuming a ceiling termination is fine. If that isn't, we could run something on the sink side of the room and down the wall somewhat. There already is a dryer exhaust on that side ("(E) DR.V."), so something else to run parallel to. But the dryer exhaust is only 4 or 6", and I was thinking an 8" line through the ceiling.
_________________
Brewery equipment photos (et al) here: https://picasaweb.google.com/114861423235799103704
|
|
| Back to top |
|
|
perogi
Joined: 12 Feb 2012
Posts: 850
Location: NH
Drinking: Perogi Pale, NEIPA, Nutter's Crossing Nut Brown Ale, Edmund Fitzgerald Porter Clone
Working on: Max's Maibock
|
| Link Posted: Thu Sep 20, 2012 8:58 pm Post subject: |
|
|
Definitely looking forward to pics - lots of pics!!
EDIT: Do you happen to live in an American Foursquare??
|
|
| Back to top |
|
|
foomench
Joined: 21 Feb 2012
Posts: 704
Location: Longmont, CO
Drinking: Pinot barrel aged quad
Working on: Flanders oude bruin in barrel, Flanders red fermenting to refill the barrel
|
| Link Posted: Thu Sep 20, 2012 11:08 pm Post subject: |
|
|
| perogi wrote: | Definitely looking forward to pics - lots of pics!!
EDIT: Do you happen to live in an American Foursquare?? |
The upstairs is a bit more interesting than the basement outline would suggest, with a two story open area and the second story extends out over the garage. But it is a cookie-cutter USHome (now Lennar).
_________________
Brewery equipment photos (et al) here: https://picasaweb.google.com/114861423235799103704
|
|
| Back to top |
|
|
perogi
Joined: 12 Feb 2012
Posts: 850
Location: NH
Drinking: Perogi Pale, NEIPA, Nutter's Crossing Nut Brown Ale, Edmund Fitzgerald Porter Clone
Working on: Max's Maibock
|
| Link Posted: Thu Sep 20, 2012 11:19 pm Post subject: |
|
|
|
Ahh okay - I live in one and the footprint of the house is 30'x30'. Pretty much looks like a cube with a hip roof. The basement set up reminded me of our basement (minus all of the junk I have down there...).
|
|
| Back to top |
|
|
VaWineSnob
Joined: 14 Jun 2011
Posts: 89
|
| Link Posted: Fri Sep 21, 2012 1:57 pm Post subject: |
|
|
Love the hand drawn floor plan.
I assume the sump at the bottom of the stair is completely contained under the floor somehow (power, discharge hose/pipes)?
|
|
| Back to top |
|
|
foomench
Joined: 21 Feb 2012
Posts: 704
Location: Longmont, CO
Drinking: Pinot barrel aged quad
Working on: Flanders oude bruin in barrel, Flanders red fermenting to refill the barrel
|
| Link Posted: Fri Sep 21, 2012 3:39 pm Post subject: |
|
|
| VaWineSnob wrote: | Love the hand drawn floor plan.
I assume the sump at the bottom of the stair is completely contained under the floor somehow (power, discharge hose/pipes)? |
They put a sump in all the houses in the neighborhood, but ours has been dry for 12+ years now. There is no pump. Some of our neighbors on the other side of the street, and closer to a drainage basin, have sumps pumps that run when there is a heavy rain.
Talking to the architect and builders, we'll make sure to run an electric circuit down there, and maintain some sort of access. We'll probably run a discharge line as well. So if we need to install a pump some day, we can. Right now, there is a platform at the bottom of the stairs at the height of the last step that covers the entire area. We'll probably keep that or something like it and put in a trap-door.
_________________
Brewery equipment photos (et al) here: https://picasaweb.google.com/114861423235799103704
|
|
| Back to top |
|
|
foomench
Joined: 21 Feb 2012
Posts: 704
Location: Longmont, CO
Drinking: Pinot barrel aged quad
Working on: Flanders oude bruin in barrel, Flanders red fermenting to refill the barrel
|
| Link Posted: Fri Apr 26, 2013 5:58 pm Post subject: |
|
|
I've been away from the forum for a good while. In my defense, the biggest reason I haven't had time to check in is because we've been very busy working on finishing our basement, meeting with more contractors, picking one ... And now even though we are paying someone to do it, it seems like a near full time job to me. Part of that is because we are doing some of the work ourselves to save money, and part because we are particular and need to pick out all the details ourselves. I've run a full 1000' of Cat-6 all throughout the house (for internet and HDMI), and am just about done putting all the connectors on. We ordered a bathroom vanity this week, and met with multiple cabinet builders for a custom cabinet to go in the bar area. I'm going to finish testing all the low voltage wiring this weekend, and I think we will be picking out paints for painting next weekend if all goes well next week.

Here's the basement before any framing except the boards on the floor. This picture was taken from near the bottom of the stairs, in the top-left corner of the floorplan.
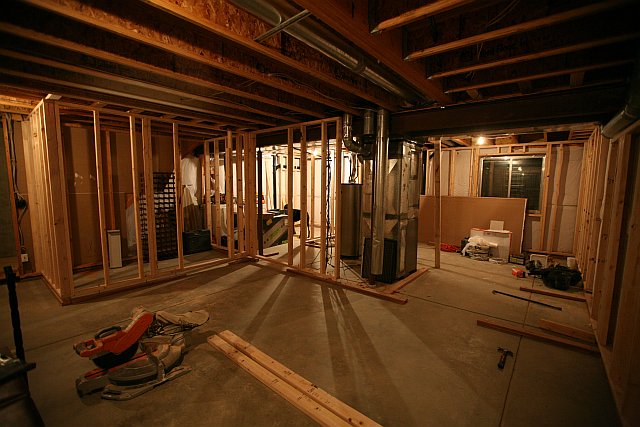
Here the basement is about half framed. You are looking from the bottom-left corner of the floorplan, with the walk-in cooler to the left, the bedroom to the right. Furthest away in the picture is the brewing area.

This is the brewing area. The plastic to the right is to contain the dust when cutting up the cement for plumbing drains. In the brewing area you can see where they cut the cement for the floor drain. On the far wall is the 240V outlet box. Brewstand will be on the right wall (the one covered in plastic). Sink will be on the left wall. If I mount a panel on the wall, it will be above where the 240V outlet is.
I'll try to take more photos this weekend. The place is a little cleaner at the moment for rough-in inspection on Monday. Since the above photos were taken the electrical, framing, HVAC, and plumbing rough-in work has all been done.
Now I'm trying to figure out:
- How do I insulate the walk-in cooler? Most wine cellars insulate the walls with fiberglass and then put greenboard sheetrock on top of that. But since I'm going colder, I'm thinking about an R-max type board (foil on top of insulation) and FRP.
- How do I control the temperature in the two-stage walk-in cooler? I plan on a 45 degree side and a 55 degree side with a fan in between the two, so I need to control the chilling unit and the fan, and possibly something for humidity control. My leading contender at the moment is the WebControl, but I'm considering other options like Arduino, possible Raspberry Pi ...
- Do I need to put something on the brewery wall behind the boil kettle? A metal backsplash looks nice, but can I get away with just painted sheetrock since I'm going all electric?
There are more questions for sure, but these are the ones I'm busy thinking about now, with the cooler insulation and brewery wall being the most pressing. The cooler control is important, but that I can pretty well do when the basement is finished.
_________________
Brewery equipment photos (et al) here: https://picasaweb.google.com/114861423235799103704
|
|
| Back to top |
|
|
kal
Forum Administrator
Joined: 12 Dec 2010
Posts: 11123
Location: Ottawa, Canada
Drinking: Pub Ale, Electric Creamsicle, Mild, Pliny the Younger, Belgian Dark Strong, Weizen, Russian Imperial Stout, Black Butte Porter
|
| Link Posted: Fri Apr 26, 2013 7:47 pm Post subject: |
|
|
Wow! Looks like it's coming along well. Thanks for sharing the pics!
I can't help you with your first two questions, but:
| Quote: | | Do I need to put something on the brewery wall behind the boil kettle? A metal backsplash looks nice, but can I get away with just painted sheetrock since I'm going all electric? |
Just regular sheetrock is fine. Just make sure to paint it with something that lets you wipe it down. The same paint finish used in bathrooms and kitchens. I would just make sure to not have a pot side completely up against the wall. With many the handles will not allow you to do this anyway, such as the Blichmanns like I use:
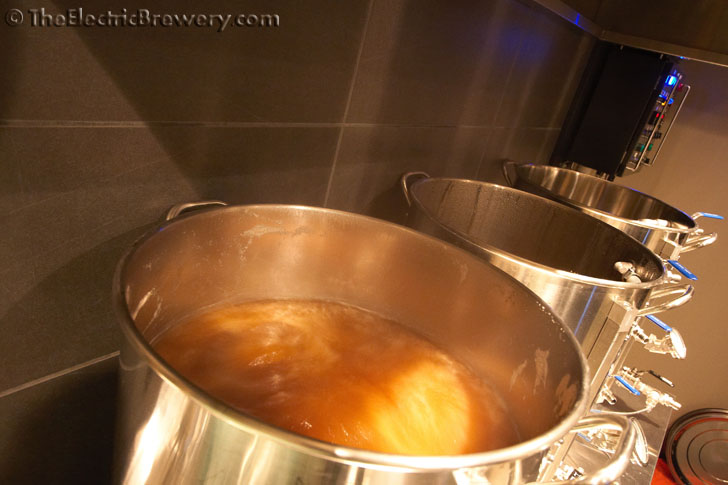
It's really no different than how you use a kitchen stove. That stove is meant to be pushed up against the wall (which doesn't have to have a tile or fancy backplash). You could have the elements with a pot on it, only a few inches away. Like so:

This example picture and my brewing setup does have a tile backsplash but it's purely decorative.
If you want, you can use green board (moisture resistant) drywall instead of the regular stuff in the brewery but I really don't think it's required (I didn't use it) since a well designed brewery with adequate ventilation should not get anywhere as steamy as a bathroom. (Bathrooms require green board, kitchens do not).
| foomench wrote: | | And now even though we are paying someone to do it, it seems like a near full time job to me. |
Yep. You're giving me flashbacks / nightmares to my basement reno... 
Kal
_________________
Our new shop with over 150 new products: shop.TheElectricBrewery.com
We ship worldwide and support our products and customers for life.
Purchasing through our affiliate links helps support our site at no extra cost to you. We thank you!
My basement/bar/brewery build 2.0
|
|
| Back to top |
|
|
perogi
Joined: 12 Feb 2012
Posts: 850
Location: NH
Drinking: Perogi Pale, NEIPA, Nutter's Crossing Nut Brown Ale, Edmund Fitzgerald Porter Clone
Working on: Max's Maibock
|
| Link Posted: Sat Apr 27, 2013 12:28 pm Post subject: |
|
|
Grats foomench! please keep us jealous with more pics as it progresses 
|
|
| Back to top |
|
|
foomench
Joined: 21 Feb 2012
Posts: 704
Location: Longmont, CO
Drinking: Pinot barrel aged quad
Working on: Flanders oude bruin in barrel, Flanders red fermenting to refill the barrel
|
| Link Posted: Mon Apr 29, 2013 5:13 pm Post subject: |
|
|

Cooling unit framed out and test-fit installed.

Exhaust line out for hood, 8" diameter, one 90 degree bend, and then about three feet to the exterior. The make-up air in line is just 4", but I figure there are other sources as well. I wonder if I should have gone bigger. Also shown on the wall there on the right is the plumbing for a "pot-filler" faucet for the brew stand. I initially decided I didn't want a jointed pot-filler faucet because I want to be able to spray down the sides of the brewing vessels. I purchased a pot-filler hose and faucet assembly, but I think I'm going to return the hose and valve part. The problem is I want the faucet to serve two purposes:
a) Fill brewing vessels with (cold) filtered water
b) Rinse brewing vessels with hot water
and with the pot-filler hose I don't have an easy way to do both. So I'm going to put a quick-disconnect on the faucet. When I want to fill, hook up the carbon-filter and hose. When I want to rinse, hook up a hose with sprayer.
_________________
Brewery equipment photos (et al) here: https://picasaweb.google.com/114861423235799103704
|
|
| Back to top |
|
|
foomench
Joined: 21 Feb 2012
Posts: 704
Location: Longmont, CO
Drinking: Pinot barrel aged quad
Working on: Flanders oude bruin in barrel, Flanders red fermenting to refill the barrel
|
| Link Posted: Thu May 02, 2013 9:22 pm Post subject: |
|
|
The brewery appeared to shrink significantly today with drywall. I'm hoping white or light colored paint will bring it back a little.

_________________
Brewery equipment photos (et al) here: https://picasaweb.google.com/114861423235799103704
|
|
| Back to top |
|
|
Ben58
Joined: 14 Aug 2011
Posts: 409
Location: Hamilton, Ontario
|
| Link Posted: Fri May 03, 2013 11:11 am Post subject: |
|
|
|
Nice space! When you do paint, your space appearance should come back and definitely us a kitchen and bath type paint as Kal recommended. As for you cooler, have you checked with any contractor for spray foam insulation? Benefits include stops air and moisture infiltration, saves on energy costs, adds strength to the building structure, it is permanent and will not sag, keeps dust and pollen out, and reduces capacity requirements, maintenance and wear of HVAC equipment.
|
|
| Back to top |
|
|
foomench
Joined: 21 Feb 2012
Posts: 704
Location: Longmont, CO
Drinking: Pinot barrel aged quad
Working on: Flanders oude bruin in barrel, Flanders red fermenting to refill the barrel
|
| Link Posted: Fri May 03, 2013 5:30 pm Post subject: |
|
|
| Ben58 wrote: | | Nice space! When you do paint, your space appearance should come back and definitely us a kitchen and bath type paint as Kal recommended. As for you cooler, have you checked with any contractor for spray foam insulation? Benefits include stops air and moisture infiltration, saves on energy costs, adds strength to the building structure, it is permanent and will not sag, keeps dust and pollen out, and reduces capacity requirements, maintenance and wear of HVAC equipment. |
Mud today, hopefully painting on Sunday, but I'm not holding my breath.
We considered spray foam, but it was cost prohibitive for the entire basement. Also, while it is wonderful, for our basement we are insulating the walls and leaving the existing insulation that was already on the cement walls, so we are double covered there. I also considered just using spray foam for the cooler, and may still try that, but in general the contractors don't want to come out for such a small piece like that. My current plan for the cooler walls, outside to inside:
- greenboard (actually blue) 1/2" drywall
- 2x4 framed filled with fiberglass insulation battes
- 1" R-max board (polyisocyanurate foam sandwiched in foil)
- TBD, possibly greenboard again, maybe FRP, maybe outdoor grade OSB ...
_________________
Brewery equipment photos (et al) here: https://picasaweb.google.com/114861423235799103704
|
|
| Back to top |
|
|
foomench
Joined: 21 Feb 2012
Posts: 704
Location: Longmont, CO
Drinking: Pinot barrel aged quad
Working on: Flanders oude bruin in barrel, Flanders red fermenting to refill the barrel
|
| Link Posted: Thu Jun 06, 2013 11:26 pm Post subject: |
|
|
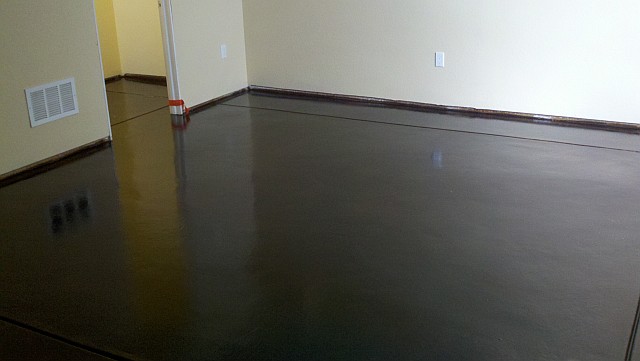
Walls have been drywalled, textured, and painted. Most electrical done, some doors, not much plumbing. We stained the concrete floor but had a major setback this week when the contractor failed to get the polyaspartic coating on the floor quick enough. We're not sure if it was a bad batch of coating, or improper application, but the result is a thick hazy floor in half of a room. Anyway, to be a little more positive, here are some pictures of progress, first the brewing area, then the cooler:


_________________
Brewery equipment photos (et al) here: https://picasaweb.google.com/114861423235799103704
|
|
| Back to top |
|
|
wubears71
Joined: 14 Mar 2012
Posts: 278
Location: Webster Groves, MO
Drinking: Keg 1- Hefenweizen, Keg 2- Vanilla Scotch Porter, Keg 3-Munich Helles
Working on: Stinky IPA
|
| Link Posted: Fri Jun 07, 2013 1:24 am Post subject: |
|
|
It's looking really sweet. That coating can be hard to work with especially if its too warm.
_________________
I am 275 lbs of chiseled half fat and half muscle.
|
|
| Back to top |
|
|
foomench
Joined: 21 Feb 2012
Posts: 704
Location: Longmont, CO
Drinking: Pinot barrel aged quad
Working on: Flanders oude bruin in barrel, Flanders red fermenting to refill the barrel
|
| Link Posted: Tue Jun 18, 2013 10:40 pm Post subject: |
|
|
New specialist flooring contractor hired to fix that part. We scraped the bad poly off the floor in one room (bedroom). He ground down the bad topcoat cement in the brewery-laundry-bathroom-hallway and poured a new topcoat. He cleaned and put down first stain color on the new topcoat and scraped up bedroom. I cleaned and put down second stain color. He cleaned and put down the first polyaspartic yesterday, and is putting down the second coat of that today. These pictures are after the first coat of poly.
Brewing area:

Main room:
_________________
Brewery equipment photos (et al) here: https://picasaweb.google.com/114861423235799103704
|
|
| Back to top |
|
|
|
|
|
|
|
|
You cannot post new topics in this forum
You cannot reply to topics in this forum
You cannot edit your posts in this forum
You cannot delete your posts in this forum
You cannot vote in polls in this forum
You cannot attach files in this forum
You can download files in this forum
|
Forum powered by phpBB © phpBB Group
|
|


