
|
|
|

|
 |
|
|
| View previous topic :: View next topic |
| Author |
Message |
Crazy Brewer

Joined: 12 Feb 2014
Posts: 60
Location: Houston area, Texas

|
 Link Posted: Fri Aug 01, 2014 11:29 am Post subject: Link Posted: Fri Aug 01, 2014 11:29 am Post subject: |
 |
|
Nice! Very nice! You might try heating your screens with a hair dryer or heat gun before starting your boil so they don't cool and condense the steam generated during the boil.
_________________
"What your mind can conceive and believe it can achieve". Napoleon Hill
|
|
| Back to top |
|
 |
foomench
Joined: 21 Feb 2012
Posts: 704
Location: Longmont, CO
Drinking: Pinot barrel aged quad
Working on: Flanders oude bruin in barrel, Flanders red fermenting to refill the barrel
|
| Link Posted: Fri Aug 01, 2014 4:06 pm Post subject: |
|
|
Thanks for the comments and advice crazy brewer. I'll do some experimenting again before a real brew.
BTW, where in Texas are you? I spent many of my younger years in San Antonio.
_________________
Brewery equipment photos (et al) here: https://picasaweb.google.com/114861423235799103704
|
|
| Back to top |
|
|
Crazy Brewer
Joined: 12 Feb 2014
Posts: 60
Location: Houston area, Texas
|
| Link Posted: Sat Aug 02, 2014 7:37 am Post subject: |
|
|
| foomench wrote: | | BTW, where in Texas are you? I spent many of my younger years in San Antonio. |
I am in Houston but on my way to Conroe. San Antonio Riverwalk is a great escape for a weekend.
Good luck with the new system. It is awesome, for sure!
Tony
|
|
| Back to top |
|
|
foomench
Joined: 21 Feb 2012
Posts: 704
Location: Longmont, CO
Drinking: Pinot barrel aged quad
Working on: Flanders oude bruin in barrel, Flanders red fermenting to refill the barrel
|
| Link Posted: Mon Aug 25, 2014 10:05 pm Post subject: |
|
|
I brewed my first beer this weekend, and ran the fan on high during the boil. I saw some condensation on the screens, but didn't ever see any drips. It was just a 6 gallon batch, so that might have helped as well.
BTW, the hood has a squirrel cage blower, not a fan. I noticed/verified that since the last test when I pulled the screens out looking at them.
_________________
Brewery equipment photos (et al) here: https://picasaweb.google.com/114861423235799103704
|
|
| Back to top |
|
|
foomench
Joined: 21 Feb 2012
Posts: 704
Location: Longmont, CO
Drinking: Pinot barrel aged quad
Working on: Flanders oude bruin in barrel, Flanders red fermenting to refill the barrel
|
| Link Posted: Mon Nov 10, 2014 5:17 pm Post subject: |
|
|
Now that I'm seriously brewing, I decided that it was time to polish up my electric BK. Plus, since Blichmann no longer sells shiny kettles, I figured it was time to set mine apart 


I still need to clean out the chimb welds and lettering a little bit.
_________________
Brewery equipment photos (et al) here: https://picasaweb.google.com/114861423235799103704
|
|
| Back to top |
|
|
Walts Malt
Joined: 27 Sep 2013
Posts: 119
Location: Farmington, MN
Drinking: Two Hearted Clone
Working on: Planning my Fall Brewing Schedule
|
| Link Posted: Mon Nov 10, 2014 6:55 pm Post subject: |
|
|
|
What did you use to polish those? Can you provide some details (tools, pads, compounds, etc.) as I'm considering doing the same when I covert to electric this winter?
|
|
| Back to top |
|
|
foomench
Joined: 21 Feb 2012
Posts: 704
Location: Longmont, CO
Drinking: Pinot barrel aged quad
Working on: Flanders oude bruin in barrel, Flanders red fermenting to refill the barrel
|
| Link Posted: Mon Nov 10, 2014 8:07 pm Post subject: |
|
|
| Walts Malt wrote: | | What did you use to polish those? Can you provide some details (tools, pads, compounds, etc.) as I'm considering doing the same when I covert to electric this winter? |
I've documented the process on a thread at the Brewing Network--search for Eric's Keg Conversion Project or some such. The short answer is that I use an angle grinder, starting with a very rough paint and scratch remover pad. I have a sander flap wheel, but I use that sparingly. Then I use medium and fine Gator Grit pads with a backer on the angle grinder. Then I use black, gray, green, and pink rouge with cotton/felt pads (also Gator Grit) on the angle grinder, cleaning the polish residue after each pass. The first time I did this, I did one pass black, one gray, and one green. Now I think the black is actually most critical, and did two passes with that this time. I think you really have to get all the scratches out with black compound. I don't know that the gray really helps. The green definitely does. It gets rid of the ghosting left from the previous polish steps. The pink rouge was something I tried new this time after some Googling suggested it. It is sold as a "no-scratch" final polish. It didn't scratch, and it did a nice job on our discolored stainless steel coffee press. But I'm not sure it really helped the keg. I have one other keg that might become my new MLT. I think I'm going to try just black and green and compare the results. I do wonder if I should use a slower speed device intended just for polishing ... Oh, and I treat with CitriSurf after all that grinding and polishing.
_________________
Brewery equipment photos (et al) here: https://picasaweb.google.com/114861423235799103704
|
|
| Back to top |
|
|
foomench
Joined: 21 Feb 2012
Posts: 704
Location: Longmont, CO
Drinking: Pinot barrel aged quad
Working on: Flanders oude bruin in barrel, Flanders red fermenting to refill the barrel
|
| Link Posted: Tue Nov 11, 2014 5:01 pm Post subject: |
|
|
Some other minor recent upgrades to the brewing area. First, the entrance area got some decor:

As I was brewing, I found the paper towels just sitting next to the sink wasn't so convenient. So I googled "Grundtal paper towel holder." Lo and behold, there is just such an item, made by Ikea ... but discontinued about eight or nine years ago. I was trying to figure out how to fabricate my own and one came up on eBay with some other accessories, so I bought it.
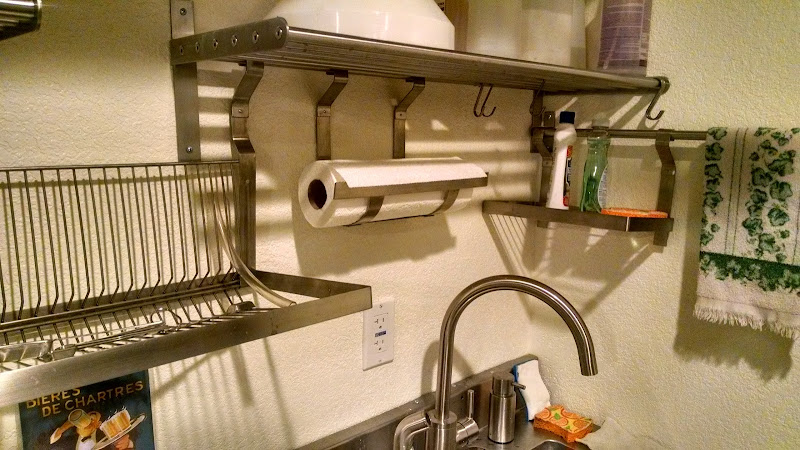
Finally, I wanted some more shelves to hold a bunch of small ingredients and what have you. Alas, the Ikea Grundtal Spice Rack, a tiered shelf, has also been discontinued. I bought three of the current individual shelves and fabricated my own stacked shelf. I might add on the third, but at the moment I like the look of two and I don't need the third.

_________________
Brewery equipment photos (et al) here: https://picasaweb.google.com/114861423235799103704
|
|
| Back to top |
|
|
bsquared
Joined: 27 Jan 2014
Posts: 9
|
| Link Posted: Sat Nov 22, 2014 3:16 am Post subject: |
|
|
Fantastic build, very inspiring for sure. We're looking into finishing our basement and the costs go up very quickly. Doing portions yourself doesn't always knock off a proportional amount from the price as some contractors want it all for themselves.
It seems like you've found some very good ones to work with that helped you out along the way, custom last-minute changes and additions, even tossed on some foil tape for you  Congrats again on the build!! Congrats again on the build!!
|
|
| Back to top |
|
|
foomench
Joined: 21 Feb 2012
Posts: 704
Location: Longmont, CO
Drinking: Pinot barrel aged quad
Working on: Flanders oude bruin in barrel, Flanders red fermenting to refill the barrel
|
| Link Posted: Mon Nov 24, 2014 5:11 pm Post subject: |
|
|
Thanks for the congrats. As for contractors, it turns out contractor #1 walked off the job somewhere around 2/3rds done (end of page one of this thread, at the time of the floor sealing). Contractor #2 saved us and I would highly recommend. We paid him and his workers time and materials. I had always planned on doing the painting, and with the contractor situation, ended up doing a bunch of other work as well. There were certainly details to work out as things took shape, but looking at the original plan on page one, there weren't really any last-minute changes or additions.
Made electric beer #3 this past weekend, and I haven't had any problems with condensation on the hood.
_________________
Brewery equipment photos (et al) here: https://picasaweb.google.com/114861423235799103704
|
|
| Back to top |
|
|
|
|
|
|
|
|
You cannot post new topics in this forum
You cannot reply to topics in this forum
You cannot edit your posts in this forum
You cannot delete your posts in this forum
You cannot vote in polls in this forum
You cannot attach files in this forum
You can download files in this forum
|
Forum powered by phpBB © phpBB Group
|
|


