| View previous topic :: View next topic |
| Author |
Message |
kal
Forum Administrator

Joined: 12 Dec 2010
Posts: 11123
Location: Ottawa, Canada
Drinking: Pub Ale, Electric Creamsicle, Mild, Pliny the Younger, Belgian Dark Strong, Weizen, Russian Imperial Stout, Black Butte Porter

|
 Link Posted: Thu Aug 11, 2011 5:31 pm Post subject: Heating Element Assemblies Link Posted: Thu Aug 11, 2011 5:31 pm Post subject: Heating Element Assemblies |
 |
|
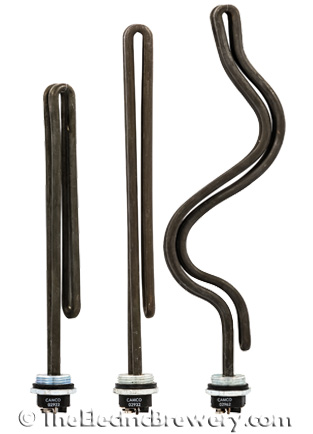
Heating Element Assemblies

We use premium stainless steel American made Camco heating elements specifically made for beer brewing. They will not rust when left in water for extended periods..
These heating element assemblies include only quality parts and feature:
1. UL listed for use in the US and Canada.
2. Ultra low watt density (ULWD) or low watt density (LWD).
3. A stainless steel base that will not rust.
4. Better sheath (tube) material made from a high performance nickel-chromium stainless steel (804) alloy with much better temperature and corrosion resistance than standard shiny 2xx/3xx stainless steel.
5. Premium SJEOOW cord protected with expandable sleeving.
6. Tough industrial grade nylon locking plug (not cheap molded rubber).
ULWD elements prevent the wort from being scorched or caramelized as the heat output is only 50W per square inch (7.8W per square cm) or less. ULWD also provides added safety as the element will not break instantaneously if fired "dry" (not immersed in water) by accident. Mistakes do happen so we recommend that ULWD elements be used whenever possible instead of LWD, especially when the element is in contact with wort. The high performance nickel-chromium stainless steel alloy sheath used on these elements provides additional strength to resist dry firing.
One of the most challenging parts in creating our Electric Brewery was how to attach the heating elements to the kettles in a safe and secure manner. Our heating element kits ensure that the entire kettle is electrically grounded in the same way any power tool or appliance chassis is grounded, with all wires well protected.
Our heating elements follow the same 100% weldless principles used by our Blichmann Boilermaker kettles. There are no screw-on threaded fittings that need to be welded to your kettle. When done right weldless connections are tight fitting, never leak, never require any adjustments, and are perfectly safe. For more information see our heating elements article.
For complete details visit our order page. GO »
_________________
Our new shop with over 150 new products: shop.TheElectricBrewery.com
We ship worldwide and support our products and customers for life.
Purchasing through our affiliate links helps support our site at no extra cost to you. We thank you!
My basement/bar/brewery build 2.0
Last edited by kal on Sun Dec 30, 2018 8:44 pm; edited 6 times in total
|
|
| Back to top |
|
 |
kal
Forum Administrator
Joined: 12 Dec 2010
Posts: 11123
Location: Ottawa, Canada
Drinking: Pub Ale, Electric Creamsicle, Mild, Pliny the Younger, Belgian Dark Strong, Weizen, Russian Imperial Stout, Black Butte Porter
|
| Link Posted: Tue Apr 14, 2015 2:25 am Post subject: |
|
|
Effective immediately:
All of our Heating Element Kits now ship with name brand Camco brand heating elements with a stainless base (will not rust). These are still ULWD (Ultra-Low-Watt-Density) ripple heating elements. ULWD means that they produce only 50W per square inch (7.8W per square centimeter) or less so as to not scorch or caramelize the wort. Equally important is that they are UL listed for use in US/Canada. The best part: The price remains the same!
Remember these 3 things when looking for heating elements:
1. ULWD (50W sq in / 7.8W sq cm or less)
2. UL listed for use in US/Canada
3. Stainless base (no rust)
These heating elements will also be available for order separately very soon for those looking to upgrade.
Kal
_________________
Our new shop with over 150 new products: shop.TheElectricBrewery.com
We ship worldwide and support our products and customers for life.
Purchasing through our affiliate links helps support our site at no extra cost to you. We thank you!
My basement/bar/brewery build 2.0
|
|
| Back to top |
|
|
kal
Forum Administrator
Joined: 12 Dec 2010
Posts: 11123
Location: Ottawa, Canada
Drinking: Pub Ale, Electric Creamsicle, Mild, Pliny the Younger, Belgian Dark Strong, Weizen, Russian Imperial Stout, Black Butte Porter
|
|
| Back to top |
|
|
Anticlimaddox
Joined: 05 Feb 2016
Posts: 85
Location: Harrisonburg, VA
|
| Link Posted: Sat Mar 19, 2016 10:39 pm Post subject: |
|
|
Is there any performance value in one shape of element over another? And I'm specifically referring just to shape, not brand or material, just the one's you sell. If I have the option to use either, would there be a reason to choose one over the other?
_________________
Rebuilding the brewery!
|
|
| Back to top |
|
|
kal
Forum Administrator
Joined: 12 Dec 2010
Posts: 11123
Location: Ottawa, Canada
Drinking: Pub Ale, Electric Creamsicle, Mild, Pliny the Younger, Belgian Dark Strong, Weizen, Russian Imperial Stout, Black Butte Porter
|
| Link Posted: Sun Mar 20, 2016 1:55 am Post subject: |
|
|
Use the ripple (curved) ones whenever possible as they are the lowest watt density (ULWD) because they are longer.
ULWD elements prevent the wort from being scorched or caramelized as the heat output is only 50W per square inch (7.8W per square cm) or less. ULWD also provides added safety as the element will not break instantaneously if fired "dry" (not immersed in water) by accident. Mistakes do happen so we recommend that ULWD elements be used whenever possible instead of LWD, especially when the element is in contact with wort. The high performance nickel-chromium stainless steel alloy sheath used on these elements provides additional strength to resist dry firing.
More info: http://www.theelectricbrewery.com/heating-element-kits
Good luck!
Kal
_________________
Our new shop with over 150 new products: shop.TheElectricBrewery.com
We ship worldwide and support our products and customers for life.
Purchasing through our affiliate links helps support our site at no extra cost to you. We thank you!
My basement/bar/brewery build 2.0
|
|
| Back to top |
|
|
wscottcross
Joined: 03 Jul 2015
Posts: 212
Location: CT
Drinking: Launch IPA, Double Sunshine clone, Maple Coffee breakfast stout
Working on: expanding my beer horizons (and my beltline)
|
| Link Posted: Sun Mar 20, 2016 2:54 am Post subject: |
|
|
The Camco 02932/02933 are straight elements that are advertised as ULWD also.
_________________
Kal clone controller, 30 gallon Spike Brewing kettles, 6 tap keezer
|
|
| Back to top |
|
|
kal
Forum Administrator
Joined: 12 Dec 2010
Posts: 11123
Location: Ottawa, Canada
Drinking: Pub Ale, Electric Creamsicle, Mild, Pliny the Younger, Belgian Dark Strong, Weizen, Russian Imperial Stout, Black Butte Porter
|
|
| Back to top |
|
|
kal
Forum Administrator
Joined: 12 Dec 2010
Posts: 11123
Location: Ottawa, Canada
Drinking: Pub Ale, Electric Creamsicle, Mild, Pliny the Younger, Belgian Dark Strong, Weizen, Russian Imperial Stout, Black Butte Porter
|
| Link Posted: Sat May 15, 2021 5:06 pm Post subject: |
|
|
Need Tri-Clamp heating elements?
All of our heating elements now ship with optional Tri-Clamp adapters. Please choose what size you need (1.5" or 2") on the order page and we'll include a pre-fitted adapter. This includes bare elements and heating element assemblies (both kits and pre-assembled).
Please note that we can only guarantee fit with our adapters. Tri-Clamp adapters sold by others may not fit.
Link: https://shop.theelectricbrewery.com/collections/heating-elements
Kal
_________________
Our new shop with over 150 new products: shop.TheElectricBrewery.com
We ship worldwide and support our products and customers for life.
Purchasing through our affiliate links helps support our site at no extra cost to you. We thank you!
My basement/bar/brewery build 2.0
|
|
| Back to top |
|
|
jcav

Joined: 21 Sep 2011
Posts: 205
Location: Central Florida
|
| Link Posted: Tue May 18, 2021 11:08 pm Post subject: |
|
|
That's great that you offer a tri clamp adapter also. Is it possible to post a pic of the tri clamp adapter on the heating element, so we all can see what it looks like?
John
_________________
"Perfection is unobtainable, but if you chase perfection you can catch excellence"- Vince Lombardi
|
|
| Back to top |
|
|
kal
Forum Administrator
Joined: 12 Dec 2010
Posts: 11123
Location: Ottawa, Canada
Drinking: Pub Ale, Electric Creamsicle, Mild, Pliny the Younger, Belgian Dark Strong, Weizen, Russian Imperial Stout, Black Butte Porter
|
| Link Posted: Wed May 19, 2021 12:04 pm Post subject: |
|
|
Hi! I'm waiting on some pictures. The adapter is reversible: 1.5" when installed one way versus 2" if installed the other.
Kal
_________________
Our new shop with over 150 new products: shop.TheElectricBrewery.com
We ship worldwide and support our products and customers for life.
Purchasing through our affiliate links helps support our site at no extra cost to you. We thank you!
My basement/bar/brewery build 2.0
|
|
| Back to top |
|
|
jcav
Joined: 21 Sep 2011
Posts: 205
Location: Central Florida
|
| Link Posted: Wed May 19, 2021 4:32 pm Post subject: |
|
|
Excellent, sounds like a cool solution to a not so easy problem! I have a 2 inch hole on my boil kettle.
John
_________________
"Perfection is unobtainable, but if you chase perfection you can catch excellence"- Vince Lombardi
|
|
| Back to top |
|
|
kal
Forum Administrator
Joined: 12 Dec 2010
Posts: 11123
Location: Ottawa, Canada
Drinking: Pub Ale, Electric Creamsicle, Mild, Pliny the Younger, Belgian Dark Strong, Weizen, Russian Imperial Stout, Black Butte Porter
|
| Link Posted: Wed May 19, 2021 5:04 pm Post subject: |
|
|
Err, wait a sec. You may know this but just to be 100% clear, these TC adapters turn our bare elements (and heating element assemblies/kits) into TC versions so that you can attach them to a standard 1.5" or 2" TC fitting already on your kettle like this:

You would supply the TC gasket and clamp.
Our TC adapter is not for attaching an element to a bare hole in a kettle nor does it add a TC fitting to an existing your kettle with a hole (or no hole).
If you wish to attach a heating element weldlessly to your kettle best to just follow our instructions. It'll explain how to punch a hole in the kettle, what size hole, and how to attach. Our kits come with everything you need to attach to bare kettle (minus the hole punch).
Feel free to email me pics (kal [at] TheElectricBrewery.com) of what you have if you have questions and we can go from there.
Cheers!
Kal
_________________
Our new shop with over 150 new products: shop.TheElectricBrewery.com
We ship worldwide and support our products and customers for life.
Purchasing through our affiliate links helps support our site at no extra cost to you. We thank you!
My basement/bar/brewery build 2.0
|
|
| Back to top |
|
|
jcav
Joined: 21 Sep 2011
Posts: 205
Location: Central Florida
|
| Link Posted: Wed May 19, 2021 6:12 pm Post subject: |
|
|
Sorry Kal, my mistake I wasnt clear. I do have 2 inch tri clamp ferrules welded to my boil kettle and HLT. I use 2 inch tri clamp heating elements on both. I currently use the plug type disconnect tri clamp heating element on my boil kettle and got away from the still dragon metal enclosure on the boil kettle. I was asking for a pic for a family member who may be going this route. I also would like to see a pic as I like the bigger box that you use to enclose the wires and the tri clamp version would make a nice disconnectable back up solution and I can put one on my HLT later also. Sorry for the confusion.
John
_________________
"Perfection is unobtainable, but if you chase perfection you can catch excellence"- Vince Lombardi
|
|
| Back to top |
|
|
kal
Forum Administrator
Joined: 12 Dec 2010
Posts: 11123
Location: Ottawa, Canada
Drinking: Pub Ale, Electric Creamsicle, Mild, Pliny the Younger, Belgian Dark Strong, Weizen, Russian Imperial Stout, Black Butte Porter
|
| Link Posted: Wed May 19, 2021 6:43 pm Post subject: |
|
|
| jcav wrote: | | I was asking for a pic for a family member who may be going this route. I also would like to see a pic as I like the bigger box that you use to enclose the wires and the tri clamp version would make a nice disconnectable back up solution and I can put one on my HLT later also. Sorry for the confusion. |
No worries!
they look exactly like this but with a 1.5" or 2" TC flange where the nut is against the metal box:

You just slide it through the TC hole in the kettle until the two flanges meet and then attach your TC gasket and clamp.
The flange of course sticks slightly out and away from the metal box so that you can attach that clamp.
Cheers,
Kal
_________________
Our new shop with over 150 new products: shop.TheElectricBrewery.com
We ship worldwide and support our products and customers for life.
Purchasing through our affiliate links helps support our site at no extra cost to you. We thank you!
My basement/bar/brewery build 2.0
|
|
| Back to top |
|
|
jcav
Joined: 21 Sep 2011
Posts: 205
Location: Central Florida
|
| Link Posted: Wed May 19, 2021 9:05 pm Post subject: |
|
|
That's perfect! Thanks for clearing that up!
Cheers,
John
_________________
"Perfection is unobtainable, but if you chase perfection you can catch excellence"- Vince Lombardi
|
|
| Back to top |
|
|
kal
Forum Administrator
Joined: 12 Dec 2010
Posts: 11123
Location: Ottawa, Canada
Drinking: Pub Ale, Electric Creamsicle, Mild, Pliny the Younger, Belgian Dark Strong, Weizen, Russian Imperial Stout, Black Butte Porter
|
| Link Posted: Sun May 23, 2021 7:32 pm Post subject: |
|
|
A picture of the Tri-Clamp adapter fitted on one of our bare ripple elements:

Note that the adapter is reversible. It presents a 1.5" Tri-Clamp flange when installed one way (as shown in pic) versus 2" if installed the other.
Kal
_________________
Our new shop with over 150 new products: shop.TheElectricBrewery.com
We ship worldwide and support our products and customers for life.
Purchasing through our affiliate links helps support our site at no extra cost to you. We thank you!
My basement/bar/brewery build 2.0
Last edited by kal on Sun May 23, 2021 8:56 pm; edited 1 time in total
|
|
| Back to top |
|
|
jcav
Joined: 21 Sep 2011
Posts: 205
Location: Central Florida
|
| Link Posted: Sun May 23, 2021 8:30 pm Post subject: |
|
|
That's a great way of doing this. Thanks for the pic Kal!
John
_________________
"Perfection is unobtainable, but if you chase perfection you can catch excellence"- Vince Lombardi
|
|
| Back to top |
|
|
perogi
Joined: 12 Feb 2012
Posts: 850
Location: NH
Drinking: Perogi Pale, NEIPA, Nutter's Crossing Nut Brown Ale, Edmund Fitzgerald Porter Clone
Working on: Max's Maibock
|
| Link Posted: Wed May 26, 2021 4:07 pm Post subject: |
|
|
LOVE IT!!! No more worries about the connection between the element and the plug burning and causing a fire. And you can remove it. Loving this design!
Edit: Question: if i get the preassembled triclamp version, is there any additional work that I would have to do on my side or could I immediately install it into the triclamp port on my kettle, plug it in, and go?
|
|
| Back to top |
|
|
kal
Forum Administrator
Joined: 12 Dec 2010
Posts: 11123
Location: Ottawa, Canada
Drinking: Pub Ale, Electric Creamsicle, Mild, Pliny the Younger, Belgian Dark Strong, Weizen, Russian Imperial Stout, Black Butte Porter
|
| Link Posted: Wed May 26, 2021 4:18 pm Post subject: |
|
|
Yup. I've never had the desire to remove my BK element and actually prefer to have the kettle "hold" it as I clean it (I find that easier) but to each their own. The HLT element never needs cleaning as it only ever sees water.
The less connections points the better too as you mention. I get tons of emails every year from people with pictures of elements (that were not purchased from us) that have burnt plugs. Often it's their 3rd or 4th element. They're wondering what they can do differently to stop it from happening all the time. Often it's because the cables/fittings are soft rubber and poorly made and do not hold well when they heat up. My recommendation is always to get rid of that extra disconnection point and stop using cheap moulded rubber plugs/receptacles.
Kal
_________________
Our new shop with over 150 new products: shop.TheElectricBrewery.com
We ship worldwide and support our products and customers for life.
Purchasing through our affiliate links helps support our site at no extra cost to you. We thank you!
My basement/bar/brewery build 2.0
|
|
| Back to top |
|
|
perogi
Joined: 12 Feb 2012
Posts: 850
Location: NH
Drinking: Perogi Pale, NEIPA, Nutter's Crossing Nut Brown Ale, Edmund Fitzgerald Porter Clone
Working on: Max's Maibock
|
| Link Posted: Wed May 26, 2021 8:06 pm Post subject: |
|
|
|
If I had a cleaning station in my basement, I wouldn't need to remove it but I have to lug it outside in the summer (not too bad) or to my upstairs bathroom in the winter (definitely not fun) to clean. Having a cord attached to a metal box in tight quarters wasn't doable long-term so I now have a BK with a tri-clamp element that detaches so I can more easily clean.
|
|
| Back to top |
|
|
|
|