
|
|
|

|
 |
|
|
| View previous topic :: View next topic |
| Author |
Message |
dietern
Joined: 27 Jun 2018
Posts: 1

|
 Link Posted: Wed Jun 27, 2018 5:11 pm Post subject: Silicon Tubing/Hose Diameter Link Posted: Wed Jun 27, 2018 5:11 pm Post subject: Silicon Tubing/Hose Diameter |
 |
|
Hi all,
I am in the process of building 1 bbl (30 gal) pilot plant (vessels sized 45 gal) for our brewery. I am using the excellent instructions created by Kal & Co (a million thanks!), but I have one question to which I can't seem to find the answer:
All silicone hoses used in the instructions are 1/2" ID. This is for a 10 gal batch size. Since my setup will be 30 gal batch size, will I need to use larger diameter hoses?
I've tried to consult online calculators for flow rates according to pressure and diameter, but these are not consistent.
I was thinking of using a two-tier system, where a pump would be used for transfer of water from HLT to MLT, but gravity alone would do the transfer during lautering between MLT and BK, as well as gravity between BK and fermenters (via wort chiller). I assume a pump could probably push a high transfer through the 1/2" ID hoses, but my main concern is that the gravity sections will flow too slowly for this batch size? Are there any rules of thumb for flow rates through these hoses? The height of my pots are 60cm (24"), so that would be the height differential considered for average gravity pressure differential.
I do not intend to have a HERMS setup, so this question does not apply for that section.
Thanks in advance for any insights, and thanks again for this wonderful website and forum!
Dieter
|
|
| Back to top |
|
 |
kal
Forum Administrator

Joined: 12 Dec 2010
Posts: 11122
Location: Ottawa, Canada
Drinking: Pub Ale, Electric Creamsicle, Mild, Pliny the Younger, Belgian Dark Strong, Weizen, Russian Imperial Stout, Black Butte Porter
|
| Link Posted: Wed Jun 27, 2018 5:23 pm Post subject: Re: Silicon Tubing/Hose Diameter |
|
|
| dietern wrote: | | All silicone hoses used in the instructions are 1/2" ID. This is for a 10 gal batch size. Since my setup will be 30 gal batch size, will I need to use larger diameter hoses? |
No.
Kal
_________________
Our new shop with over 150 new products: shop.TheElectricBrewery.com
We ship worldwide and support our products and customers for life.
Purchasing through our affiliate links helps support our site at no extra cost to you. We thank you!
My basement/bar/brewery build 2.0
|
|
| Back to top |
|
|
LW117
Joined: 21 Nov 2016
Posts: 4
Location: NH
|
| Link Posted: Mon Sep 10, 2018 10:17 pm Post subject: Updating old panel |
|
|
|
I originally built panel for 1bbl batches about 5 years ago, and Im now going back through and updating the internals to work off the din rail components. I was wondering if there are updated wiring diagrams anywhere for this? Most of it seems pretty straight forward but I just want to make sure Im doing this right the first time. Thanks in advance!
|
|
| Back to top |
|
|
kal
Forum Administrator
Joined: 12 Dec 2010
Posts: 11122
Location: Ottawa, Canada
Drinking: Pub Ale, Electric Creamsicle, Mild, Pliny the Younger, Belgian Dark Strong, Weizen, Russian Imperial Stout, Black Butte Porter
|
|
| Back to top |
|
|
LW117
Joined: 21 Nov 2016
Posts: 4
Location: NH
|
| Link Posted: Mon Sep 10, 2018 10:31 pm Post subject: |
|
|
|
Thanks for such a fast reply Kal! I guess my only area of confusion is the terminal block bus that took the place of the hot bus and neutral bus that used to be there. Does the order of wires matter, or is everything kosher as long as they link up? Love the new online store btw!
|
|
| Back to top |
|
|
kal
Forum Administrator
Joined: 12 Dec 2010
Posts: 11122
Location: Ottawa, Canada
Drinking: Pub Ale, Electric Creamsicle, Mild, Pliny the Younger, Belgian Dark Strong, Weizen, Russian Imperial Stout, Black Butte Porter
|
| Link Posted: Mon Sep 10, 2018 11:01 pm Post subject: |
|
|
Order of wires doesn't matter on terminal blocks - they're all connected (depending on how you use the jumpers of course!). Good luck with the build and glad to hear you're liking the new store! (Many new products yet to come that I've been working on, including March and Chugger pumps at great prices!)
Kal
_________________
Our new shop with over 150 new products: shop.TheElectricBrewery.com
We ship worldwide and support our products and customers for life.
Purchasing through our affiliate links helps support our site at no extra cost to you. We thank you!
My basement/bar/brewery build 2.0
|
|
| Back to top |
|
|
MonkeyMountain
Joined: 07 Oct 2018
Posts: 3
Location: Oita, Japan
|
| Link Posted: Tue Nov 27, 2018 2:26 pm Post subject: |
|
|
Kal and the Electric Brewery Gang,
Do you remember all of the stuff you shipped to Japan earlier this year?
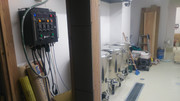 
As you can see, the brewery is still under construction but the equipment is up and running! 
We only get 200V here...
|
|
| Back to top |
|
|
kal
Forum Administrator
Joined: 12 Dec 2010
Posts: 11122
Location: Ottawa, Canada
Drinking: Pub Ale, Electric Creamsicle, Mild, Pliny the Younger, Belgian Dark Strong, Weizen, Russian Imperial Stout, Black Butte Porter
|
|
| Back to top |
|
|
MonkeyMountain
Joined: 07 Oct 2018
Posts: 3
Location: Oita, Japan
|
| Link Posted: Wed Nov 28, 2018 11:54 am Post subject: |
|
|
I do have one issue where the safe start interlock is not working properly.
It correctly keeps the panel from powering up if anything is on and the panel will power up if everything is off. However, whenever I turn anything on, the panel shuts off.
I have double-checked the wiring to the safe start relay and so far, it looks OK. Any hints as to where I should look?
I bypassed it by adding a wire between the power in contactor coil and terminal 8 of the interlock relay. Everything else seems to work fine but I would sure like to get the safe start feature to work as well.
|
|
| Back to top |
|
|
kal
Forum Administrator
Joined: 12 Dec 2010
Posts: 11122
Location: Ottawa, Canada
Drinking: Pub Ale, Electric Creamsicle, Mild, Pliny the Younger, Belgian Dark Strong, Weizen, Russian Imperial Stout, Black Butte Porter
|
| Link Posted: Wed Nov 28, 2018 1:52 pm Post subject: |
|
|
Look at your wiring around the safe start relay. You most likely missed a jumper wire. The relay is closing when the switches are all in the right position (normal) but without the loopback wire jumper it's not staying latched once closed. That missing wire would be the issue.
Kal
_________________
Our new shop with over 150 new products: shop.TheElectricBrewery.com
We ship worldwide and support our products and customers for life.
Purchasing through our affiliate links helps support our site at no extra cost to you. We thank you!
My basement/bar/brewery build 2.0
|
|
| Back to top |
|
|
MonkeyMountain
Joined: 07 Oct 2018
Posts: 3
Location: Oita, Japan
|
| Link Posted: Sun Dec 02, 2018 10:56 am Post subject: |
|
|
|
That was it! No jumper between terminal 1 and 2. Fixed that and everything is working as it should.
|
|
| Back to top |
|
|
kal
Forum Administrator
Joined: 12 Dec 2010
Posts: 11122
Location: Ottawa, Canada
Drinking: Pub Ale, Electric Creamsicle, Mild, Pliny the Younger, Belgian Dark Strong, Weizen, Russian Imperial Stout, Black Butte Porter
|
| Link Posted: Sun Dec 02, 2018 3:05 pm Post subject: |
|
|
Perfect! Glad it was something simple. Happy brewing!
Kal
_________________
Our new shop with over 150 new products: shop.TheElectricBrewery.com
We ship worldwide and support our products and customers for life.
Purchasing through our affiliate links helps support our site at no extra cost to you. We thank you!
My basement/bar/brewery build 2.0
|
|
| Back to top |
|
|
HTGBrew
Joined: 23 Sep 2020
Posts: 5
|
| Link Posted: Mon Mar 29, 2021 3:57 pm Post subject: |
|
|
|
Kal, I noticed you have 6 AWG wire going into the contactor, then from out of the contactor 2 10AWG black wires and 2 10AWG red wires, which feed the 30A fuses. I understand the need for the 30A fuse to protect the 30A receptacles. However, since you are stepping down from 6 AWG to 10 AWG, there is technically nothing protecting the 10AWG wire between the contactor and the 30A fuse (or the 14 AWG wire to the 240v element light), correct? Just trying to wrap my head around why these wouldn't have to be protected as well when reducing the wire size.
|
|
| Back to top |
|
|
kal
Forum Administrator
Joined: 12 Dec 2010
Posts: 11122
Location: Ottawa, Canada
Drinking: Pub Ale, Electric Creamsicle, Mild, Pliny the Younger, Belgian Dark Strong, Weizen, Russian Imperial Stout, Black Butte Porter
|
| Link Posted: Mon Mar 29, 2021 4:17 pm Post subject: |
|
|
| HTGBrew wrote: | | Kal, I noticed you have 6 AWG wire going into the contactor, then from out of the contactor 2 10AWG black wires and 2 10AWG red wires, which feed the 30A fuses. I understand the need for the 30A fuse to protect the 30A receptacles. However, since you are stepping down from 6 AWG to 10 AWG, there is technically nothing protecting the 10AWG wire between the contactor and the 30A fuse (or the 14 AWG wire to the 240v element light), correct? Just trying to wrap my head around why these wouldn't have to be protected as well when reducing the wire size. |
Because they're internal only / not required (or more accurately: Not a safety concern). No device protects every single wire inside, especially with subtle gauge changes like 6 to 10 ga, otherwise every electrical device would have 100s of fuses or breakers. There's certainly nothing wrong with adding more protection, but it could easily double or triple to price of the product so nobody does that. In some cases (like a fuse or breaker to protect those 220-240V element lights) would cost more than the device it's protecting. 
We use fuses/breakers for safety reasons when there's external connections we can't control, such as the heating elements or pumps. Same way that wiring in your home works: Your standard wall outlets have the 14 gauge feed wires protected by a 15A breaker in the electrical panel. The table lamp you plug in to that wall outlet will probably only use an 18 gauge lamp cord as it only draws 60-100 watts at most (less than 1 amp). There's no fuse or breaker in a table lamp because if something was to short out in the lamp, the 15 amp breaker will probably pop before the 18 ga lamp cord wire overheats.
Kal
_________________
Our new shop with over 150 new products: shop.TheElectricBrewery.com
We ship worldwide and support our products and customers for life.
Purchasing through our affiliate links helps support our site at no extra cost to you. We thank you!
My basement/bar/brewery build 2.0
|
|
| Back to top |
|
|
HTGBrew
Joined: 23 Sep 2020
Posts: 5
|
| Link Posted: Mon Mar 29, 2021 4:47 pm Post subject: |
|
|
|
Fantastic explanation. Thank you!
|
|
| Back to top |
|
|
kal
Forum Administrator
Joined: 12 Dec 2010
Posts: 11122
Location: Ottawa, Canada
Drinking: Pub Ale, Electric Creamsicle, Mild, Pliny the Younger, Belgian Dark Strong, Weizen, Russian Imperial Stout, Black Butte Porter
|
|
| Back to top |
|
|
huaco
Joined: 05 Apr 2012
Posts: 1506
Location: Burleson Texas
|
| Link Posted: Mon Mar 21, 2022 12:28 am Post subject: |
|
|
Kal,
Let's journey back in the way-back machine to early 2012. I purchased and built a kit (I think your first kit to ship) of the 50 Amp Back-to-Back systems. You had run out of enclosures but shipped a larger 16x20 enclosure instead.
Fast-forward to present day.
My build has pretty much worked flawlessly except a few blown fuses due to some loose connections. (I now tighten everything about once a year.)
I am looking at a very real possibility of building the system up to a 3 or 4 BBL brewery. I like the idea you suggested of the auxiliary heating elements for a boost to raise temps.
My question: Do you have a kit or plan designed already to convert a 50 Amp Back To Back panel into a 50 Amp 30 Gallon+ panel?
Thanks for all you do man!
|
|
| Back to top |
|
|
kal
Forum Administrator
Joined: 12 Dec 2010
Posts: 11122
Location: Ottawa, Canada
Drinking: Pub Ale, Electric Creamsicle, Mild, Pliny the Younger, Belgian Dark Strong, Weizen, Russian Imperial Stout, Black Butte Porter
|
| Link Posted: Mon Mar 21, 2022 12:33 am Post subject: |
|
|
| huaco wrote: | | My question: Do you have a kit or plan designed already to convert a 50 Amp Back To Back panel into a 50 Amp 30 Gallon+ panel? |
We don't. You could look at the two and list the differences. Part differences aside, you may find it a bit difficult given that you need two extra holes on the bottom for two extra heating elements and that you may not have allocated room for originally.
We use much larger fuses in out kits too (or breakers in pre-assembled panels).
Good luck on your upgrade! Sounds like a fun expansion. If you have any specific questions feel free to email me directly at kal@TheElectricBrewery.com. Cheers!
Kal
_________________
Our new shop with over 150 new products: shop.TheElectricBrewery.com
We ship worldwide and support our products and customers for life.
Purchasing through our affiliate links helps support our site at no extra cost to you. We thank you!
My basement/bar/brewery build 2.0
|
|
| Back to top |
|
|
|
|
|
|
|
|
You cannot post new topics in this forum
You cannot reply to topics in this forum
You cannot edit your posts in this forum
You cannot delete your posts in this forum
You cannot vote in polls in this forum
You cannot attach files in this forum
You can download files in this forum
|
Forum powered by phpBB © phpBB Group
|
|


