| View previous topic :: View next topic |
| Author |
Message |
mike0416
Joined: 03 Jan 2017
Posts: 62

|
 Link Posted: Fri Mar 02, 2018 3:24 pm Post subject: Aligning Ball Valves with Lock Nuts so the Handle is on top Link Posted: Fri Mar 02, 2018 3:24 pm Post subject: Aligning Ball Valves with Lock Nuts so the Handle is on top |
 |
|
Hi Kal,
This may be something that I'm missing or one of those 'duh' moments, but I ran into an issue I'm hoping I can get some assistance with. My ball valves coming out of the HLT from the HERMS coil were leaking a bit from the outside between the ball valve and the lock nut. To get rid of this I tried to put a little extra tape around the nipple but it still leaked a bit. The only way to truly stop the leak was to tighten the ball lock against the lock nut. This caused the handle to be more in between the top and the side, which bothers me because I'm a perfectionist like that. Anyway, I'm wondering what you suggest to be able to get the handle back on the top where it belongs!
As a parallel subject, do you have any helpful hints when building the brewery to make sure the ball lock handles are aligned on the top? I went through some trial and error on this while building it. If you do, it may be something other might be interested in when building the system. Unless, of course, I'm overlooking something that makes this simple, which is entirely possible!
Thanks,
Mike
|
|
| Back to top |
|
 |
jcav

Joined: 21 Sep 2011
Posts: 205
Location: Central Florida
|
| Link Posted: Fri Mar 02, 2018 4:15 pm Post subject: |
|
|
I use Loctite 55 pipe sealing cord instead of teflon tape. Works awesome and you can line up your ball valves anyway you desire. Excellent product and seals instantly with the ability to readjust to any position without having to take off and re-apply. Also seals with fewer turns with the wrench so there is a lot of room for alignment as you tighten the fitting down. Here is a link to a post I made on another site if you want to check it out.
https://www.homebrewtalk.com/forum/threads/line-up-your-ball-valves-with-less-hassle.543536/
John
_________________
"Perfection is unobtainable, but if you chase perfection you can catch excellence"- Vince Lombardi
|
|
| Back to top |
|
|
kal
Forum Administrator

Joined: 12 Dec 2010
Posts: 11122
Location: Ottawa, Canada
Drinking: Pub Ale, Electric Creamsicle, Mild, Pliny the Younger, Belgian Dark Strong, Weizen, Russian Imperial Stout, Black Butte Porter
|
| Link Posted: Fri Mar 02, 2018 4:59 pm Post subject: Re: Aligning Ball Valves with Lock Nuts so the Handle is on |
|
|
| mike0416 wrote: | | This may be something that I'm missing or one of those 'duh' moments, but I ran into an issue I'm hoping I can get some assistance with. My ball valves coming out of the HLT from the HERMS coil were leaking a bit from the outside between the ball valve and the lock nut. To get rid of this I tried to put a little extra tape around the nipple but it still leaked a bit. The only way to truly stop the leak was to tighten the ball lock against the lock nut. This caused the handle to be more in between the top and the side, which bothers me because I'm a perfectionist like that. Anyway, I'm wondering what you suggest to be able to get the handle back on the top where it belongs! |
I'm assuming you meant this:
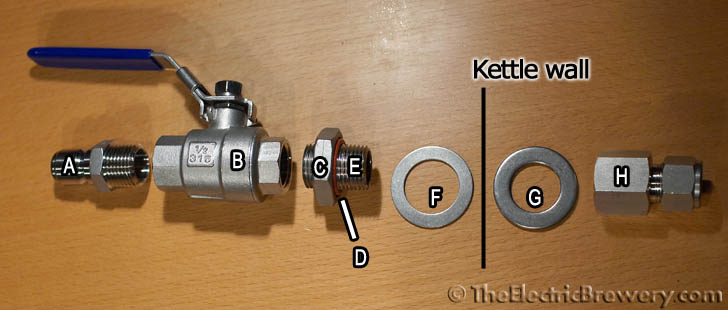
From here: http://www.theelectricbrewery.com/hot-liquor-tank?page=4
Tighten the ball lock to the nipple first then place it through the HLT wall. Hold the assembly upright so that the valve is in the position you want, and tighten from the inside of the kettle. In other words, turn the compression fitting (part H) and not the ball valve (part B), as you don't care how many turns the compression fitting takes to go tight.
Same idea of the water input on the HLT:

When tightening, hold the ball valve in the position you want, and tighten coupler H. Not the other way around.
Same goes for the MLT input.
If I'm not mistaken, the only place where you have to actually tighten by turning the ball valve is the pumps. There I would simply use large wrenches and tighten until things line up. You can always do this another 1/4-3/4" if required.
| Quote: | | As a parallel subject, do you have any helpful hints when building the brewery to make sure the ball lock handles are aligned on the top? I went through some trial and error on this while building it. |
Maybe I'm misunderstanding, but isn't this the same question you had above?
Other than the pumps, the general idea is to not turn the ball valves to tighten. Turn the other end. If you turn the ball valves, you never know what position they'll be in once tight.
Kal
_________________
Our new shop with over 150 new products: shop.TheElectricBrewery.com
We ship worldwide and support our products and customers for life.
Purchasing through our affiliate links helps support our site at no extra cost to you. We thank you!
My basement/bar/brewery build 2.0
|
|
| Back to top |
|
|
mike0416
Joined: 03 Jan 2017
Posts: 62
|
| Link Posted: Fri Mar 02, 2018 8:47 pm Post subject: |
|
|
|
Yup, same question, Kal. I just didn't know if the compression fittings became an issue or not, which it does because I'd have to loosen that from the nipple and start over. Gonna try the Loctite 55 from jcav's post (thanks jcay) and see if I can fix it without it tightening down as much. Thanks Kal
|
|
| Back to top |
|
|
dp Brewing Company
Joined: 08 Jul 2013
Posts: 664
Location: Midwest
Drinking: Chocolate Taco, Raspberry Mango Cider, American X, Sandy Dunes
Working on: Nothing
|
| Link Posted: Wed Mar 07, 2018 2:54 pm Post subject: |
|
|
I use bulkhead compression fittings for my coil and have had the same issue with the handles not lining up. I may try backing the valves back off and slipping on a nut. Then put the ball valve back on. This should allow me to lock the valve against the nut.
_________________
Visit dp Brewing Company
Hangovers hurt....but good memories last forever!
|
|
| Back to top |
|
|
rcrabb22
Joined: 23 Dec 2010
Posts: 462
Location: Illinois
|
| Link Posted: Mon Apr 02, 2018 1:44 am Post subject: |
|
|
|
For the pumps I went with 3 piece ball valves. Actually I went with 3 piece ball valves for all of them but that was my personal preference. Tighten the ball valve so the handle is at the 12, 3, 6 or 9 o'clock position then take the valve apart and reposition the handle as appropriate.
|
|
| Back to top |
|
|
dp Brewing Company
Joined: 08 Jul 2013
Posts: 664
Location: Midwest
Drinking: Chocolate Taco, Raspberry Mango Cider, American X, Sandy Dunes
Working on: Nothing
|
| Link Posted: Mon Apr 02, 2018 11:46 am Post subject: |
|
|
| rcrabb22 wrote: | | For the pumps I went with 3 piece ball valves. Actually I went with 3 piece ball valves for all of them but that was my personal preference. Tighten the ball valve so the handle is at the 12, 3, 6 or 9 o'clock position then take the valve apart and reposition the handle as appropriate. |
Great tip!!
_________________
Visit dp Brewing Company
Hangovers hurt....but good memories last forever!
|
|
| Back to top |
|
|
KB
Joined: 06 Nov 2014
Posts: 334
Location: Virginia
Working on: Next brew
|
| Link Posted: Sat Apr 07, 2018 1:02 pm Post subject: |
|
|
| jcav wrote: | | I use Loctite 55 pipe sealing cord instead of teflon tape. |
Interesting. Looks like dental floss. I know it's not dental floss, but looks like it.
|
|
| Back to top |
|
|
jcav
Joined: 21 Sep 2011
Posts: 205
Location: Central Florida
|
| Link Posted: Sat Apr 07, 2018 2:26 pm Post subject: |
|
|
| KB wrote: | | jcav wrote: | | I use Loctite 55 pipe sealing cord instead of teflon tape. |
Interesting. Looks like dental floss. I know it's not dental floss, but looks like it. |
You right it does look like dental floss. It has the Teflon stuff impregnated in the cord. Works great though and gets the job done very easily!
John
_________________
"Perfection is unobtainable, but if you chase perfection you can catch excellence"- Vince Lombardi
|
|
| Back to top |
|
|
|
|


