
|
|
|

|
 |
|
|
| View previous topic :: View next topic |
| Author |
Message |
codex

Joined: 04 Nov 2016
Posts: 45
Location: Co Durham, UK
Drinking: American Pale Ale, NEIPA, German Pilsner

|
 Link Posted: Wed Oct 04, 2017 11:52 am Post subject: Hello from North East England Link Posted: Wed Oct 04, 2017 11:52 am Post subject: Hello from North East England |
 |
|
Hello to all on the forum.
I have been a member of the forum a while, but first post. I have been researching the Electric Brewery in the hope of building one myself. No previous experience other than kits in a bucket years ago, so will be a steep learning curve.
My plans are well advanced for a garage conversion to a small brew room. Already purchased the DIY control panel, heating elements, probes, cables etc. from Kal. At present, continuing prep work in the garage in readiness to install all the kit and get brewing
Will let you know how I progress and hopefully post some pics.
Cheers
codex
|
|
| Back to top |
|
 |
kal
Forum Administrator
Joined: 12 Dec 2010
Posts: 11121
Location: Ottawa, Canada
Drinking: Pub Ale, Electric Creamsicle, Mild, Pliny the Younger, Belgian Dark Strong, Weizen, Russian Imperial Stout, Black Butte Porter
|
|
| Back to top |
|
|
rivetcatcher
Joined: 21 Apr 2016
Posts: 132
Location: Thailand
Drinking: Way Out Wheat - Mindcircus
Working on: Zombie Dust
|
| Link Posted: Sat Oct 07, 2017 7:34 am Post subject: |
|
|
Hello Codex,
Im from the north east as well. Jarrow.
Good luck in setting up. I have just completed the build.
Rivet
|
|
| Back to top |
|
|
KB
Joined: 06 Nov 2014
Posts: 334
Location: Virginia
Working on: Next brew
|
| Link Posted: Sat Oct 07, 2017 5:09 pm Post subject: |
|
|
You'll really enjoy the EB when finished and up-and-running. Having recently built the DIY kit, I'll recommend the following.
1. Take your time.
2. Triple check things.
3. Test, using the http://www.theelectricbrewery.com/forum/viewtopic.php?t=25460 instructions.
4. Ask in the forums for help, clarification if needed.
Kraig
|
|
| Back to top |
|
|
codex
Joined: 04 Nov 2016
Posts: 45
Location: Co Durham, UK
Drinking: American Pale Ale, NEIPA, German Pilsner
|
| Link Posted: Sun Oct 08, 2017 11:19 am Post subject: |
|
|
Thanks Rivet & Kraig for your comments and advice.
I think the control panel build is the one thing I am a little nervous about undertaking. I can wire an electric plug or socket, but that is all the electrical experience I have. I would have bought the pre-assembled unit if I could, but they are not available to overseas orders.
Planning to start on the control panel in a couple of weeks, so there will be plenty of questions to the forum!!
Cheers
|
|
| Back to top |
|
|
KB
Joined: 06 Nov 2014
Posts: 334
Location: Virginia
Working on: Next brew
|
| Link Posted: Sun Oct 08, 2017 12:11 pm Post subject: |
|
|
Just follow the instructions. Realize some of the photos show things on the left when they are actually on the right and some photos show things on the right when actually they are on the left. Take time to understand the instructions before actually beginning the step.
Only need ability to cut wire, strip wire, crimp wire and do some soldering to build the control panel.
Don't rush. Take your time, check things are you go.
Kraig
|
|
| Back to top |
|
|
kal
Forum Administrator
Joined: 12 Dec 2010
Posts: 11121
Location: Ottawa, Canada
Drinking: Pub Ale, Electric Creamsicle, Mild, Pliny the Younger, Belgian Dark Strong, Weizen, Russian Imperial Stout, Black Butte Porter
|
| Link Posted: Sun Oct 08, 2017 2:54 pm Post subject: |
|
|
| Kraig wrote: | | Just follow the instructions. Realize some of the photos show things on the left when they are actually on the right and some photos show things on the right when actually they are on the left. Take time to understand the instructions before actually beginning the step. |
The pictures are all correct. I think what Kraig means is that the wiring diagrams may show some parts not physically in the same spots as the actual photos of a built panel as it depends on whether you look at the panel from inside, or outside. It's also done to avoid having to cross too many wires in the diagrams which could be confusing. The wiring diagrams are all correct however. Just make sure to read the labels.
For example, take this wiring diagram for the PID controllers:
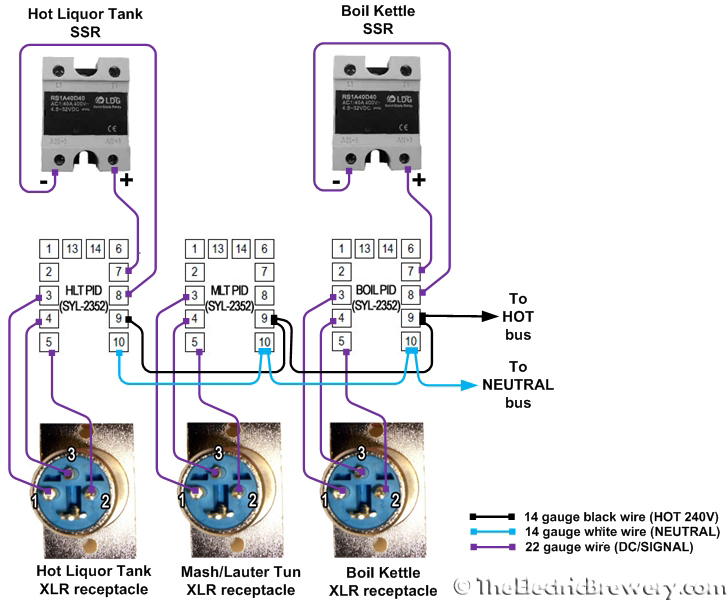
In your panel the HLT PID will be on the right, or the left, depending on whether you look at the panel from the outside or the inside. In the case of this picture, it was done as if you're looking at the inside of the door as that's where you're going to be wiring. But the SSRs at the top may positioned relative to each other as would be normally done as normally the Hot Liquor Tank SSR is on the right instead of the left. This was done to avoid having to cross wires in the diagram.
The wiring diagrams are all correct, the pictures are all correct. Just make sure the read the labels when connecting wires. Don't connect things blindly, don't make assumptions.
Good luck!
Kal
_________________
Our new shop with over 150 new products: shop.TheElectricBrewery.com
We ship worldwide and support our products and customers for life.
Purchasing through our affiliate links helps support our site at no extra cost to you. We thank you!
My basement/bar/brewery build 2.0
|
|
| Back to top |
|
|
|
|
|
|
|
|
You cannot post new topics in this forum
You cannot reply to topics in this forum
You cannot edit your posts in this forum
You cannot delete your posts in this forum
You cannot vote in polls in this forum
You cannot attach files in this forum
You can download files in this forum
|
Forum powered by phpBB © phpBB Group
|
|


