
|
|
|

|
 |
|
|
| View previous topic :: View next topic |
| Author |
Message |
jonymac
Joined: 18 Dec 2014
Posts: 145

|
 Link Posted: Thu Dec 24, 2015 3:52 am Post subject: JonyMac's Keezer and Freezer Build Link Posted: Thu Dec 24, 2015 3:52 am Post subject: JonyMac's Keezer and Freezer Build |
 |
|
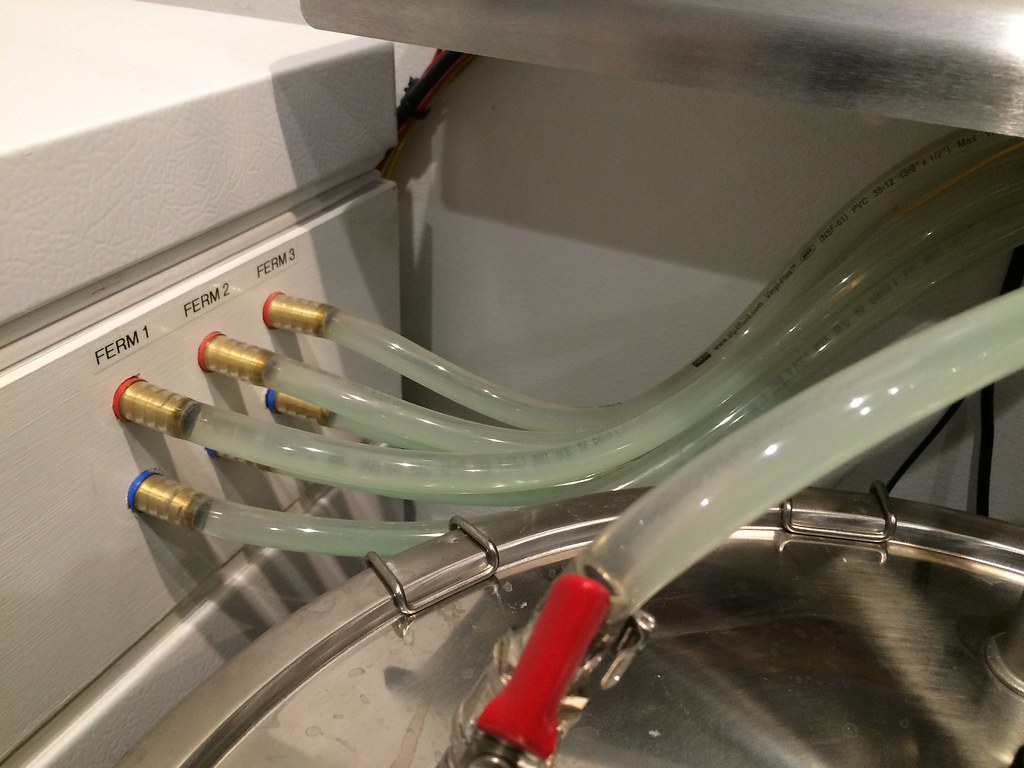
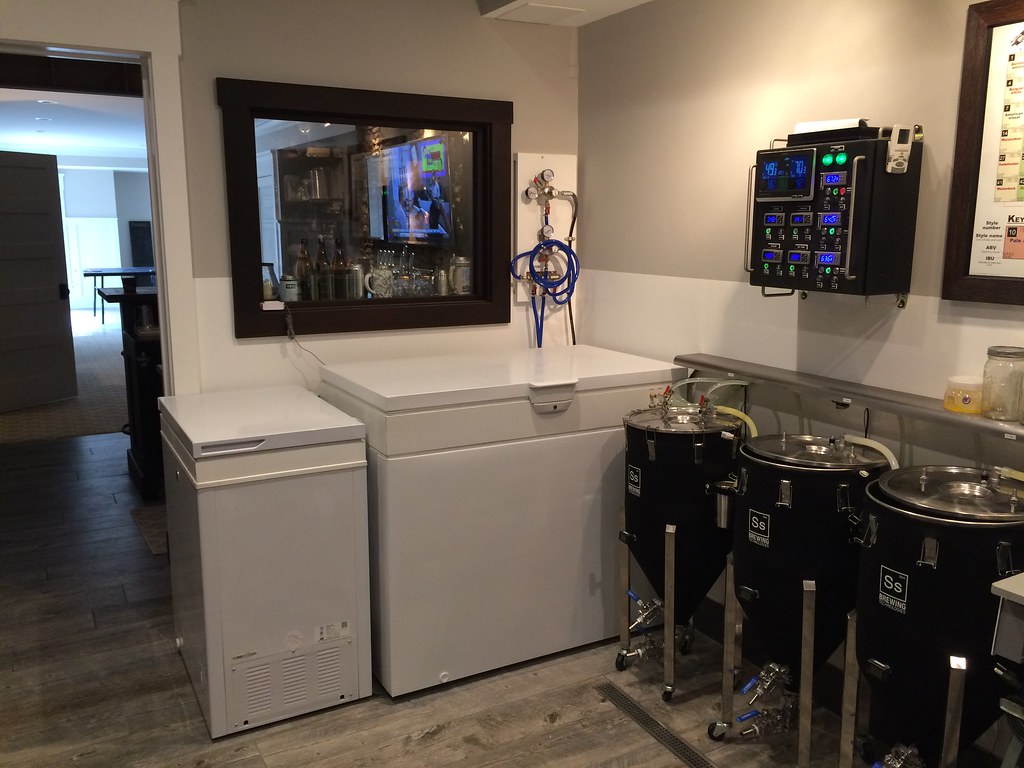
My brewery has a keezer (Whirlpool 14.8 Cu Ft http://www.whirlpool.com/-[EH155FXBQ]-1021418/EH155FXBQ/) that holds 8 kegs to serve my 8 taps, 1 keg that holds cleaner/sanitizer used to clean out the lines and taps, 1 keg that holds 3 aquarium pumps to cool my three conical fermenters, 1 reservoir that contains a glycol mix that runs out of the keezer into the freezer (GE 7 Cu Ft http://products.geappliances.com/appliance/gea-specs/FCM7SHWW) through the tap and back to the reservoir, and 1 10lb nitrogen tank to feed my stout tap. I keep a scuba sized CO2 tank under my bar and the high pressure feed runs through the wall into the brewery. I used Micromatic's 8 line trunk line to run from the keezer to the taps, stripped off the insulation and ran them inside the keezer. They are all color coded. I placed beer shutoff valves inside the keezer to make it easier to change kegs without spilling beer in the keezer, to have a place to add flow meters for my RaspberryPints app, and to be able to shutoff beer to the taps and then lock the keezer cuz I have a 15 year old...
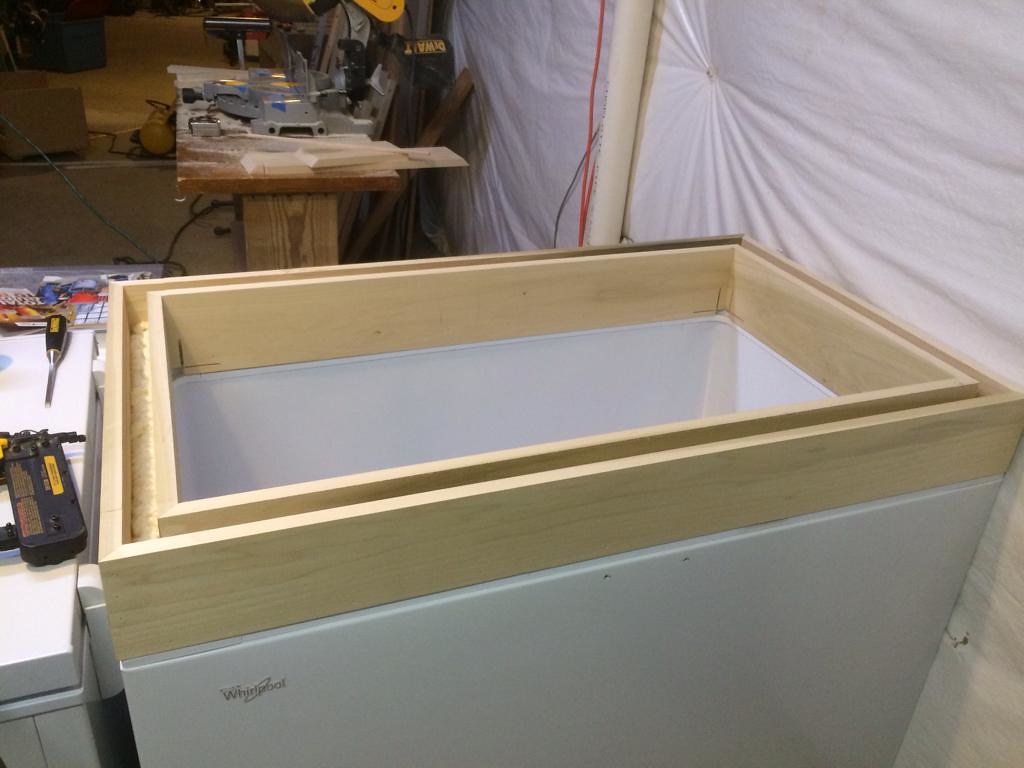
I built collars for both the keezer and the freezer out of 1x stock - 1x6 for the keezer and 1x4 for the freezer to run my tubing through. I filled the gap between the 1x with expanding foam and capped it with a thin strip of 1x and then primed and painted it white to match the keezer and freezer. I secured the collars to the keezer and freezer using silicone adhesive caulk. For the Keezer, I used Micromatic quad CO2 distribution panels and built a CO2 distribution board external to the keezer to be able to easily view, shutoff and distribute CO2 to clear kegs and to push beer from the conicals to kegs. I have enough room in the keezer for a pail of DampRid, and a layer of growlers on top of the kegs. My fermentation refrigeration controller controls the temp of the keezer and keeps it between 33º and 34º. I added a plug in moisture absorber that I pull out of the keezer and plug in to dry out every month or so - this results in very little condensation in the keezer.
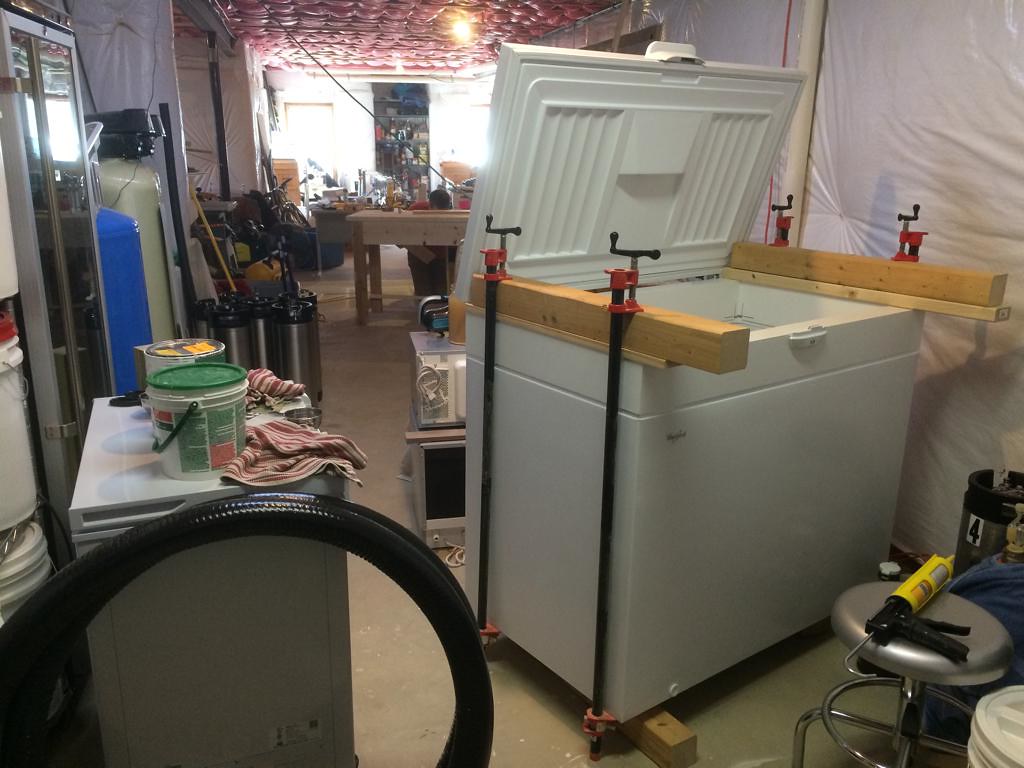
In the freezer I have 50' of 3/8" copper coil that sits on the bottom of the freezer kept at 10º. I use the freezer for hops, ice, moonshine and a cold coil for the tap pump that keeps the taps at 39º. If I am lagering a beer in the fermentation tank, I put the aquarium pump in the tap reservoir and can get the fermenter below 53º. Below are pics of the setups:
FREEZER:
 IMG_8896 by jonymac, on Flickr IMG_8896 by jonymac, on Flickr
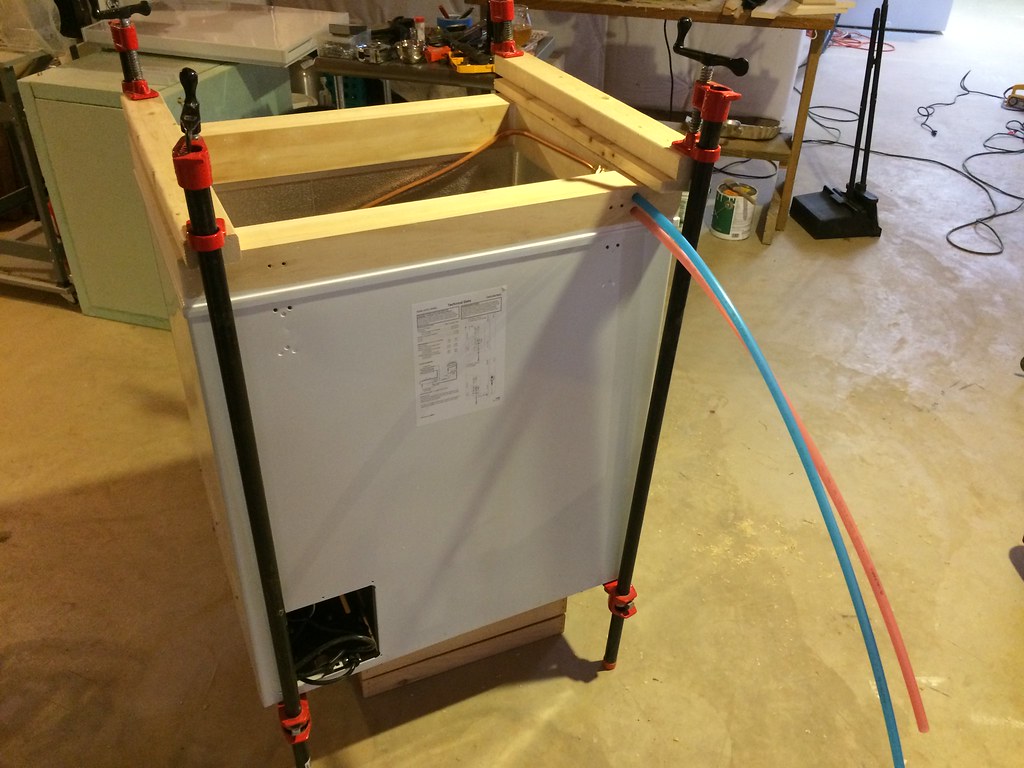
Freezer collar being clamped.
 IMG_8897 by jonymac, on Flickr IMG_8897 by jonymac, on Flickr
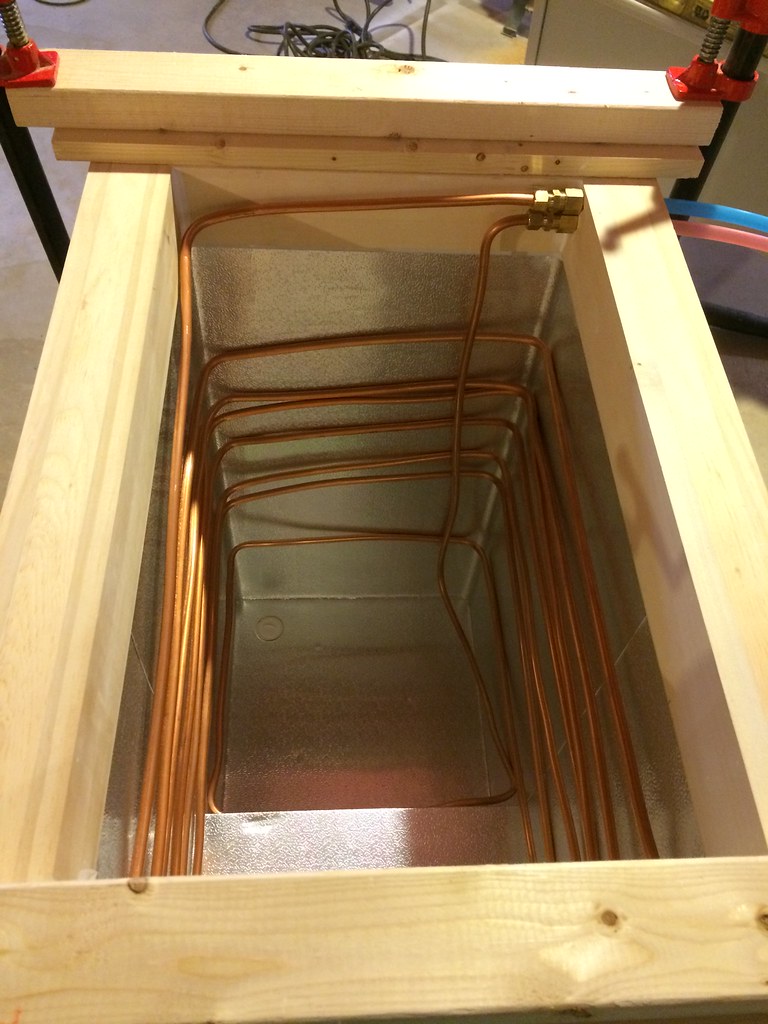
Version 1 of the copper coil in the freezer - I had to upgrade from 1/4" tubing to 3/8" tubing to get the glycol to flow better, instead of bending it all around the interior (pain in the ass) I left it coiled in the bottom.
 IMG_8905 by jonymac, on Flickr IMG_8905 by jonymac, on Flickr
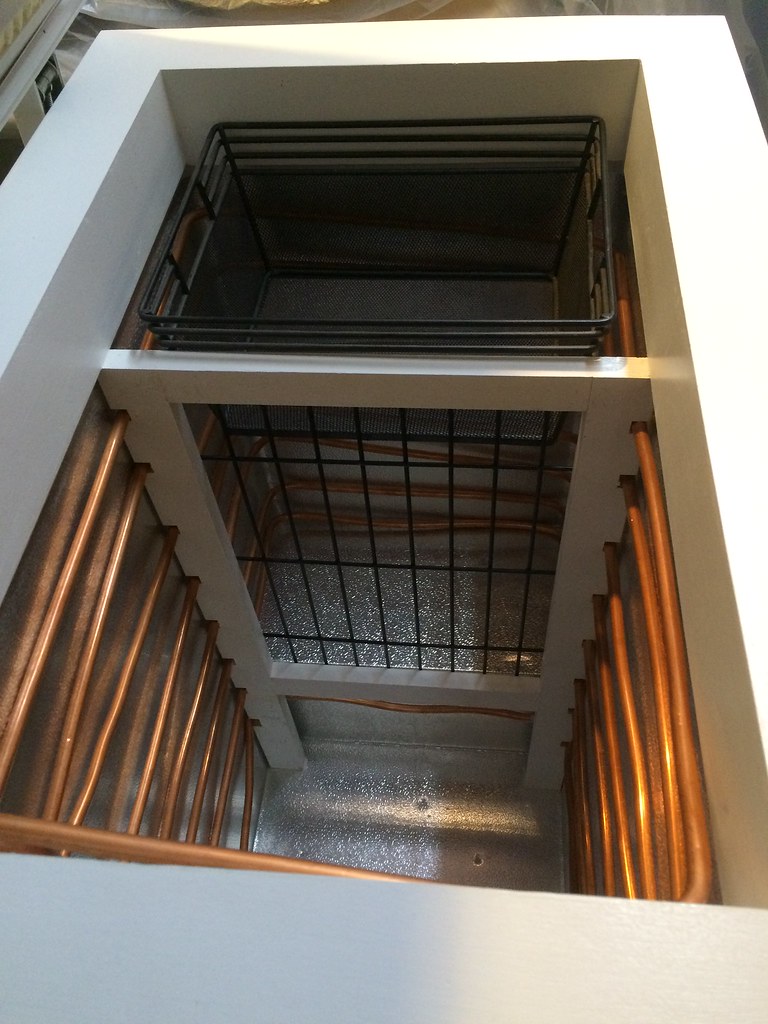
I built a separator out of 1x2 and cut up a bit of an old dog kennel to use as the screen to hold all the hops on 1 side of the freezer.
 IMG_8906 by jonymac, on Flickr IMG_8906 by jonymac, on Flickr
Freezer collar installed, primed and painted.
 IMG_8907 by jonymac, on Flickr IMG_8907 by jonymac, on Flickr
Detail of copper tubing going through freezer collar.
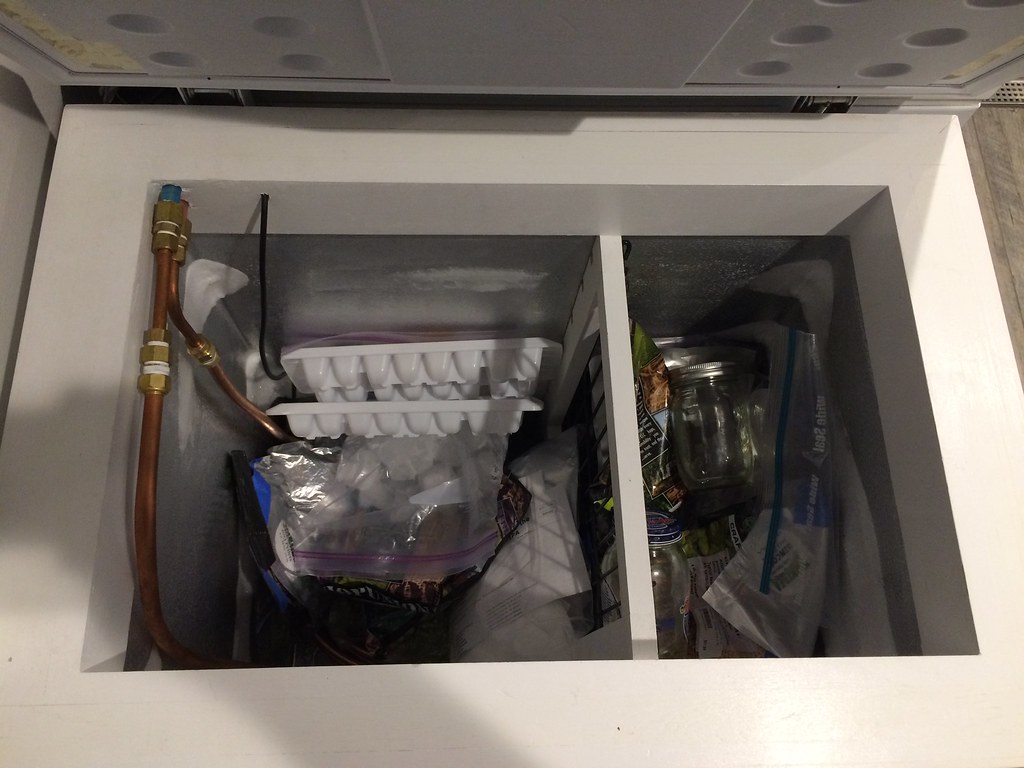 IMG_0161 by jonymac, on Flickr IMG_0161 by jonymac, on Flickr
Freezer with 3/8" tubing, full of hops, moonshine and showing temperature sensor coming through collar.
KEEZER:
 keezercollar by jonymac, on Flickr keezercollar by jonymac, on Flickr
Keezer collar partially filled with expanding foam.
 IMG_8855 by jonymac, on Flickr IMG_8855 by jonymac, on Flickr
Clamping collar to keezer using silicone adhesive.
 IMG_8856 by jonymac, on Flickr IMG_8856 by jonymac, on Flickr
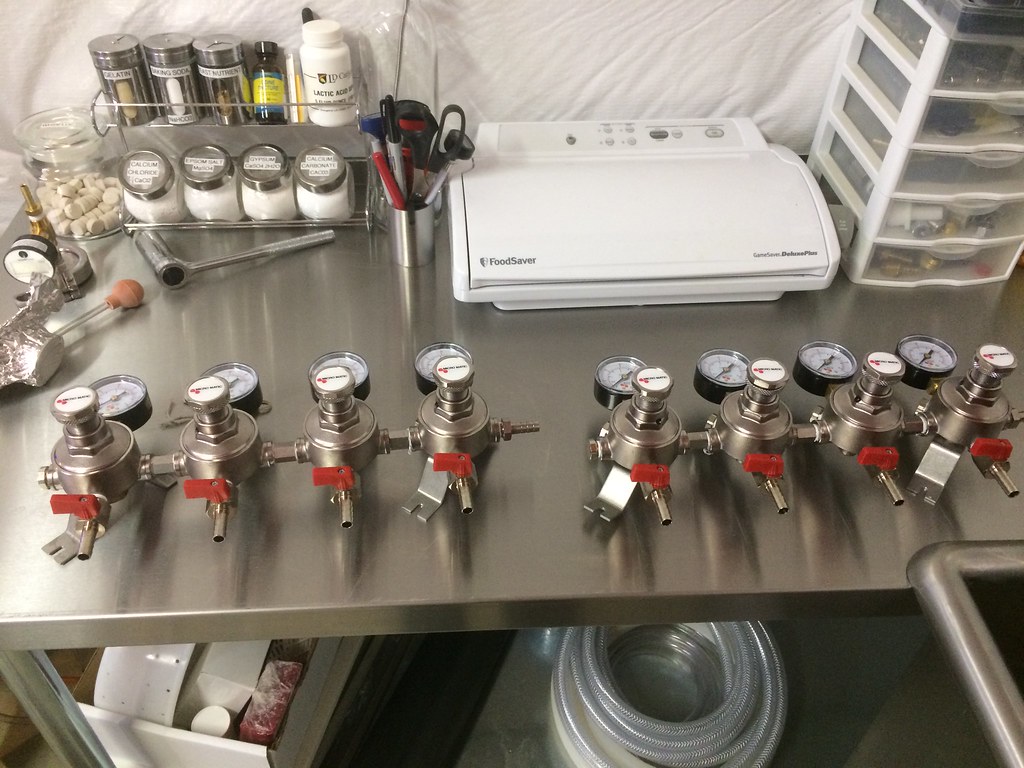
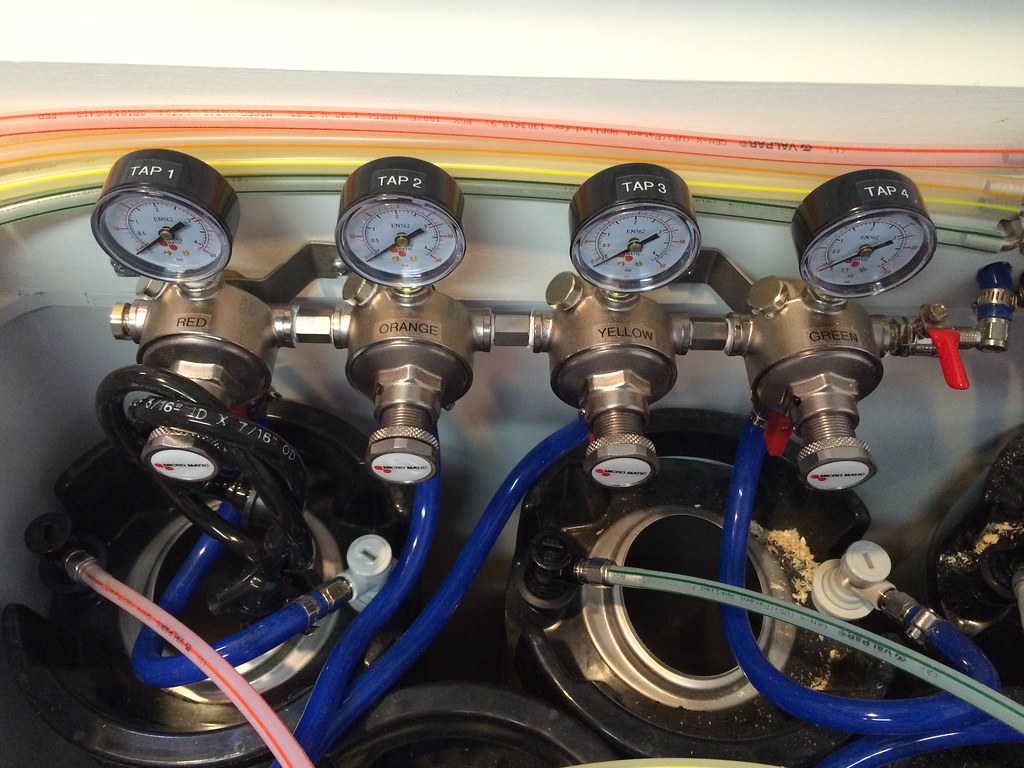
Micromatic quad distribution panels for controlling CO2 individually for each keg.
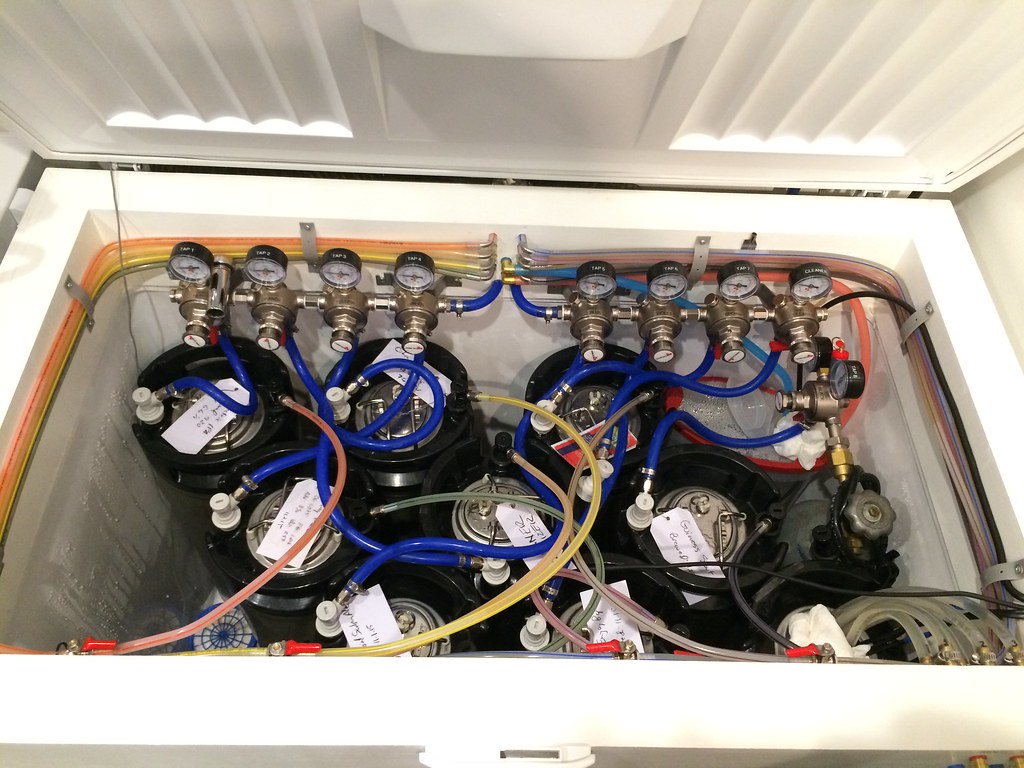 IMG_0164 by jonymac, on Flickr IMG_0164 by jonymac, on Flickr
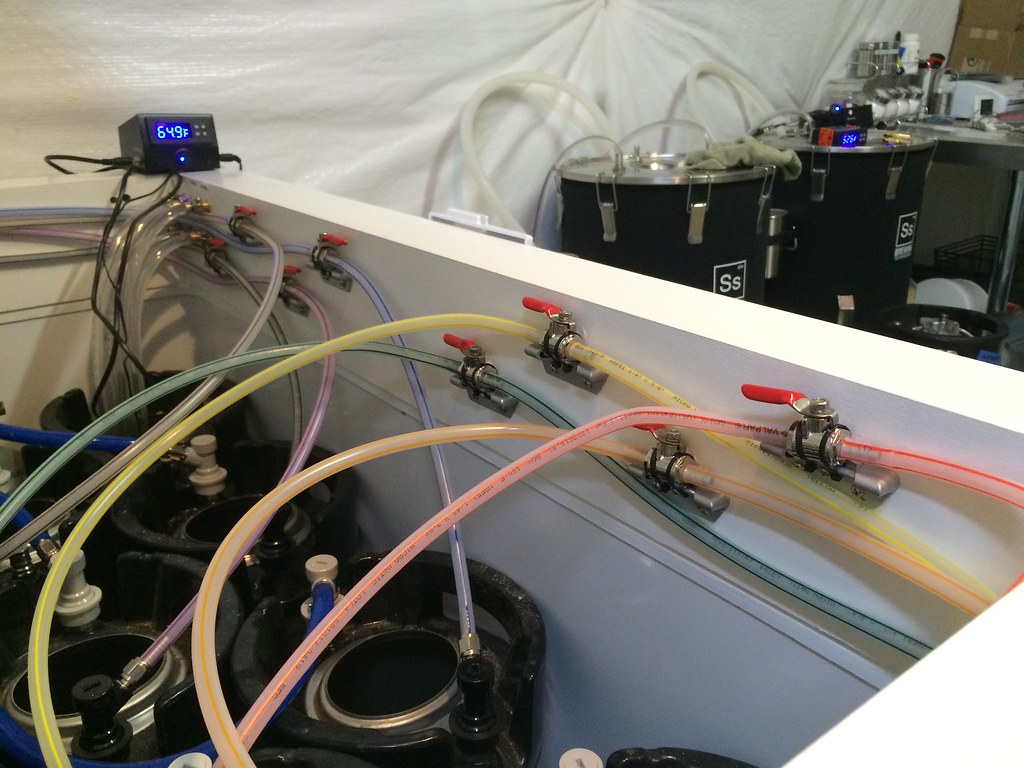
Keezer view of CO2 valves and beer distribution lines.
 IMG_8887 by jonymac, on Flickr IMG_8887 by jonymac, on Flickr
CO2 valves left side.
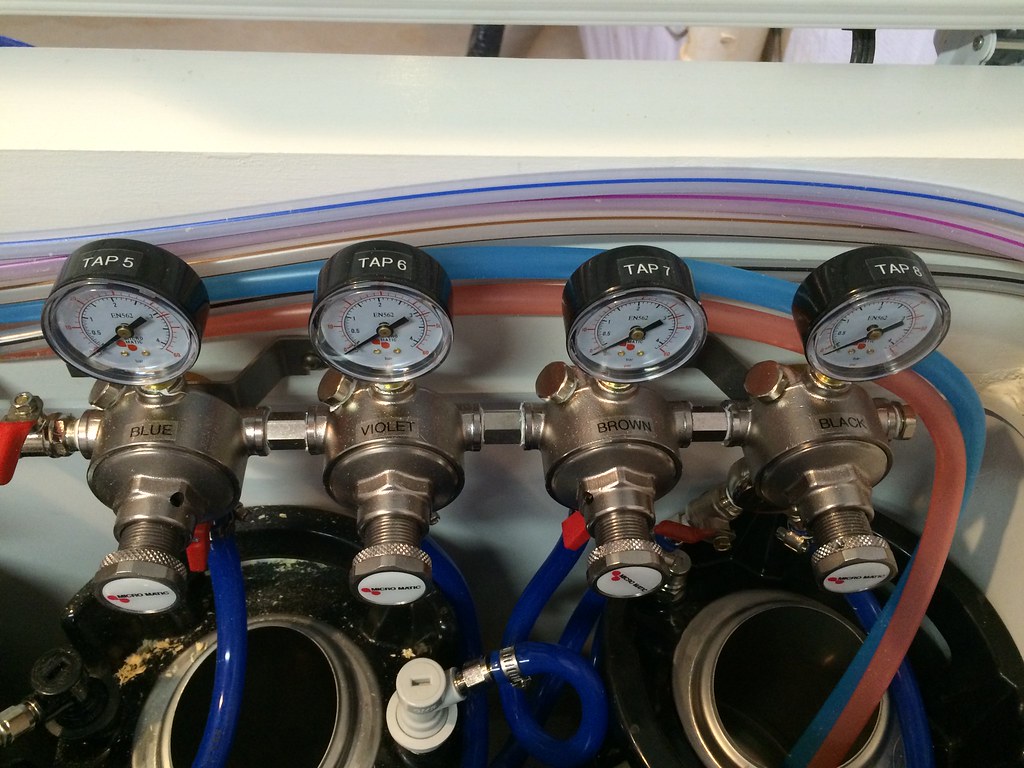 IMG_8886 by jonymac, on Flickr IMG_8886 by jonymac, on Flickr
CO2 valves right side.
 IMG_8888 by jonymac, on Flickr IMG_8888 by jonymac, on Flickr
Beer shutoff valves for each keg.
 IMG_8891 by jonymac, on Flickr IMG_8891 by jonymac, on Flickr
Mating beer lines with trunk line and cooling lines with freezer coil.
 IMG_0162 by jonymac, on Flickr IMG_0162 by jonymac, on Flickr
Vinyl lines coming from cooling keg aquarium pumps to three fermenters.
 IMG_8869 by jonymac, on Flickr IMG_8869 by jonymac, on Flickr
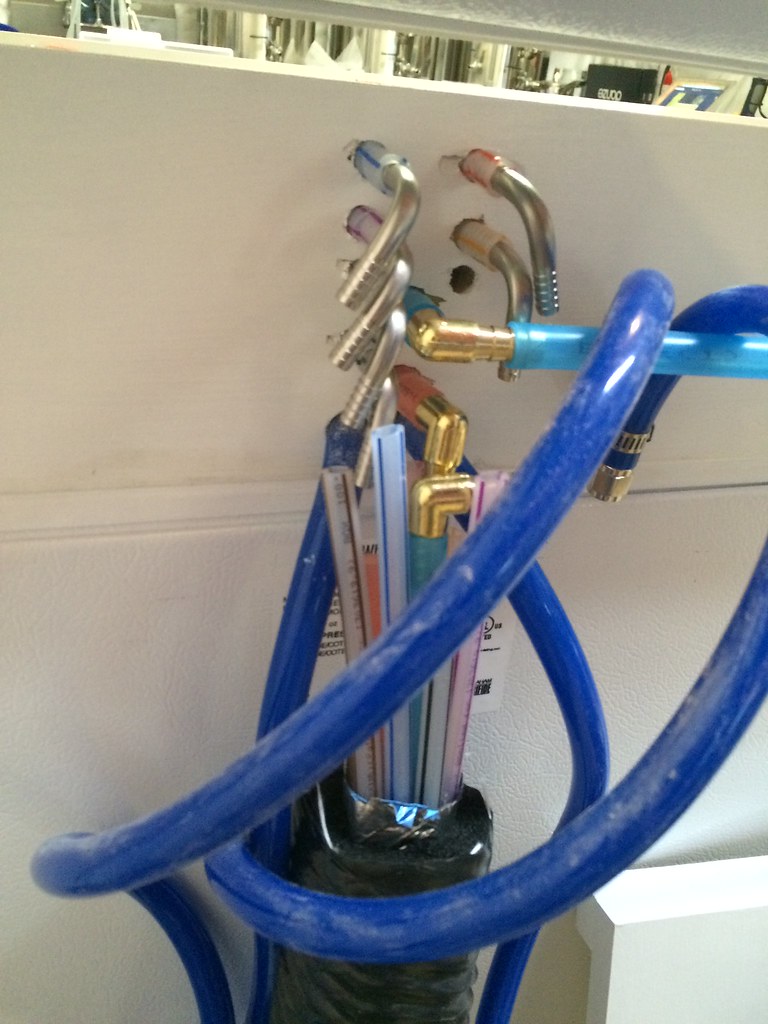
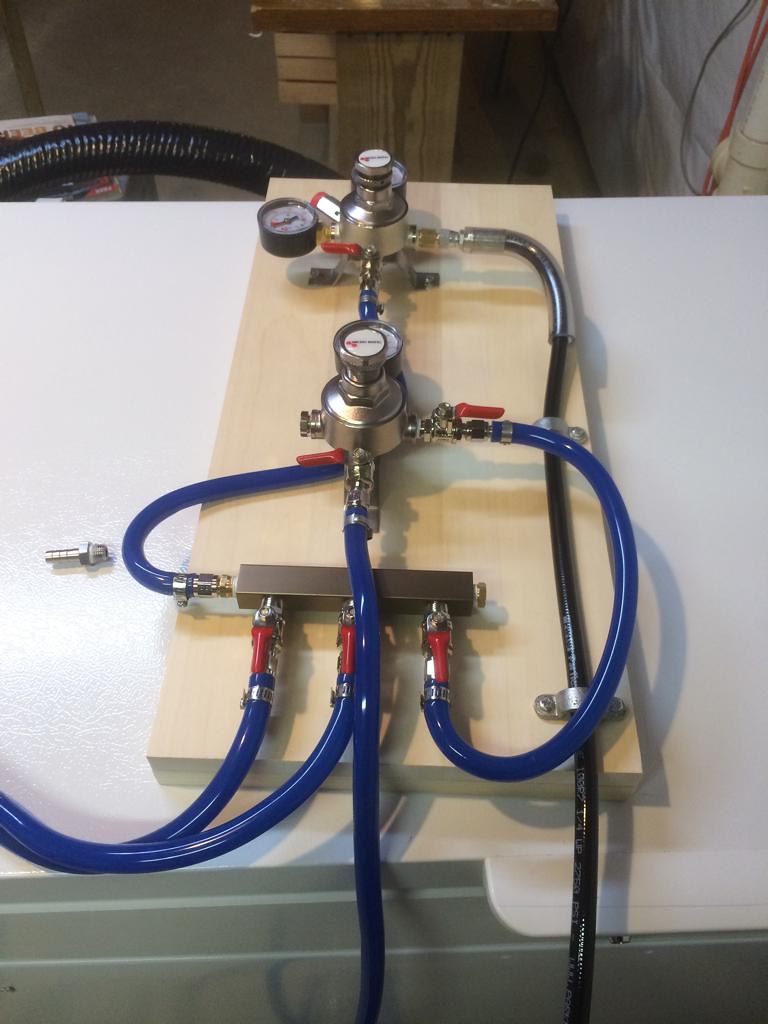
CO2 distribution board prior to being painted.
 IMG_0159 by jonymac, on Flickr IMG_0159 by jonymac, on Flickr
Freezer, keezer, distribution panel and fermenters in place being controlled by my fermentation refrigeration controller.
JonyMac
_________________
JonyMac's Stillwater Home Brewery Build
http://www.theelectricbrewery.com/forum/viewtopic.php?p=314470#314470
Last edited by jonymac on Mon Oct 09, 2017 10:07 pm; edited 3 times in total
|
|
| Back to top |
|
 |
kal
Forum Administrator

Joined: 12 Dec 2010
Posts: 11123
Location: Ottawa, Canada
Drinking: Pub Ale, Electric Creamsicle, Mild, Pliny the Younger, Belgian Dark Strong, Weizen, Russian Imperial Stout, Black Butte Porter
|
| Link Posted: Thu Dec 24, 2015 3:19 pm Post subject: |
|
|
Nice job! No expense spared either I see! Those are the premium Micromatic quad CO2 distribution panels!
The only comment / suggestion I'd make is that you may find they get in the way of the kegs in the keezer - you have to remove the regulators in order to replace a keg. You can install them outside too and avoid that issue.
Looks great!
Kal
P.S. I know we went back and forth a lot over the last year with your build as you wanted to use a lot of the same parts / items as I did (ex: same Micromatic 8 tap tower), so I took the liberty of updating your post by adding links to many of the parts to make it easier for others to understand what you used.
_________________
Our new shop with over 150 new products: shop.TheElectricBrewery.com
We ship worldwide and support our products and customers for life.
Purchasing through our affiliate links helps support our site at no extra cost to you. We thank you!
My basement/bar/brewery build 2.0
|
|
| Back to top |
|
|
jonymac
Joined: 18 Dec 2014
Posts: 145
|
| Link Posted: Thu Dec 24, 2015 5:00 pm Post subject: |
|
|
Thanks for posting the links - I know it helps to go through your links to cover site costs. Over the years I have had wonky CO2 controllers that have done funny things. One day I came down and one of my regulators had mysteriously gone from my setting of 11 psi to 34 over the weekend and I didn't know it until I pulled the tap handle! I decided for this build to use quality. I got all new kegs vs reconditioned and gave my reconditioned kegs to a buddy who was just getting into brewing. I am SO happy I went with quality vs. always fussing with leaking posts, regulator diaphragms, etc.
You can certainly mount the regulators outside the keezer, but it would require many more holes through the collar if you are going to run different psi CO2 pressures to different kegs. I do not find they get in the way at all. I typically have one open spot in the keezer as I am conditioning a beer an simply lean the empty keg into that spot and remove it. If I am full of kegs, I can remove the cleaner keg which is dead center and lifts straight out and then lean the kegs a bit to remove empties. I am also finding I am keeping my beers that move less through my taps on the back wall - stouts, hard cider, etc.
_________________
JonyMac's Stillwater Home Brewery Build
http://www.theelectricbrewery.com/forum/viewtopic.php?p=314470#314470
|
|
| Back to top |
|
|
kal
Forum Administrator
Joined: 12 Dec 2010
Posts: 11123
Location: Ottawa, Canada
Drinking: Pub Ale, Electric Creamsicle, Mild, Pliny the Younger, Belgian Dark Strong, Weizen, Russian Imperial Stout, Black Butte Porter
|
| Link Posted: Thu Dec 24, 2015 5:52 pm Post subject: |
|
|
| jonymac wrote: | | Thanks for posting the links - I know it helps to go through your links to cover site costs. |
It does it indeed! And thanks in advance to everyone who helps out by using the links!
| Quote: | | Over the years I have had wonky CO2 controllers that have done funny things. One day I came down and one of my regulators had mysteriously gone from my setting of 11 psi to 34 over the weekend and I didn't know it until I pulled the tap handle! I decided for this build to use quality. |
+1 to this.
It's especially bad with draft equipment (disconnects, regulators, etc). There's a lot of "junk" out there so I *always* buy my draft supplies from stores (such as Micromatic) that cater to commercial locations such bars, restaurants, and so forth. Unlike a homebrew shop they cannot afford to sell cheap junk as their customers 100% depend on the equipment working 24/7.
| Quote: | | You can certainly mount the regulators outside the keezer, but it would require many more holes through the collar if you are going to run different psi CO2 pressures to different kegs. I do not find they get in the way at all. |
Good! Maybe it's the camera angle but it looks like they completely overhang the back row of kegs.
| Quote: | | I am also finding I am keeping my beers that move less through my taps on the back wall - stouts, hard cider, etc. |
Yup - I do the same. I don't have my regulators inside but it's harder to get kegs in/out from the back so I try and put those that get emptied less often back there.
Kal
_________________
Our new shop with over 150 new products: shop.TheElectricBrewery.com
We ship worldwide and support our products and customers for life.
Purchasing through our affiliate links helps support our site at no extra cost to you. We thank you!
My basement/bar/brewery build 2.0
|
|
| Back to top |
|
|
rcrabb22
Joined: 23 Dec 2010
Posts: 462
Location: Illinois
|
|
| Back to top |
|
|
jonymac
Joined: 18 Dec 2014
Posts: 145
|
|
| Back to top |
|
|
Topdollar
Joined: 20 Aug 2015
Posts: 65
|
| Link Posted: Thu Jul 07, 2016 2:13 pm Post subject: |
|
|
Jonymac - sorry to resurrect this - but I'm looking to do the same setup to provide chill water to my for my FTSS.
Where did you source those handy barbed fittings to run through the keezer bulkhead? Looking for something similar in Canada....
|
|
| Back to top |
|
|
jimmiec
Joined: 02 Aug 2016
Posts: 7
Location: Lousiana
|
| Link Posted: Tue Aug 09, 2016 9:02 pm Post subject: |
|
|
Awesome builds. I like the idea of the coil in the freezer. I was just going to add the reservoir to the kegerator but I think I will do the freezer coil too. Just to double check, you do have the reservoir in the kegerator that flows to the freezer coil, and then to the conical? Sorry read it more careful and the freezer line does not go to the conicals.
How do you cold crash your conicals then? The water line is not enough is it? Why not run the gycol line to the conicals? I would think this would keep temperature very good and be used to cold crash.
|
|
| Back to top |
|
|
jonymac
Joined: 18 Dec 2014
Posts: 145
|
| Link Posted: Thu Sep 29, 2016 2:02 am Post subject: |
|
|
Jimmiec - sorry - been WAYYY too long since I have looked at my threads! I use the coil in the freezer to connect to another reservoir in the keezer that feeds the trunk line and 8 taps at the bar behind the window. I found to keep the taps at 39º, the freezer coil was necessary. I also use that same reservoir when lagering beers in the conicals - can get the conicals down between 48º and 50º that way. I cold crash in my kegs, not the conicals - too hard in the conicals to get them near 32º. I use a glycol/water mix with a bit of star san in it - can't use straight water or it would freeze in the copper line in the freezer. Good luck!
_________________
JonyMac's Stillwater Home Brewery Build
http://www.theelectricbrewery.com/forum/viewtopic.php?p=314470#314470
|
|
| Back to top |
|
|
fseider
Joined: 10 May 2013
Posts: 156
Location: Two Naked Frogs Brewery; Reading, PA (USA); Interests: Beer, Frogs, Steampunk, Being Naked
|
| Link Posted: Sat Mar 18, 2017 6:12 pm Post subject: |
|
|
I'm not exactly following how this board is setup:

Would love to see a simple diagram if possible.
Thanks in advance!
_________________
Fred Seider
Two Naked Frogs Brewery, Winery, & Meadery
Reading, PA
"What's in your goblet?!"
---
Model 30A; SN 0130
|
|
| Back to top |
|
|
jonymac
Joined: 18 Dec 2014
Posts: 145
|
| Link Posted: Tue Mar 21, 2017 12:38 am Post subject: |
|
|
Sure Fred - the black hose is the high pressure line coming from a large CO2 tank into the primary set at 35 PSI. The blue hose coming out of the primary goes to the 3 way manifold on the board. The two left blue hoses running left and out of the picture go to two quad secondaries in the keezer - you can see that inside the keezer in one of the pics above. Each of the kegs can then be set at a different PSI 5 - 25 or so depending on what's on tap. The third line on the right goes to a third secondary on the board set at 2 PSI for clearing keg headspace, and moving beer form my conical into kegs. Hope that helps.
JonyMac
_________________
JonyMac's Stillwater Home Brewery Build
http://www.theelectricbrewery.com/forum/viewtopic.php?p=314470#314470
|
|
| Back to top |
|
|
fseider
Joined: 10 May 2013
Posts: 156
Location: Two Naked Frogs Brewery; Reading, PA (USA); Interests: Beer, Frogs, Steampunk, Being Naked
|
| Link Posted: Tue Mar 21, 2017 2:33 am Post subject: |
|
|
| jonymac wrote: | Sure Fred - the black hose is the high pressure line coming from a large CO2 tank into the primary set at 35 PSI. The blue hose coming out of the primary goes to the 3 way manifold on the board. The two left blue hoses running left and out of the picture go to two quad secondaries in the keezer - you can see that inside the keezer in one of the pics above. Each of the kegs can then be set at a different PSI 5 - 25 or so depending on what's on tap. The third line on the right goes to a third secondary on the board set at 2 PSI for clearing keg headspace, and moving beer form my conical into kegs. Hope that helps.
JonyMac |
Yep!. Thanks. I suspected that, but the one line going under the secondary was not clear to me. You just confirmed what I thought was going on there. Much appreciated.
_________________
Fred Seider
Two Naked Frogs Brewery, Winery, & Meadery
Reading, PA
"What's in your goblet?!"
---
Model 30A; SN 0130
|
|
| Back to top |
|
|
fseider
Joined: 10 May 2013
Posts: 156
Location: Two Naked Frogs Brewery; Reading, PA (USA); Interests: Beer, Frogs, Steampunk, Being Naked
|
| Link Posted: Wed Apr 05, 2017 6:34 pm Post subject: |
|
|
| kal wrote: | Nice job! No expense spared either I see! Those are the premium Micromatic quad CO2 distribution panels!
The only comment / suggestion I'd make is that you may find they get in the way of the kegs in the keezer - you have to remove the regulators in order to replace a keg. You can install them outside too and avoid that issue.
...
Kal
|
So, on the point of possibly mounting external - I am working towards a very similar setup, and have my pieces in hand. (Ouch! Expensive! And no, I don't ask for permission.) I love the idea of mounting them external if only for the cool factor. In my setup, my keezer is in the garage against the wall to the kitchen, where I'll have my 8 taps, so the run is only a few feet. What are people's thoughts on mounting this beautiful array of secondary regulators? I have no experience as to where to best place them from a use and maintenance perspective. I would think in the keezer is the best overall option, but if I were to put them outside, what's best? Just behind the keezer on the wall, but that would be covered when the keezer lid is open - is that a big deal? In the front, on the collar - would be a bump hazard, though could be covered with plexiglass, etc, but still in the way when playing musical kegs. Some other suggestion? Would be awesome to have them just above the actual taps, but that could be overboard (or is it?). (But I like do that idea as well.)
Thoughts?
_________________
Fred Seider
Two Naked Frogs Brewery, Winery, & Meadery
Reading, PA
"What's in your goblet?!"
---
Model 30A; SN 0130
|
|
| Back to top |
|
|
jonymac
Joined: 18 Dec 2014
Posts: 145
|
| Link Posted: Fri Apr 07, 2017 1:46 am Post subject: |
|
|
So, maintenance is almost nothing on Micromatics. I liked them in the Keezer, cause it makes my space look a bit cleaner, and results in drilling far fewer holes in my keezer collar - draw it out on paper first, you'll see. Keeping a lot of the hosing hidden feels right to me aesthetically, but my main reason was really fewer holes in the keezer, plus with the collar height I had a perfect space to mount them. I have no problem getting kegs in and out - my back row of kegs are a reservoir for the tap cooling pump, a keg full of sanitizer, and a beer or two that could stand longer aging, or isn't my favorite. To pull one out, I just tip it forward as I am pulling it out and slides right past the regulators.
_________________
JonyMac's Stillwater Home Brewery Build
http://www.theelectricbrewery.com/forum/viewtopic.php?p=314470#314470
|
|
| Back to top |
|
|
fseider
Joined: 10 May 2013
Posts: 156
Location: Two Naked Frogs Brewery; Reading, PA (USA); Interests: Beer, Frogs, Steampunk, Being Naked
|
| Link Posted: Fri Apr 07, 2017 3:24 am Post subject: |
|
|
| jonymac wrote: | | So, maintenance is almost nothing on Micromatics. I liked them in the Keezer, cause it makes my space look a bit cleaner, and results in drilling far fewer holes in my keezer collar - draw it out on paper first, you'll see. Keeping a lot of the hosing hidden feels right to me aesthetically, but my main reason was really fewer holes in the keezer, plus with the collar height I had a perfect space to mount them. I have no problem getting kegs in and out - my back row of kegs are a reservoir for the tap cooling pump, a keg full of sanitizer, and a beer or two that could stand longer aging, or isn't my favorite. To pull one out, I just tip it forward as I am pulling it out and slides right past the regulators. |
By "maintenance" I meant all around general activities - tweaking pressure, swapping kegs, etc. It's interesting that I had my initial vision, and then I found your build topic, and my first thought was that you stole my concept a few years ago by scanning my brain thoughts of the future. I knew I should have wore that tin foil hat .... Anyway - great minds?
I'm liking the cool factor of an exposed regulator bank. If for the same reason we have cool brew rooms. (And yours being up there on the list of pretty cool.) Just don't know if I'd be setting myself up more trouble. I'll mull over it a bit more.
_________________
Fred Seider
Two Naked Frogs Brewery, Winery, & Meadery
Reading, PA
"What's in your goblet?!"
---
Model 30A; SN 0130
|
|
| Back to top |
|
|
robbie_c
Joined: 16 May 2017
Posts: 3
Location: Staten Island, NY
|
| Link Posted: Wed May 31, 2017 1:29 pm Post subject: |
|
|
|
Jonymac awesome build there!! Do you mind telling me where you got the color coded liquid lines?
|
|
| Back to top |
|
|
jonymac
Joined: 18 Dec 2014
Posts: 145
|
|
| Back to top |
|
|
kal
Forum Administrator
Joined: 12 Dec 2010
Posts: 11123
Location: Ottawa, Canada
Drinking: Pub Ale, Electric Creamsicle, Mild, Pliny the Younger, Belgian Dark Strong, Weizen, Russian Imperial Stout, Black Butte Porter
|
|
| Back to top |
|
|
jonymac
Joined: 18 Dec 2014
Posts: 145
|
|
| Back to top |
|
|
kal
Forum Administrator
Joined: 12 Dec 2010
Posts: 11123
Location: Ottawa, Canada
Drinking: Pub Ale, Electric Creamsicle, Mild, Pliny the Younger, Belgian Dark Strong, Weizen, Russian Imperial Stout, Black Butte Porter
|
| Link Posted: Mon Oct 09, 2017 10:31 pm Post subject: |
|
|
Thanks! It's appreciated! I do get a lot of questions about it.
Kal
_________________
Our new shop with over 150 new products: shop.TheElectricBrewery.com
We ship worldwide and support our products and customers for life.
Purchasing through our affiliate links helps support our site at no extra cost to you. We thank you!
My basement/bar/brewery build 2.0
|
|
| Back to top |
|
|
|
|
|
|
|
|
You cannot post new topics in this forum
You cannot reply to topics in this forum
You cannot edit your posts in this forum
You cannot delete your posts in this forum
You cannot vote in polls in this forum
You cannot attach files in this forum
You can download files in this forum
|
Forum powered by phpBB © phpBB Group
|
|


