
|
|
|

|
 |
|
|
| View previous topic :: View next topic |
| Author |
Message |
kal
Forum Administrator

Joined: 12 Dec 2010
Posts: 11122
Location: Ottawa, Canada
Drinking: Pub Ale, Electric Creamsicle, Mild, Pliny the Younger, Belgian Dark Strong, Weizen, Russian Imperial Stout, Black Butte Porter

|
 Link Posted: Fri Apr 17, 2015 12:39 pm Post subject: Stainless Steel Heating Elements Link Posted: Fri Apr 17, 2015 12:39 pm Post subject: Stainless Steel Heating Elements |
 |
|
Stainless Steel Heating Elements (bare element)
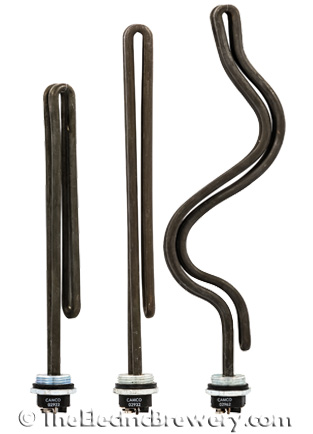
These premium stainless steel American made Camco heating elements are specifically made for beer brewing. They will not rust when left in water for extended periods.
For years we've been recommending and using Camco 02953/02963 ripple elements. These new heating elements are the same, but now with a stainless steel base that will not rust so it is safe to leave water in your kettles for extended durations without using a magnesium anode. Straight (higher watt density) versions are also available for RIMS based setups, small kettles, or where ripple elements will not fit.
These heating elements include important features a brewer should look for:
1. UL listed for use in the US and Canada.
2. Ultra low watt density (ULWD) or low watt density (LWD).
3. A stainless steel base that will not rust.
4. Better sheath (tube) material made from a high performance nickel-chromium stainless steel (804) alloy with much better temperature and corrosion resistance than standard shiny 2xx/3xx stainless steel.
ULWD elements prevent the wort from being scorched or caramelized as the heat output is only 50W per square inch (7.8W per square cm) or less. ULWD also provides added safety as the element will not break instantaneously if fired "dry" (not immersed in water) by accident. Mistakes do happen so we recommend that ULWD elements be used whenever possible instead of LWD, especially when the element is in contact with wort. The high performance nickel-chromium stainless steel alloy sheath used on these elements provides additional strength to resist dry firing.
These stainless steel heating elements are already included in all of our Heating Element Kits. They are available for sale separately for those looking to upgrade or source their own parts.
For complete details visit our order page. GO »
_________________
Our new shop with over 150 new products: shop.TheElectricBrewery.com
We ship worldwide and support our products and customers for life.
Purchasing through our affiliate links helps support our site at no extra cost to you. We thank you!
My basement/bar/brewery build 2.0
Last edited by kal on Sat Mar 03, 2018 2:11 pm; edited 4 times in total
|
|
| Back to top |
|
 |
mbiskup
Joined: 09 Jun 2014
Posts: 26
Location: Massachusetts
|
| Link Posted: Tue Apr 28, 2015 1:42 pm Post subject: |
|
|
Hi Kal,
Would the new SS ripple element fit in a G1 10 gallon Boilermaker? The diameter of the 10 gallon boilermaker is ~13-5/8".
Thanks.
|
|
| Back to top |
|
|
kal
Forum Administrator
Joined: 12 Dec 2010
Posts: 11122
Location: Ottawa, Canada
Drinking: Pub Ale, Electric Creamsicle, Mild, Pliny the Younger, Belgian Dark Strong, Weizen, Russian Imperial Stout, Black Butte Porter
|
| Link Posted: Tue Apr 28, 2015 1:55 pm Post subject: |
|
|
| mbiskup wrote: | Hi Kal,
Would the new SS ripple element fit in a G1 10 gallon Boilermaker? The diameter of the 10 gallon boilermaker is ~13-5/8".
Thanks. |
Yes. From the order page:
| Quote: | These heating elements will fit in any kettle that is at least 13.5 inches (34.3 cm) inner diameter. This includes any Blichmann Boilermaker kettles (10 gallons up to 55 gallons) and 'keggles' (15 gallon converted Sanke kegs used by many homebrewers).
The heating elements are somewhat flexible and can be bent slightly if required. |
Kal
_________________
Our new shop with over 150 new products: shop.TheElectricBrewery.com
We ship worldwide and support our products and customers for life.
Purchasing through our affiliate links helps support our site at no extra cost to you. We thank you!
My basement/bar/brewery build 2.0
|
|
| Back to top |
|
|
kal
Forum Administrator
Joined: 12 Dec 2010
Posts: 11122
Location: Ottawa, Canada
Drinking: Pub Ale, Electric Creamsicle, Mild, Pliny the Younger, Belgian Dark Strong, Weizen, Russian Imperial Stout, Black Butte Porter
|
|
| Back to top |
|
|
kal
Forum Administrator
Joined: 12 Dec 2010
Posts: 11122
Location: Ottawa, Canada
Drinking: Pub Ale, Electric Creamsicle, Mild, Pliny the Younger, Belgian Dark Strong, Weizen, Russian Imperial Stout, Black Butte Porter
|
|
| Back to top |
|
|
Jerz
Joined: 17 Nov 2013
Posts: 235
Location: Canton, Georgia
Drinking: Rye IPA (brewed a year and a half ago)
Working on: ESB
|
| Link Posted: Tue Jul 14, 2015 5:57 pm Post subject: |
|
|
Woot! Great timing!
_________________
Jerz
Head Brewer and #1 Consumer
2dogsBrewing - Canton, GA
|
|
| Back to top |
|
|
nzgrover
Joined: 16 Sep 2015
Posts: 1
|
| Link Posted: Wed Sep 16, 2015 6:37 pm Post subject: |
|
|
| kal wrote: | | mbiskup wrote: | Hi Kal,
Would the new SS ripple element fit in a G1 10 gallon Boilermaker? The diameter of the 10 gallon boilermaker is ~13-5/8".
Thanks. |
Yes. From the order page:
| Quote: | These heating elements will fit in any kettle that is at least 13.5 inches (34.3 cm) inner diameter. This includes any Blichmann Boilermaker kettles (10 gallons up to 55 gallons) and 'keggles' (15 gallon converted Sanke kegs used by many homebrewers).
The heating elements are somewhat flexible and can be bent slightly if required. |
Kal |
What's the smallest kettle the ripple elements could be made to fit? We have 30cm inner diameter pots.
|
|
| Back to top |
|
|
kal
Forum Administrator
Joined: 12 Dec 2010
Posts: 11122
Location: Ottawa, Canada
Drinking: Pub Ale, Electric Creamsicle, Mild, Pliny the Younger, Belgian Dark Strong, Weizen, Russian Imperial Stout, Black Butte Porter
|
| Link Posted: Wed Sep 16, 2015 8:08 pm Post subject: |
|
|
| nzgrover wrote: | | What's the smallest kettle the ripple elements could be made to fit? We have 30cm inner diameter pots. |
Take a look at the order page for the lengths:
http://www.theelectricbrewery.com/stainless-steel-heating-elements
Quote:
Camco 02955: 4500W (240V), ripple, ultra low watt density (ULWD). 13.7" long from flange base to tip. For kettles approximately 13.5" in diameter or larger if using in our Heating Element Kit.
Camco 02965: 5500W (240V), ripple, ultra low watt density (ULWD). 13.7" long from flange base to tip. For kettles approximately 13.5" in diameter or larger if using in our Heating Element Kit.
Camco 02929: 4500W (240V), straight, low watt density (LWD), 10.375" long from flange base to tip (9.875" long from end of threads).
Camco 02935: 5500W (240V), straight, low watt density (LWD), 12.25" long from flange base to tip (11.875" long from end of threads).
30cm is 11.8 inches.
I'm fairly certain you could probably bend down a 13.7" long one by the 2.1" required given how "bendy" they are, but not having ever done exactly that type of bend (I've done others) I'd say proceed cautiously.
Kal
_________________
Our new shop with over 150 new products: shop.TheElectricBrewery.com
We ship worldwide and support our products and customers for life.
Purchasing through our affiliate links helps support our site at no extra cost to you. We thank you!
My basement/bar/brewery build 2.0
|
|
| Back to top |
|
|
wscottcross
Joined: 03 Jul 2015
Posts: 212
Location: CT
Drinking: Launch IPA, Double Sunshine clone, Maple Coffee breakfast stout
Working on: expanding my beer horizons (and my beltline)
|
| Link Posted: Thu Sep 17, 2015 12:28 am Post subject: |
|
|
I have 1.5" Tri-Clover fittings on my kettles and the Camco 02965 is only 11.5" into my kettle. You could add a TC bulkhead fitting and use the TC element adapter: https://www.brewershardware.com/TC15F10NPSCOV.html
Like I said, I have the 1.5" TC and the ripple element fits, but it does require some rotating while installing. the 2" TC fitting should be easier and it's the same price. It's really quite nice to be able to easily remove the entire element after each brew session for cleaning.
_________________
Kal clone controller, 30 gallon Spike Brewing kettles, 6 tap keezer
|
|
| Back to top |
|
|
RangerBrewer
Joined: 23 Mar 2016
Posts: 21
Location: earth
|
| Link Posted: Wed Apr 13, 2016 8:02 pm Post subject: Non-stainless elements |
|
|
Kal,
If I understood this correctly, I could use 2 elements from the hardware store (as long as I don't leave them sitting in water too long after I'm done brewing each batch), until I can afford to buy 2 stainless ones from Electric Brewery? (Very, Very Limited Budget!!) That would give me a couple of backups once I change over to the SS. (It's a long way to town ........) Once I get the SS ones, it would be a 5 0r 10 minute change over, I'd think.
Thanks
_________________
There are only 3 choices in life: God, brewing your own beer, and eventually, death - I choose all three!
|
|
| Back to top |
|
|
kal
Forum Administrator
Joined: 12 Dec 2010
Posts: 11122
Location: Ottawa, Canada
Drinking: Pub Ale, Electric Creamsicle, Mild, Pliny the Younger, Belgian Dark Strong, Weizen, Russian Imperial Stout, Black Butte Porter
|
| Link Posted: Wed Apr 13, 2016 8:14 pm Post subject: Re: Non-stainless elements |
|
|
| RangerBrewer wrote: | Kal,
If I understood this correctly, I could use 2 elements from the hardware store (as long as I don't leave them sitting in water too long after I'm done brewing each batch), until I can afford to buy 2 stainless ones from Electric Brewery? (Very, Very Limited Budget!!) That would give me a couple of backups once I change over to the SS. (It's a long way to town ........) Once I get the SS ones, it would be a 5 0r 10 minute change over, I'd think.
Thanks |
Sure. I think it would take more than 5-10 minutes however. If using ones from the hardware store would also try to buy ULWD ones if you can to avoid any possibility of scorching issues however unlikely.
If you're on a budget, I'd suggest waiting to save up and just buying the elements you want to use. Buying once will always be cheaper than buying twice. 
I recently swapped mine out - pictures and more information here: http://www.theelectricbrewery.com/forum/viewtopic.php?t=28904
Kal
_________________
Our new shop with over 150 new products: shop.TheElectricBrewery.com
We ship worldwide and support our products and customers for life.
Purchasing through our affiliate links helps support our site at no extra cost to you. We thank you!
My basement/bar/brewery build 2.0
|
|
| Back to top |
|
|
RangerBrewer
Joined: 23 Mar 2016
Posts: 21
Location: earth
|
| Link Posted: Thu Apr 14, 2016 4:25 am Post subject: Re: Non-stainless elements |
|
|
| kal wrote: | | Sure. I think it would take more than 5-10 minutes however. If using ones from the hardware store would also try to buy ULWD ones if you can to avoid any possibility of scorching issues however unlikely. |
Right, I'll look for the ulwd's - thanks
| kal wrote: | | If you're on a budget, I'd suggest waiting to save up and just buying the elements you want to use. Buying once will always be cheaper than buying twice. |
Yeah, I understand, but we're talking months to save up, not weeks lol I haven't brewed in a few months just to save up for a few things I need to get my kettles and control box 'electrified' !! My kitchen stove isn't the best place to brew - the last brewday was 11 or 12 hours for a 5 gallon batch! Never again, if I can help it!
I'll take a gander at that - thanks
_________________
There are only 3 choices in life: God, brewing your own beer, and eventually, death - I choose all three!
|
|
| Back to top |
|
|
RichmonS
Joined: 25 Mar 2018
Posts: 2
|
| Link Posted: Sun Mar 25, 2018 3:33 pm Post subject: |
|
|
|
I have the Bayou 10 Gallon Kettles. I measured the inside dimension at 13.5 inches which allows for the ripple element. How much clearance would I have from the end to the edge of the kettle?
|
|
| Back to top |
|
|
kal
Forum Administrator
Joined: 12 Dec 2010
Posts: 11122
Location: Ottawa, Canada
Drinking: Pub Ale, Electric Creamsicle, Mild, Pliny the Younger, Belgian Dark Strong, Weizen, Russian Imperial Stout, Black Butte Porter
|
| Link Posted: Sun Mar 25, 2018 4:26 pm Post subject: |
|
|
Hi and welcome to the forum!
| RichmonS wrote: | | I have the Bayou 10 Gallon Kettles. I measured the inside dimension at 13.5 inches which allows for the ripple element. How much clearance would I have from the end to the edge of the kettle? |
Very little as the ripple ones will fit in kettles that are 13.5" in diameter or larger. It's perfectly fine for the tip to be close to the wall or to have it touch. This won't do anything. They're somewhat flexible as well, so they're not all *exactly* the same. There's probably a slight variation (maybe a quarter of an inch?) between samples. If you'd prefer the tip to be a bit farther from the wall, you can bend it gently.
You can order one here: http://www.theelectricbrewery.com/stainless-steel-heating-elements
Cheers!
Kal
_________________
Our new shop with over 150 new products: shop.TheElectricBrewery.com
We ship worldwide and support our products and customers for life.
Purchasing through our affiliate links helps support our site at no extra cost to you. We thank you!
My basement/bar/brewery build 2.0
|
|
| Back to top |
|
|
rcrabb22
Joined: 23 Dec 2010
Posts: 462
Location: Illinois
|
| Link Posted: Fri Mar 30, 2018 4:30 pm Post subject: |
|
|
|
I have purchased and replaced my rusty "version 1" elements with theses SS elements. One advantage I have found is they allow me to fill my HLT the night before a brew, heat it to 180F just before I go to bed then shut it off and wrap the HLT in a blanket. In the morning my HLT has lost approx 40F and the reheated HLT is waiting for me after milling my grains. I no longer have to worry about rust forming on the element and have cut almost an hour off my brew day effort.
|
|
| Back to top |
|
|
kal
Forum Administrator
Joined: 12 Dec 2010
Posts: 11122
Location: Ottawa, Canada
Drinking: Pub Ale, Electric Creamsicle, Mild, Pliny the Younger, Belgian Dark Strong, Weizen, Russian Imperial Stout, Black Butte Porter
|
| Link Posted: Fri Mar 30, 2018 4:53 pm Post subject: |
|
|
| rcrabb22 wrote: | | I have purchased and replaced my rusty "version 1" elements with theses SS elements. One advantage I have found is they allow me to fill my HLT the night before a brew, heat it to 180F just before I go to bed then shut it off and wrap the HLT in a blanket. In the morning my HLT has lost approx 40F and the reheated HLT is waiting for me after milling my grains. I no longer have to worry about rust forming on the element and have cut almost an hour off my brew day effort. |
+1. I do that as well sometimes. I throw some folded up towels on top of the HLT (and nothing around the sides) and it holds heat well overnight.
Kal
_________________
Our new shop with over 150 new products: shop.TheElectricBrewery.com
We ship worldwide and support our products and customers for life.
Purchasing through our affiliate links helps support our site at no extra cost to you. We thank you!
My basement/bar/brewery build 2.0
|
|
| Back to top |
|
|
|
|
|
|
|
|
You cannot post new topics in this forum
You cannot reply to topics in this forum
You cannot edit your posts in this forum
You cannot delete your posts in this forum
You cannot vote in polls in this forum
You cannot attach files in this forum
You can download files in this forum
|
Forum powered by phpBB © phpBB Group
|
|


