
|
|
|

|
 |
|
|
| View previous topic :: View next topic |
| Author |
Message |
LiquidFlame
Joined: 22 Dec 2012
Posts: 35
Location: Normal, IL

|
 Link Posted: Wed May 15, 2013 3:01 pm Post subject: Link Posted: Wed May 15, 2013 3:01 pm Post subject: |
 |
|
|
This is probably a dumb question, but I just wanted to make sure. For the ground bar you just mount it to your back plate just like the other components. Then you just have your ground wires, including your enclosure and door panel ground, screw into the ground bar. You don't need any kind of wire that goes from the ground bar to the back plate. Correct?
|
|
| Back to top |
|
 |
kal
Forum Administrator

Joined: 12 Dec 2010
Posts: 11122
Location: Ottawa, Canada
Drinking: Pub Ale, Electric Creamsicle, Mild, Pliny the Younger, Belgian Dark Strong, Weizen, Russian Imperial Stout, Black Butte Porter
|
| Link Posted: Wed May 15, 2013 3:06 pm Post subject: |
|
|
Correct. By screwing the ground bar to the back plate you've electrically connected the two things.
Kal
_________________
Our new shop with over 150 new products: shop.TheElectricBrewery.com
We ship worldwide and support our products and customers for life.
Purchasing through our affiliate links helps support our site at no extra cost to you. We thank you!
My basement/bar/brewery build 2.0
|
|
| Back to top |
|
|
LiquidFlame
Joined: 22 Dec 2012
Posts: 35
Location: Normal, IL
|
| Link Posted: Fri May 17, 2013 1:21 am Post subject: |
|
|
Another possible dumb question 
Just got done drilling and tapping my back plate and started mounting the components. Does it matter if the screws touch the back of the control panel? Do I need to cut them so they don't? I wasn't sure if this would affect grounding at all.
Thanks.
|
|
| Back to top |
|
|
kal
Forum Administrator
Joined: 12 Dec 2010
Posts: 11122
Location: Ottawa, Canada
Drinking: Pub Ale, Electric Creamsicle, Mild, Pliny the Younger, Belgian Dark Strong, Weizen, Russian Imperial Stout, Black Butte Porter
|
| Link Posted: Fri May 17, 2013 1:03 pm Post subject: |
|
|
| LiquidFlame wrote: | | Just got done drilling and tapping my back plate and started mounting the components. Does it matter if the screws touch the back of the control panel? Do I need to cut them so they don't? I wasn't sure if this would affect grounding at all. |
Doesn't matter and you don't need to cut them. The backplate is already electrically grounded to the enclosure through the 4 large mounting bolts. If you short circuit any bolts you're adding yourself it simply adds more grounding (doesn't help but doesn't cause any harm).
Something to look out for as many people have problems with this: Make sure to not ground any of the points on the DC power supplies to the backplate by overtightening and having the leads on the back of the circuit board touch the backplate, or you may fry the them. You also don't want the screw head on the front touching any of the copper printed circuits on the board and then shorting this to the back plate. If you purchased our kit we provide spacers/isolators and proper sized screws to make sure that the small printed circuit boards are electrically isolated from the back plate. For more information see my build instructions and pictures.
Kal
_________________
Our new shop with over 150 new products: shop.TheElectricBrewery.com
We ship worldwide and support our products and customers for life.
Purchasing through our affiliate links helps support our site at no extra cost to you. We thank you!
My basement/bar/brewery build 2.0
|
|
| Back to top |
|
|
LiquidFlame
Joined: 22 Dec 2012
Posts: 35
Location: Normal, IL
|
| Link Posted: Fri May 17, 2013 9:34 pm Post subject: |
|
|
|
Just started wiring up the panel. I'm on "Step 5: Wire up power" and I'm about to wire the 7A inline fuse holder. I noticed that it came with a little packet that says "Heatsink Compounds Soft Pack". I haven't seen anyone else mention what this is. Is it liquid heatsink tubing, and do I need to use it?
|
|
| Back to top |
|
|
ateene
Joined: 02 Apr 2012
Posts: 55
Location: Fort Collins, CO
|
|
| Back to top |
|
|
LiquidFlame
Joined: 22 Dec 2012
Posts: 35
Location: Normal, IL
|
| Link Posted: Fri May 17, 2013 10:28 pm Post subject: |
|
|
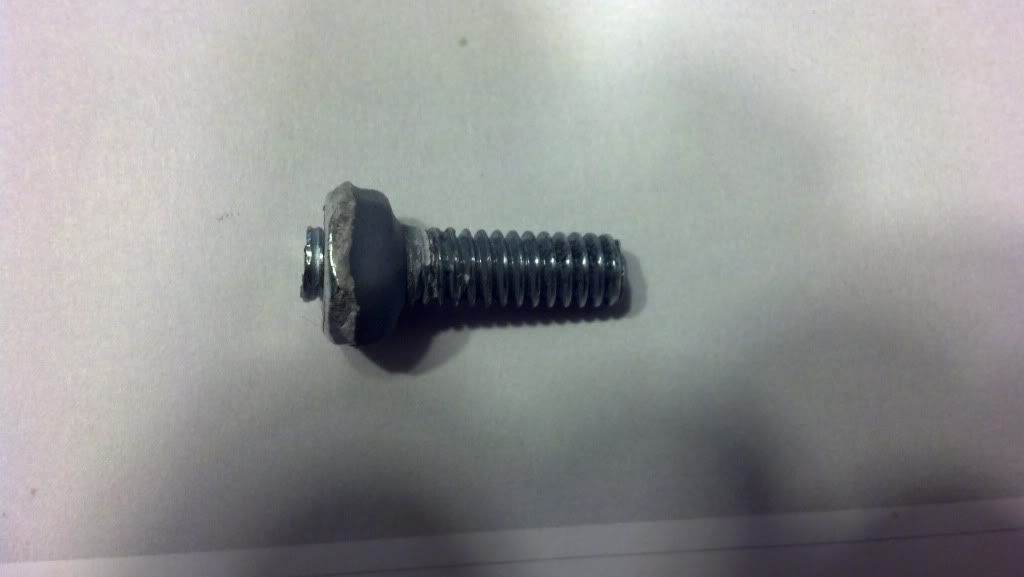
I think you miss understood what I was asking. I know you need to use thermal paste on the SSR's with the heatsink, but that's not what I'm asking. The baggie that contained the 7A inline fuse holder had in it the picture below. I'm confused if I need to use this with the 7A inline fuse holder or not.
 [/img] [/img]
|
|
| Back to top |
|
|
kal
Forum Administrator
Joined: 12 Dec 2010
Posts: 11122
Location: Ottawa, Canada
Drinking: Pub Ale, Electric Creamsicle, Mild, Pliny the Younger, Belgian Dark Strong, Weizen, Russian Imperial Stout, Black Butte Porter
|
| Link Posted: Fri May 17, 2013 10:36 pm Post subject: |
|
|
You don't need to use heat sink compound with the fuse holder. It was likely put in that baggie just to have a place to put it.
Kal
_________________
Our new shop with over 150 new products: shop.TheElectricBrewery.com
We ship worldwide and support our products and customers for life.
Purchasing through our affiliate links helps support our site at no extra cost to you. We thank you!
My basement/bar/brewery build 2.0
|
|
| Back to top |
|
|
LiquidFlame
Joined: 22 Dec 2012
Posts: 35
Location: Normal, IL
|
| Link Posted: Sat May 18, 2013 4:23 pm Post subject: |
|
|
I have the worst luck. I started wiring the ground wires, and when I got to wiring the the ground wire for the door, I tightened down the nut on to the ring terminal and the ground post came off. I didn't think I used that much force, and thought the JB Weld would be stronger. I'm guessing the only thing I can do is go out and buy another stove bolt and JB Weld that one on again. It's going to be a pain cleaning up the hole, considering I already have everything mounted and painted.

While I'm in here, one other question. The grounding wire that came with the enclosure to hook up the enclosure grounding post is to short to meet my grounding bar, I'm assuming I can just make another grounding wire using the 10 AWG wire. Sorry for asking some of these questions that are probably easy ones to know the answer to, but I'd rather be safe then sorry.
Thanks.
|
|
| Back to top |
|
|
kal
Forum Administrator
Joined: 12 Dec 2010
Posts: 11122
Location: Ottawa, Canada
Drinking: Pub Ale, Electric Creamsicle, Mild, Pliny the Younger, Belgian Dark Strong, Weizen, Russian Imperial Stout, Black Butte Porter
|
| Link Posted: Sat May 18, 2013 7:38 pm Post subject: |
|
|
A longer grounding wire can indeed be used.
For the door ground wire, if it's easier you can connect to one of the 4 bolts that holds the 2x4" name tag. Take a look at the pictures in the first post. This is how we do our prebuilt panels since they usually don't come with ground posts.
Kal
_________________
Our new shop with over 150 new products: shop.TheElectricBrewery.com
We ship worldwide and support our products and customers for life.
Purchasing through our affiliate links helps support our site at no extra cost to you. We thank you!
My basement/bar/brewery build 2.0
|
|
| Back to top |
|
|
LiquidFlame
Joined: 22 Dec 2012
Posts: 35
Location: Normal, IL
|
| Link Posted: Sat May 25, 2013 3:20 am Post subject: |
|
|
Question about wiring the Volt meter. The pictures show wiring one of the AC wires to the boil relay coil. For those of us that have the contactors, it looks like the only way to attach a wire to the coil, is by using a female quick disconnect terminal, but the ones that came with the kit are rated for 16-14 AWG. Is there another way to attach the AC wire to the coil?
Thanks.
|
|
| Back to top |
|
|
kal
Forum Administrator
Joined: 12 Dec 2010
Posts: 11122
Location: Ottawa, Canada
Drinking: Pub Ale, Electric Creamsicle, Mild, Pliny the Younger, Belgian Dark Strong, Weizen, Russian Imperial Stout, Black Butte Porter
|
| Link Posted: Sat May 25, 2013 2:55 pm Post subject: |
|
|
You should be able to use the disconnects rated for 14-16 AWG with thinner wire as well if needed. If you don't think the crimp will hold correctly when using the smaller 22 AWG wire you can do one of the following:
- solder it on after crimping.
or
- use thicker 14-16 AWG wire instead for the whole thing.
or
- make the the 22 AWG wire 'bigger' where you're going to crimping it by stripping an inch or so of both 22 AWG and 14-16 AWG wire, twisting the two together, crimping on the disconnect, then cutting off the excess 14-16 AWG wire. This'll give the disconnect more wire to crimp down on. You've effectively added a ~1/2" length or so of thicker wire to the end of the 22 AWG wire.
or
- Strip an inch or two of the 22 AWG wire and fold it over a few times to make it fatter first.
Kal
_________________
Our new shop with over 150 new products: shop.TheElectricBrewery.com
We ship worldwide and support our products and customers for life.
Purchasing through our affiliate links helps support our site at no extra cost to you. We thank you!
My basement/bar/brewery build 2.0
|
|
| Back to top |
|
|
LiquidFlame
Joined: 22 Dec 2012
Posts: 35
Location: Normal, IL
|
| Link Posted: Sat May 25, 2013 3:36 pm Post subject: |
|
|
Thanks for the info.
As I was waiting for a reply I decided to test the power output on the doorbell transformers. When I measured each one I get 21V AC instead of the 12V AC. I double checked my wiring and everything seems right.
I have both the ground cables from the doorbell transformers hooked up to my grounding bar. I have the black cables going to the HOT Bus and the other going to the NEUTRAL Bus. I then took my multimeter and had one lead touching one of the AC output wires and the other lead touching the other AC output wire from the doorbell transformer. The reading I'm getting is 21V AC. Am I doing something wrong.
Thanks.
|
|
| Back to top |
|
|
kal
Forum Administrator
Joined: 12 Dec 2010
Posts: 11122
Location: Ottawa, Canada
Drinking: Pub Ale, Electric Creamsicle, Mild, Pliny the Younger, Belgian Dark Strong, Weizen, Russian Imperial Stout, Black Butte Porter
|
| Link Posted: Sat May 25, 2013 3:42 pm Post subject: |
|
|
What's the measured voltage going into the transformers? An output of 21V AC will still work, the DC voltmeters can take anywhere from a 4-30V AC/DC input. Just make sure to set the output to about 4.8V before you hook them up.
Kal
_________________
Our new shop with over 150 new products: shop.TheElectricBrewery.com
We ship worldwide and support our products and customers for life.
Purchasing through our affiliate links helps support our site at no extra cost to you. We thank you!
My basement/bar/brewery build 2.0
Last edited by kal on Sat May 25, 2013 8:31 pm; edited 1 time in total
|
|
| Back to top |
|
|
LiquidFlame
Joined: 22 Dec 2012
Posts: 35
Location: Normal, IL
|
| Link Posted: Sat May 25, 2013 5:30 pm Post subject: |
|
|
OK, I tested to make sure that I was only getting 4.8V DC output, wired everything up and tested it out. The amp meter turns on fine and I get a reading ranging from 00.0 - 00.3, but the volt meter doesn't turn on. I noticed that the red light on the adjustable AC/DC power supply of the volt meter wasn't on. I removed all the wires going to the volt meter, and tested the output of the doorbell transformer, and was getting 21V AC. I then attached the doorbell transformer wires to the volt meter's AC/DC power supply, and when I turned the control panel on, the red light on the AC/DC power supply turned on. I then tried reattaching the volt meters wires, and then turned the control panel back on, but the red light on the volt meter AC/DC power supply did not turn on. Do I have a short somewhere? Not sure what else/how to test my problem.
Thanks.
|
|
| Back to top |
|
|
kal
Forum Administrator
Joined: 12 Dec 2010
Posts: 11122
Location: Ottawa, Canada
Drinking: Pub Ale, Electric Creamsicle, Mild, Pliny the Younger, Belgian Dark Strong, Weizen, Russian Imperial Stout, Black Butte Porter
|
| Link Posted: Sat May 25, 2013 8:41 pm Post subject: |
|
|
What's the measured voltage going into the transformers?
Measure whever you have the two input wires connected. The transformer's simply (usually) a 10:1 stepdown so 21V out means you probably have about 210V going in. Just curious. Are there any marking on the transformer? Are there different windings (ie: more than just 2 output wires). Some have 3 wires plus ground. The 3 wires may let you get different voltages depending which pair you measure across.
| LiquidFlame wrote: | | I noticed that the red light on the adjustable AC/DC power supply of the volt meter wasn't on. I removed all the wires going to the volt meter, and tested the output of the doorbell transformer, and was getting 21V AC. I then attached the doorbell transformer wires to the volt meter's AC/DC power supply, and when I turned the control panel on, the red light on the AC/DC power supply turned on. I then tried reattaching the volt meters wires, and then turned the control panel back on, but the red light on the volt meter AC/DC power supply did not turn on. Do I have a short somewhere? |
Sounds like you're shorting the output of the AC/DC power supply somehow.Don't run it like that for very long. You may fry it. Check your wiring again especially the wire connection points on the voltmeter.
See here: http://www.theelectricbrewery.com/control-panel-part-2?page=9
Pay special attention to the fact that the voltmeter is upside down in relation to the amp meter:

Kal
_________________
Our new shop with over 150 new products: shop.TheElectricBrewery.com
We ship worldwide and support our products and customers for life.
Purchasing through our affiliate links helps support our site at no extra cost to you. We thank you!
My basement/bar/brewery build 2.0
|
|
| Back to top |
|
|
LiquidFlame
Joined: 22 Dec 2012
Posts: 35
Location: Normal, IL
|
| Link Posted: Sun May 26, 2013 3:32 am Post subject: |
|
|
Good news I hope, I tested out my theory and I think I was right. I was wondering if the black shrink wrap that I added to protect the solder connections on the volt meter wires that I had to do to extend the connection was causing some kind of issue. When I took the shrink wrap off it looked like all the soldering points were all touching each other very closely and I was hoping this was causing the short.
I hooked the wires back up and the volt meter turned on, thankfully. The only thing I wasn't sure was the volt meter reads -000 and the amp meter reads -000 initially, but after a couple minutes, the amp meter turns to 000. Also the dot doesn't light up on the amp meter. I wasn't sure if this was an issue because the thread on "How To: Testing your control panel as you build it." says the volt meter should read 000 and the amp meter should read 00.0 - 00.1.
|
|
| Back to top |
|
|
kal
Forum Administrator
Joined: 12 Dec 2010
Posts: 11122
Location: Ottawa, Canada
Drinking: Pub Ale, Electric Creamsicle, Mild, Pliny the Younger, Belgian Dark Strong, Weizen, Russian Imperial Stout, Black Butte Porter
|
| Link Posted: Sun May 26, 2013 1:59 pm Post subject: |
|
|
Glad you solved it!
I don't believe there is a dot in the 3-digit volt meter because it reads from 0 to 700V and it is not auto-ranging (meaning the dot is not able to move on its own - it won't say "24.5"as well as "600"). The amp meter is 3-digit as well but only reads from 0 to 50 amps so the dot is always before the last digit no matter what the current reading is:

Kal
_________________
Our new shop with over 150 new products: shop.TheElectricBrewery.com
We ship worldwide and support our products and customers for life.
Purchasing through our affiliate links helps support our site at no extra cost to you. We thank you!
My basement/bar/brewery build 2.0
|
|
| Back to top |
|
|
beamar
Joined: 29 Aug 2013
Posts: 2
|
| Link Posted: Thu Aug 29, 2013 2:41 pm Post subject: |
|
|
This may be a dumb question, but are these two parts really needed?
(Qty: 1) 50 Amp 125/250 Volt AC Locking Grounded California-Style receptacle (Buy at: Amazon.com, eBay.com)
50 Amp 125/250 Volt AC Locking Grounded California-Style connector
I don't know electric like the back of my hand, so if it's a dumb question, please ignore.
But couldn't you just direct wire the cord right to the coil in the panel? It seems like these pieces would be more of a convenience like a quick release. I wouldn't mind having it, but when you are piecing it together, seems like it's a big expense($200+ from amazon) and something that I could add later.
thanks,
Brian
Last edited by beamar on Thu Aug 29, 2013 3:10 pm; edited 1 time in total
|
|
| Back to top |
|
|
kal
Forum Administrator
Joined: 12 Dec 2010
Posts: 11122
Location: Ottawa, Canada
Drinking: Pub Ale, Electric Creamsicle, Mild, Pliny the Younger, Belgian Dark Strong, Weizen, Russian Imperial Stout, Black Butte Porter
|
| Link Posted: Thu Aug 29, 2013 2:55 pm Post subject: |
|
|
You need the contactor as it's what turns the power on/off to the panel when you flip the ON/OFF switch.
Correct that you do not need any receptacles or plugs at all (heating elements, pumps, temperature probes, power cable) if you hardwire. I chose to use receptacles and plugs for ease of use / convenience.
Both the panel and the power cord are very heavy so separating the two makes things easier. Whether you choose to do this is up to you. It's not really something that can easily be added later as once the panel is punched, primed and painted, and wired, to add another hole means you'd have to prime and paint it again. Punching a hole in a panel that's already wired is also dangerous as you get metal slivers everywhere into already installed components which can cause shorts or other failures.
Kal
_________________
Our new shop with over 150 new products: shop.TheElectricBrewery.com
We ship worldwide and support our products and customers for life.
Purchasing through our affiliate links helps support our site at no extra cost to you. We thank you!
My basement/bar/brewery build 2.0
|
|
| Back to top |
|
|
|
|
|
|
|
|
You cannot post new topics in this forum
You cannot reply to topics in this forum
You cannot edit your posts in this forum
You cannot delete your posts in this forum
You cannot vote in polls in this forum
You cannot attach files in this forum
You can download files in this forum
|
Forum powered by phpBB © phpBB Group
|
|


